Pages
▼
Thursday, March 31, 2011
It's party time! Ultimate Blog Party 2011
Okay, friends! Let's party!
Welcome to Taste and See God's Goodness! I'm Marsha and I'm the chief cook and bottle washer around here.
Pull up a chair and share a piece of Nutella Walnut Strudel with me.
I started blogging so I could share recipes with family and friends. I love to try new dishes, too. I'm a well-known tweaker, though - meaning I rarely ever follow a recipe exactly. Sometimes it works, sometimes it doesn't.
I also love my family. I've been married to my handsome husband for 12 years. We have two children - Mr. Lego who is 10, and the Princess who is 8. They are my joys!
Another passion besides cooking is homeschooling. We're just about done with our fourth year, and I love it more now than I did when we first started. Occasionally I'll mention what we're doing in school. I'm not a homeschooling expert by any stretch, but I'm happy to share what I've learned along the way.
More important than all of those loves is my love for Jesus. I'm not perfect but I do strive to please Him. My life would be a mess without Him. Sometimes I'll share what He's doing in my life. If you're a Christian, too, let me know! I love meeting new brothers and sisters in Christ!
So, that's my blog in a nutshell. Thank you for dropping by and have a lovely time at the party!
PS - if you want to participate, too, just click on that big banner at the top of this post and join in the fun!
Wednesday, March 30, 2011
Nutella Walnut Strudel
As soon as I saw this recipe for nutella strudel, I knew I had to try it. What could be easier than nutella and puff pastry? And why had I never thought of it before? Ha ha!
Okay, confession time. I love nutella. But this is the first time I let the kids have any! I wanted it all to myself before this. I'm such a selfish mother! I knew they'd like it. And I was right. I'm going to have to hide the jar from now on!
Here's what you need:
1 puff pastry sheet (there are 2 sheets to a box, so you can easily double this recipe)
1/2 cup nutella
1/4 cup chopped walnuts
2 TBSP milk
Thaw the sheet of pastry and allow it to come to room temperature. Then gently unfold it. With a sharp knife, cut slits about an inch apart on each side of the puff pastry. The pastry has previously been folded into thirds, so there will be lines to help you know where to start the slits.
Spread the nutella down the center of the pastry and sprinkle with the chopped walnuts.
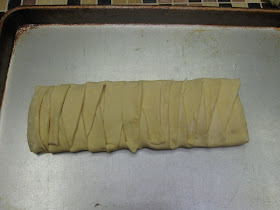
Now carefully criss cross the dough strips over the top, making sure to cover the filling.
Pinch each end closed. Brush the milk over the top of the pastry.
Bake at 400 degrees for 15-20 minutes or until puffed and golden brown.
Slice into 4 pieces with a serrated knife.
This dessert was fantastic! It's definitely something I'd serve to guests. In fact, this Sunday night after church we're having a dessert party and I'm going to make this as one of my contributions. It will be easy to double and slice into smaller pieces to share.
Would there be anything wrong in making this for breakfast, you think?
For more yummy recipes, visit Miz Helen's Full Plate Thursday.
Monday, March 28, 2011
Fudgy Brownies
I confess, I've never been good at making homemade brownies. They always turn out too dry or crumbly or something. So I was convinced that using a boxed mix was the only way I'd ever make yummy brownies.
Until I tried this recipe.
These brownies are fudgy and moist and almost melt in your mouth. Did I mention they were easy, too?
Here's what you need:
1 cup (2 sticks) unsalted butter
1 bag of chocolate chips - I use milk chocolate
1 cup sugar
1 teas vanilla
4 eggs
1 cup white flour
1/2 cup white wheat flour
1/2 teas sea salt
1 cup chopped nut, optional
In a large saucepan, melt the butter over medium heat. Add the entire bag of chocolate chips. Stirring constantly, combine the butter and chips. When the chocolate is completely melted, remove from the heat.
Stir in the sugar and vanilla. Then add the eggs, one at a time, beating well after each addition.
Add the flour and salt. Mix until the batter is smooth.
If you're using nuts, stir those in. Now beat the batter until air bubbles form.
Pour the batter into a greased 9x13 pan. Bake at 350 degrees for 20-25 minutes, or until a knife inserted in the center comes out clean.
Cut into small squares and pour yourself a glass of ice-cold milk! You're going to love these brownies!
It's almost time to party!
Once again, 5 Minutes for Mom is hosting its annual Ultimate Blog Party and you can get in on the fun! Join hundreds of bloggers from around the web to introduce yourself and your blog, win prizes, and gain some new friends.
I participated last year and had a GREAT time! This is a fantastic way to connect with others. Click on the graphic above for more details.
Then come on back here and join me Friday, April 1, for a great blog party!
Sunday, March 27, 2011
Menu Plan March 27-April 2
Oh my word! April is almost here! Last year for April Fool's Day, I made sweet sushi for the kids.
This year I got nuthin'! I've been dealing with some health issues and trying to get meds regulated, so my ability to plan ahead is being sorely tested. Just getting a regular menu plan together this week was a major feat! Maybe I'll hint around to hubby that he needs to come up with something.
But if he doesn't, here's what I came up with:
Sunday
Pulled pork sandwiches, fries
Monday
Hamburger cheesesteaks, veggie platter
Tuesday - brought to us by the letter "N"
Noodle soup with chicken, naan bread, nutella strudel for dessert
Wednesday
Taco salad, cheesy fiesta potatoes
Thursday
Grilled burgers, grilled veggies
Friday
Bourbon chicken over rice, sesame broccoli
Saturday
West Virginia pepperoni rolls - didn't get to these last week
For more yummy menu ideas, head over to Organizing Junkie and check out her Menu Plan Monday.
Saturday, March 26, 2011
It's not all about winning
A friend sent me the link to this video about a young woman whose injury after hitting her first ever home run was going to prevent her from running the bases. Players from the opposing team demonstrate compassion and sportsmanship even though it cost them the game. Amazing!
Wednesday, March 23, 2011
Fiesta Chicken and Rice
This recipe comes from my dear friend Shannon. Back in the mid-nineties when we were both single, Shannon and I used to hang out. She has an extraordinary cooking talent that is still unmatched. Right now she's in Malaysia going through an adoption process that could take months. I know she'd appreciate any prayers you could spare for her and her husband.
Anyway, I knew when she posted this recipe I wanted to try it. But in typical Marsha fashion, I tweaked it a little. And I loved it! So did the family. This one's a keeper!
Here's what you need:
3 boneless, skinless chicken breasts, cut into bite-sized chunks
salt and pepper, to taste
1/4 cup olive oil
1 cup long grain rice
1 small onion, finely chopped
1 TBSP minced garlic
1 teas dried oregano
1 teas chili powder
dash cayenne pepper
1 can diced tomatoes, drained (I use petite)
1/2 cup chopped green pepper
2 cups chicken broth
shredded cheese to sprinkle on after cooking (I use sharp cheddar)
Season the chicken chunks with salt and pepper. Heat the olive oil in a large pan over medium heat. Cook the chicken chunks until mostly done.
Scoot the chicken over to one side of the pan and add the rice and onion. Cook and stir until the rice starts to brown. Stir in the garlic and spices until the chicken pieces are coated.
Then add the tomatoes, green pepper and chicken broth. Bring to a boil.
Reduce heat, cover and simmer for 10 minutes. Give the entire pot a good stir, then put the lid back on and simmer until the rice is tender and all the liquid is absorbed. That will probably take another 10 minutes or so.
You could stir the cheese into the entire pot, or you can do what I did - top individual servings with the cheese. Some children in my family don't like cheese sprinkled on top of anything. Weird, huh?
I was so happy that the kids gobbled this up. I loved that it took only one pot! Yay! And we took the small amount of leftovers the next day and added them to quesadillas. Super yum!
Thank you, sweet Shannon, for the inspiration!
Anyway, I knew when she posted this recipe I wanted to try it. But in typical Marsha fashion, I tweaked it a little. And I loved it! So did the family. This one's a keeper!
Here's what you need:
3 boneless, skinless chicken breasts, cut into bite-sized chunks
salt and pepper, to taste
1/4 cup olive oil
1 cup long grain rice
1 small onion, finely chopped
1 TBSP minced garlic
1 teas dried oregano
1 teas chili powder
dash cayenne pepper
1 can diced tomatoes, drained (I use petite)
1/2 cup chopped green pepper
2 cups chicken broth
shredded cheese to sprinkle on after cooking (I use sharp cheddar)
Season the chicken chunks with salt and pepper. Heat the olive oil in a large pan over medium heat. Cook the chicken chunks until mostly done.
Scoot the chicken over to one side of the pan and add the rice and onion. Cook and stir until the rice starts to brown. Stir in the garlic and spices until the chicken pieces are coated.
Then add the tomatoes, green pepper and chicken broth. Bring to a boil.
Reduce heat, cover and simmer for 10 minutes. Give the entire pot a good stir, then put the lid back on and simmer until the rice is tender and all the liquid is absorbed. That will probably take another 10 minutes or so.
You could stir the cheese into the entire pot, or you can do what I did - top individual servings with the cheese. Some children in my family don't like cheese sprinkled on top of anything. Weird, huh?
I was so happy that the kids gobbled this up. I loved that it took only one pot! Yay! And we took the small amount of leftovers the next day and added them to quesadillas. Super yum!
Thank you, sweet Shannon, for the inspiration!
Monday, March 21, 2011
Cookie Dough Truffles
You know how you're not supposed to eat raw cookie dough? That's because most cookie doughs have raw eggs in them. Well, not this recipe! You can snack to your heart's content on these little morsels of wonderfulness!
This recipe makes a LOT of truffles. In fact, I realized while I was dipping them that I wouldn't have enough chocolate to cover them all. Not a problem! You can eat these "naked" as my kids pointed out. Or you can leave the undipped truffles in the freezer for later.
I adapted this recipe slightly from the one at The Sisters Cafe. For instance, the recipe calls for baking soda, but since these aren't baked, I left that out. I also recommend freezing the truffles before dipping instead of just refrigerating.
Here's what you'll need:
1 cup butter, softened
3/4 cup brown sugar
1 small box (3.5 oz) vanilla pudding mix
1 TBSP vanilla
1/4 cup milk
2 cups flour
2 cups mini chocolate chips
melted chocolate for dipping (I used one bag of milk chocolate chips and dipped about half of the truffles)
In a mixing bowl, cream the butter and sugar together until light and fluffy. Add the vanilla pudding, vanilla, and milk.
Stir in the flour a little at a time until it's all well-combined.
Now gently stir in the mini chips. I do this by hand instead of using the mixer.
Shape the dough into balls and place on baking sheets lined with wax paper. I use my Pampered Chef cookie scoop so they're all about the same size. I scoop the dough out on the sheets, then I go back and roll the little blobs into balls. It's much quicker to do it this way than to shape each one as I scoop it out. Place the dough balls into the freezer for about an hour.
Melt the chocolate and dip each cookie dough ball into it. Gently shake off the excess chocolate.
Put the truffles back on the wax paper and return to the freezer until the chocolate is set.
Doesn't that look irresistible?
My taste testers - about 20 members of my friend Suzanne's family all the way from Iowa - gave these their seal of approval. Even the naked ones got eaten!
For more yummy recipes, visit Tempt My Tummy Tuesday over at Blessed with Grace.
Sunday, March 20, 2011
Menu Plan March 20-26
Ahhh, spring seems to have finally arrived to stay...I hope! I have tons of work ahead of me, though. You know, the Great Seasonal Clothing Exchange. I have to go through all of the kids' warm weather clothes and see what they can still wear from last year. Then I have to pack away the cold weather clothes and get rid of what I know they won't be able to use next year.
So this week's menu will be simple. I'm only trying one new recipe. I'll let you know how it goes.
Here's the plan:
Sunday
No power - we had to use the drive-thru
Monday
Fiesta Chicken and Rice
Tuesday
Sausage veggie calzones, corn
Wednesday
Lentil sloppy joes - my regular sloppy joe recipe with lentils replacing the ground beef
Thursday
Greek Chicken Pasta, broccoli
Friday
Spaghetti and meatballs, no-knead garlic cheese flatbread
Saturday
WV pepperoni rolls
For more menu planning ideas, head over to Organizing Junkie's Menu Plan Monday.
Saturday, March 19, 2011
Spring Morning
Isn't that a lovely bouquet of daffodils? I love how delicate the centers are and the contrast of colors. The Princess picked these from our backyard, and there are tons more! Spring is here!
Spring is also the time for birds to build their nests. See that tiny little wren sitting on my windshield wiper? Sorry for the blurry pic, but I was taking this through my kitchen window.
That little bird and its spouse have been trying desperately to build a nest under the hood of my minivan for the past two weeks. Apparently the space between the hood and the windshield is prime real estate.
Every morning I look out and see them busily stuffing all kinds of debris into their chosen space. And every morning I go out and remove it, leaving the hood of the van up to discourage their building endeavors.
We've tried using a rubber snake on the hood to scare them away. It worked for a day. Then they started pecking its head. So back to clearing out the nest daily and leaving the hood up.
Please note: I love birds and would greatly enjoy having them build a nest elsewhere. But I use my van almost every day and can't stand the thought of harming little tiny eggs should the mama and daddy succeed in setting up residence. So these birds are going to have to find an alternate place to live. What else can we do to encourage them to do so?
Thursday, March 17, 2011
An Irish Blessing ~ and a winner!
May the road rise up to meet you.
May the wind always be at your back.
May the sun shine warm upon your face,
and rains fall soft upon your fields.
And until we meet again,
May God hold you in the palm of His hand.
May the wind always be at your back.
May the sun shine warm upon your face,
and rains fall soft upon your fields.
And until we meet again,
May God hold you in the palm of His hand.
And we have a winner for the 200th follower giveaway. It's Stephanie! Congratulations!
Tuesday, March 15, 2011
Have you heard of Ana-White.com?
My husband found this wonderful website a few months ago and was intrigued by how easy Ana White made furniture-making seem. She includes the plans for each piece with exact supply lists. Not only that, but she also tells you how many cuts and what size is needed for each. Really, she takes the calculating out of the planning, which is a big stumbling block for many wanna-be DIY'ers. Simply follow the directions and you'll do great!
The hardest part for Charles was deciding which project he wanted to tackle. He finally chose this console table as his first attempt to make furniture. Including black wood stain and polyurethane, the supplies cost about $50. Try buying a similar solid wood console table for that! You won't be able to!
Look at the finished table! We put it in our guest room.
Yes, if you come to visit us, we'll give you Milano cookies and bottled water. See that high gloss on the table? I love it! Charles did a fantastic job.
He's already picked his next project, this factory cart coffee table for our den. I think we're going to paint it a rustic red and distress it a little. Really looking forward to that!
For more helpful tips and useful websites, visit We are THAT Family's Works for Me Wednesday.
Monday, March 14, 2011
Roasted Garlic Cauliflower
I don't know about you, but sometimes I'm veggie-challenged. Meaning, I can't think of exciting ways to serve vegetables that my kids will like. I get stuck in a rut of preparing veggies a certain way and it's hard to try new methods. Now, I know that I'm blessed because both of my children enjoy eating broccoli and cauliflower. But after a while, they get tired of the same old veggies prepared the same old way, ya know?
I am SO glad I came upon this recipe for roasted garlic cauliflower! It breathed new life into an old favorite and the kids gobbled it up.
Here's what you need:
1 head of cauliflower
3 TBSP olive oil
2 TBSP minced garlic
sale and pepper, to taste
1/4 cup grated Parmesan cheese
Separate the cauliflower into florets. You don't want them too small or they'll burn as they roast. But if they're too big, they might not cook all the way through. Try to make them about the same size.
Place the olive oil and minced garlic into a Ziploc bag, then add the cauliflower. Shake to coat, then spread on a greased baking sheet.
Bake at 425 degrees for about 20 minutes, stirring once about halfway through. Sprinkle with the Parmesan cheese and return to the oven for a couple of minutes until the cheese is golden brown. My cauliflower was a little too browned because I forgot to stir. Oops!
In spite of not stirring like the directions said to, the cauliflower was delicious! The garlic added such a wonderful flavor and the cheese gave it a slight tang.
This is one veggie dish I'll be making again and again!
Sunday, March 13, 2011
Menu Plan March 13-19
Did y'all remember to set your clocks forward last night? Losing an hour of sleep just about kills me but I sure do like having more light in the evenings!
This week is full of easy meals, mainly because Wednesday is my birthday and I don't want to cook! While you're here don't forget to enter my 200th follower giveaway, the lovely print below.
Now on to the menu plan for the week:
Sunday
White bean and spinach pasta (at the kids' request! Yay!)
Monday
Buffalo blue cheese burgers, crispy potato wedges
Tuesday
Baked egg rolls, rice
Wednesday
Pizza
Thursday
Irish stew, cabbage, homemade bread
Friday
Stuffed shells, green beans, garlic bread
Saturday
Burritos
For more menu plan ideas, visit Organizing Junkie's Menu Plan Monday.
Friday, March 11, 2011
Cheesy Pull-Apart Bread
This easy recipe was a staple at our house for many years as an after-church snack on Sunday nights. I recently made it again as an appetizer when we had friends over for dinner. There was nothing left. Not a crumb. Once you start snacking on this bread, you won't want to stop until it's gone.
Here's what you'll need:
One round loaf of sourdough bread
1 8-oz block of cheese, cut into thin slices (you can use sharp cheddar, white cheddar
or monterey jack, all are yummy)
1/4 cup bacon pieces (cooked, of course)
1/4 cup melted butter
1 teas garlic powder
1 teas poppy seeds
2 green onions, thinly sliced (optional)
With a bread knife, cut thick slices of the bread, but don't cut all the way through.
Now cut slices in the opposite direction to form little squares. Again, don't slice all the way through.
Place the loaf on a piece of foil large enough to wrap around the entire loaf. Stuff the cheese slices into every crevice you can find.
Sprinkle the loaf with the bacon pieces. Combine the butter, garlic powder and poppy seeds. Pour over the entire loaf, getting down into the crevices and all around the edges. If you're using green onions, sprinkle them over the loaf, too.
Tightly wrap the foil around the loaf and on a baking sheet. Bake at 400 degrees for 15-20 minutes or until the cheese is melted throughout the loaf.
Now start pulling that bread apart and enjoy the cheesy goodness!
Thursday, March 10, 2011
200 Followers? It's Giveaway Time!
I mentioned earlier that when this blog reached 200 followers, I'd host a giveaway. I mean, we need to celebrate, right?
Only thing was, I had no idea WHAT I wanted to give away! Until I stumbled upon this Etsy shop, Just a Tiny Owl. I fell in love with Angie's collage prints right away. And especially this one.
So for my 200-follower giveaway, I'm going to give you the opportunity win this lovely cooking print!
All you have to do is visit Just a Tiny Owl and leave me a comment telling me what other piece of art captures your fancy.
Here are a few more details:
This giveaway is open to my US readers only.
Please note, this giveaway is for an 8x10 print only. It does not include a mat or frame.
This giveaway will end at midnight on Tuesday, March 15. I'll draw a winner on Wednesday!
Best wishes to everyone who enters!
Monday, March 7, 2011
Chocolate Chip Oatmeal Cake
This is my Aunt Joann's famous Oatmeal Cake. I added the Chocolate Chip part to the title because the chocolate chip topping takes this cake over the top.
Here's what you need:
1 cup quick oats
1 1/4 cups boiling water
1 stick of butter, cut into slices
1 cup brown sugar
1 cup white sugar
2 eggs
1 TBSP vanilla
1 heaping TBSP cinnamon
1 3/4 cups flour
1 teas baking soda
1 cup chopped walnuts
1 cup chocolate chips
maraschino cherries, drained
Place the oats in a mixing bowl. Pour the boiling water over the oats, then add the slices of butter.
Let the oat mixture sit for 20 minutes. It will look like this - all gooey and melty.
Mix the remaining ingredients together in a separate bowl. Add to the oat mixture and stir until well-combined.
Pour into a greased 13x9 pan. Sprinkle the nuts, then the chocolate chips, over the entire cake.
Now place the maraschino cherries on the cake. I try to allow for one cherry per piece of cake. You can put more cherries on if you wish.
Bake at 350 degrees for 30-35 minutes. This cake is so delicious warm!
I love eating this cake for breakfast. It's oatmeal, after all....right?
For more yummy recipes, visit Blessed with Grace's Tempt My Tummy Tuesday.