Pages

Monday, November 30, 2009

Fabulous Flatbread

I love bread. All kinds. But this recipe is one of my favorites. It's very versatile and can be used for mini pizzas or sandwiches or scooping up hummus or dip. If you decide to make it, be aware that it takes about 2 hours with rising, rolling and cooking.

First, let me introduce you to my cooktop.


Our house was built in 1975. It has tons of 70's character and charm. This cooktop is one example. That is a griddle there in the middle. Ha! Such poetry. I promise you that the burn mark on the sunny yellow countertop was there when we moved in. Promise.

This is a close up with the griddle cover removed. See how seasoned and well-used it is? I didn't think I would like having a griddle on the stovetop at first, but I've grown to really like the convenience of it. It's come in very handy for making flatbread. And pancakes. But today it's just about the flatbread.

Fabulous Flatbread

1 pkg active dry yeast (2 1/4 teas)
1 cup warm water
1/4 cup white sugar
2 TSBP milk
1 egg, beaten
2 teas salt
3 1/2 - 4 cups bread flour
1/4 cup butter, melted

In a large bowl, dissolve the yeast in the water. Let stand about 10 minutes until frothy. Stir in the sugar, milk, egg and salt. Add enough flour to make a soft dough. I usually start with 3 cups and work my way up to 3 1/2. Knead for 6-8 minutes or until smooth. A Kitchenaid mixer is awesome for this. Place the dough in a greased bowl. Cover and let rise for about an hour, until doubled in volume.

Punch the dough down and pinch off golf-ball sized pieces. You can make these bigger if you want. Roll into balls and place on a greased cookie sheet. I normally get a dozen portions out of this. Cover and let rise until doubled in size. This should take about 30 minutes.

Heat your griddle to high. If you want to grill this bread, that will work too. Roll out one or two balls of dough into thin circles, or as many as will fit on your griddle at one time. Be sure to use a little flour to keep the circles from sticking. Lightly rub griddle with oil. Place dough onto the griddle and brush with melted butter. It should bubble up like this almost immediately.
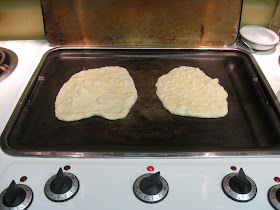

Cook for 2-3 minutes until puffy. Flip over and brush cooked side with butter. They should look brown but not burnt. Turn the heat down slightly if they're browning too quickly. Cook another 2-3 minutes after flipping.

Repeat with the remaining dough balls. You will end up with a stack like this. Oh, the possibilities!

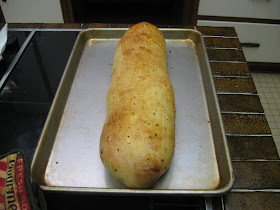
I've used these to make gyros, Philly cheese steak sandwiches and pizzas. My kids like to eat them plain. They will keep in a Ziploc bag for a couple of days, but I don't think they've ever lasted that long around here. If you want to reheat them, wrap in a damp paper towel and pop into the microwave for a few seconds. If you have a griddle in the middle (I just said it again!) you can throw them on for a minute or two on each side.

Enjoy!

This recipe is linked to Tempt My Tummy Tuesday over at Blessed with Grace.

Sunday, November 29, 2009

Menu Plan Monday

We had a marvelous Thanksgiving dinner. The brined turkey was perfect and juicy. I will definitely make brining a yearly tradition! And the leftovers were so good in the Turkey and Rice soup. I'll still be cooking this week, but not on such a large scale and just for my little family.

On Saturday, we're hosting our annual Sunday School Christmas party. I'll be making several pork roasts in the crockpot and shredding them for BBQ sandwiches. The rest of the food will be supplied by our guests and we expect about 30 people. There are a lot of great cooks in our class, so we're anticipating a feast! And the fellowship is sure to be sweet and funny. We always have such a great time with our brothers and sisters in Christ. Since all of our family lives out of state, these people have become family to us and we're so very thankful for them.

Sunday
Penne pasta casserole, salad, bread
Apple Spice Cake

Monday
Deep dish pizza

Tuesday
Chinese chicken and rice

Wednesday
Spaghetti and meatballs, garlic bread

Thursday
Baked chicken, green beans, mashed potatoes

Friday
Corn chowder, bread

Saturday
Sunday School Christmas party

For more great meal plans, visit the Organizing Junkie.

Foolproof Bread for the bread machine

I love my bread machine. My mother-in-law gave it to me shortly after I married her handsome son. It's very easy to use and has lasted for over 10 years. I've tried dozens of recipes over the years, trying to get the perfect loaf of white bread. I finally found it. It's so easy!

I often measure out the dry ingredients (minus the yeast) into Ziploc bags and store in the freezer so I always have it on hand. I set up an assembly line on the counter until I have several batches bagged up. Then I can just grab a bag out of the freezer, dump it into the bread machine pan, add the wet ingredients and yeast, and start pressing buttons. A few minutes filling up Ziploc bags saves me tons of time later.

Foolproof Bread for the Bread Machine

1 cup warm water
3 TBSP olive oil
3 cups bread flour
3 TBSP sugar
1 1/2 teas salt
2 1/4 (or one pkg) dry yeast

Add the ingredients to the bread machine pan in the order recommended by your machine. Select the white bread setting and press start. My machine also has a medium or dark crust setting. I always choose medium.

Sometimes I add garlic powder and Italian seasoning if I'm making bread to accompany pasta. I've also added grated Parmesan cheese and pepper. You can add whatever seasonings or spices you like.

Serve warm with butter. Lots of melty butter!

Apple Spice Cake


If you need an easy dessert, this cake is for you. I had some apple pie filling left over from my Thanksgiving desserts and wanted to use it for something other than pie. I found a couple of recipes that called for a yellow cake mix, but I didn't have one on hand. I did, however, have a spice cake mix. And what goes better together than cinnamon, nutmeg, ginger and apples? Ummm, not much! So I thawed the filling and started mixing.

Apple Spice Cake

1 box spice cake mix
3 eggs
1 can apple pie filling (if you're using homemade, use enough for one pie)
1/2 cup chopped nuts
1/3 cup brown sugar
2 TBSP butter, melted

Mix cake mix, eggs and pie filling together until well blended and spread into a greased 9x13 pan. Combine the remaining ingredients and sprinkle over the batter. Bake at 350 degrees for 35-40 minutes or until knife inserted in the center comes out clean.


This was a moist cake but not too sweet. Next time I make it, I'm going to finish it off with a simple powdered sugar/milk glaze. Or maybe I'll leave the nut topping off and use vanilla frosting instead. Both will be fabulous, I'm sure.

Friday, November 27, 2009

Online shopping for free!

I'm not a shopper. I know what I want and I get it. I don't like to wander up and down the aisles searching for a deal. That's just me. My husband does like to shop. Today he's taking his sister and grandmother out for a little shopping. I'm staying home and shopping online. I enjoy that so much more than trying to find a parking space, dealing with the crowds and standing in line to check out.

I don't about you, but I love free stuff. Love, love, love it! One of my favorite homeschooling resources is CurrClick. This website offers thousands of e-books and activities to supplement curriculum. I love being able to download what I want immediately, after payment, of course. And I don't have to pay shipping since it's downloaded right on to my computer. Once you've purchased a product, you can download it up to 5 times. After losing all the stuff I had saved on an external hard drive, it was nice to be able to download some of my previous purchases again.

Today, CurrClick is offering hundreds of homeschool resources for FREE! Yes, free! It's their Black Friday Blowout sale. No lines, no crowds, no waiting. Head on over and take advantage of their fantastic giveaways at CurrClick.com. I can't wait to see what goodies they have available!

Tuesday, November 24, 2009

It's the Little Things

More and more as I get older, I realize just how much enjoyment in life comes from the little things. The simple everyday things we take for granted that make our lives easier. Oh, the "big" things like vacations and toys are nice and do bring a certain amount of enjoyment. But these things are fleeting. The vacation ends. The toy breaks. And life goes on.

But what if I couldn't hear? What if I couldn't taste? What if I couldn't walk or move my arms to do simple tasks? How drastically my life would be different without those simple things.

I'm especially thankful for the gift of reading. Some people struggle to learn to read and some never master it. Some people don't like to read even though they have the ability. But I love to read. I have since I was a child. Maybe because reading came easy to me. I read just about anything I could get my hands on. I could travel to faraway places and back in time. I loved books and still do.

Mostly I'm thankful I can read the Bible for myself. I don't have to rely on another person's interpretation. I can read and study, listen to the Holy Spirit, and apply the truths I learn to my life. If I never heard another sermon, I could still dig into Scripture and learn. All because I know how to read.

Thank you, Lord, for the gift of reading!

This post is linked to Heavenly Homemakers' Gratituesday.

Monday, November 23, 2009

Beef....it's what's for dinner!


Uh, ground beef, that is.

Remember those commercials way back with Robert Mitchum's voice extolling the virtues of beef? It just came back to me as I was preparing to write this post.

Now back to our regularly scheduled recipe. Cheeseburger Rice. It's an excellent way to use up leftover rice and couldn't be simpler to prepare. Not to mention, it's pretty cheap to make. Fast, cheap, easy. My kind of food!

I hosted a Pampered Chef party last year and one of the recipes we prepared for it was Deluxe Cheeseburger Salad. I really liked how the flavors reminded me of a cheeseburger, but it's tough to call ground beef mixed with ketchup, mustard and pickles a salad. Even though Pampered Chef does it and they're perfectly within their rights to do so. I wanted to make it more hearty, so I added some leftover rice and tweaked it a bit. That's what I am, a recipe tweaker. I can't help it. I rarely follow a recipe exactly. Oh, well. If you want the Pampered Chef recipe, it's the "Season's Best" fall/winter recipe collection booklet from 2008.

Cheeseburger Rice


1 lb ground beef
1/2 cup chopped onion (you can substitute 1 TBSP of dried minced onion if you like)
2 cups cooked rice
3 TBSP ketchup
1 TBSP mustard
1/2 TBSP dill pickle relish
salt and pepper, to taste
1 cup shredded cheddar cheese (I prefer sharp cheddar)

Optional ingredients : chopped tomatoes, bacon, lettuce, whatever else you'd put on a cheeseburger.

Brown the ground beef and onion. Drain.


Stir in the rice. Use a big skillet, bigger than the one I'm using. I'll show you why in a minute.


Stir in the ketchup, mustard and relish until well combined. Sprinkle on the salt and pepper too. Really get in there and mix it up. You want every grain of rice to be coated.


Now you can see why you need a bigger skillet. I kept flipping rice and beef out of the pan onto the stove. See all those specks of rice? Maybe someone will get me a bigger one for Christmas.


Hmmm...anyway, sprinkle the cheese over the top and turn the burner on low. Cover until the cheese melts. Stir until the gooey cheese is mixed throughout. Add any of your optional ingredients. Sometimes I add bacon, sometimes I don't. You can serve the rice over a bed of lettuce. Top it with tomatoes. Mushrooms. Whatever your little cheeseburger heart desires.


That's the beauty of this recipe. You can play around with the ingredients until you find the combination your family likes. If you don't care for ketchup, use steak sauce or barbecue sauce instead. Leave out the onions or relish.


This recipe is linked to Tempt My Tummy Tuesday.
You can also check out some more easy recipes at Life as Mom.

Sunday, November 22, 2009

Easy Stromboli

This is easily one of my most requested recipes. I got it from Joyce Anderson, the wife of my high school history teacher. I've tweaked it more to my own preferences, but it's basically the same recipe. She made it every time students came over. I went to a small Christian school and we were a close-knit bunch. The Andersons always had groups of kids over. They really liked being around us. And we them. Every time I make this, I think about them and the impact they had on my life. Ahhhh, the power of the stromboli.

Easy Stromboli

2 loaves frozen bread dough, thaw but do not let rise
1 (4.5 oz) pkg hard salami slices
1 (4.5 oz) pkg pepperoni slices (this is not pizza pepperoni, this is larger and the same size as the salami)
2 cups shredded mozzarella cheese
2 cups shredded cheddar cheese
Italian dressing

After the dough is thawed, stretch it out on a greased cookie sheet. This is the most difficult part of the whole process, getting the dough to stretch and stay while you put on good stuff. You can use your favorite bread dough recipe for this instead of the frozen. I've even used whole wheat dough and it's quite good.

Brush the dough with a little Italian dressing. Don't douse it, just a light brushing all over the dough. Don't you like the precise measurements? Layer about 10 slices of salami, slightly overlapping each other. Spread 1 cup of cheese over the salami. Layer the pepperoni and mozzarella cheese the same way. You don't have to do it in this order. You can start with the pepperoni if you want, or even the cheese. Make it your own!


Fold the dough over the filling and pinch tightly to seal. Carefully turn the stromboli over and place seam side down on the cookie sheet. Brush a little more Italian dressing over the top.


Repeat the steps for the second loaf. Bake at 350 for 30 minutes or until golden brown. Let cool until you don't burn your fingers, then slice and eat.


Some people like to dip the slices in pizza sauce, but we usually just eat it plain. If you want to freeze the loaves, cool completely and wrap tightly in plastic wrap. Thaw, then heat up in the oven at 325 for about 15 minutes. Wrap in foil if the stromboli browns too much on top.

I currently have three strombolis in the freezer, waiting the arrival of my father-in-law. One for him, two for the rest of us.

Honey Bun Cake

Tonight after church, we had some friends come over for dessert. I decided to fall back on one of my favorite recipes. One, because it's easy. And I'm all about easy. Second, it's delicious. As in lip-smacking, plate-licking delicious.

My sister-in-law passed this recipe along to me and now I'll pass it along too. It's too good not to be shared. You will thank me. Your hips might not, but your taste buds will.


Honey Bun Cake

1 yellow cake mix
1 cup sour cream
3/4 cup vegetable oil
4 large eggs.

Preheat oven to 350 degrees. Grease a 9x13 pan. In a large mixing bowl, mix the above ingredients with an electric mixer. I use my Kitchen-Aid. Beat on low for one minute. Scrape down the sides of the bowl, then increase speed to medium and beat for 2 more minutes. Batter should be thick and well-blended. Pour into prepared pan and smooth out.

1/2 cup honey
1/2 cup brown sugar
1/2 cup chopped pecans
1 TBSP ground cinnamon

Drizzle the honey over the top of the batter. I confess I rarely measure out 1/2 cup. I just start drizzling and drizzle until it looks good. By the time you're done, most of the cake should be covered. Sprinkle the brown sugar, pecans and cinnamon over the honey. Take a butter knife and swirl the ingredients together.

Bake for 35-40 minutes until golden brown and the cake springs back when lightly pressed with your finger. Remove from the oven and cool slightly while you prepare the glaze.

2 cups powdered sugar
1/3 cup milk
1 tsp vanilla extract

Whisk the glaze ingredients together until smooth. Pour over the top of the warm cake and around the edges. Spread with a spatula until the cake is completely covered. Cool for at least 20 more minutes. It is best served warm, but is good at room temperature too. Cover leftovers with plastic wrap. If you have any left over, that is. And then scrape out all the carmelized honey from the bottom of the pan. You can tell your family that you're just cleaning up. No one will notice the sticky hands and face.

Menu Plan Monday

This week will be super busy. I'm going to fall back on some old easy-to-prepare favorites before and after Thanksgiving to save myself some time and stress. I've already got plans for the leftovers and several things in the freezer ready to defrost. I feel prepared. Kind of. Well, better prepared than usual, let's put it that way.

Here's my menu plan for the week:

Sunday
Donuts
Baked chicken, rice
Leftovers, Honey Bun cake

Monday
Toast, cereal
Popcorn shrimp, french fries
Cheeseburger rice, green beans, rolls

Tuesday
Cereal
Leftover cheeseburger rice, corn
Chili, cornbread, salad

Wednesday
Bacon, eggs
Stromboli
Taco salad, homemade salsa

Thanksgiving
Overnight Bubble Bread

Brined turkey, mashed potatoes, gravy, sweet potato casserole, green beans, cranberry sauce, rolls, apple pie with homemade filling, pumpkin pie, pecan pie, olives

Friday
Cereal
Homemade pizza
Pork roast, potatoes, corn

Saturday
Breakfast pizza
Turkey and rice soup, homemade bread
Leftovers

For more menu ideas and recipes, visit I'm an Organizing Junkie

Mashed potatoes, the easy way!

This year I'm making fake mashed potatoes. I confess, my mashed potatoes are coming out of a box. I can hear the gasps of disbelief. It goes against everything that is traditional about Thanksgiving to use fake mashed potatoes. But honestly, the instant stuff IS made from real potatoes. It says so on the box!

In the interest of saving time and money, I'm going with the boxed stuff. It will be okay.

7 cups water
1 1/2 sticks of butter
2 teas garlic powder
2 teas salt (optional)
2 TBSP dried minced onion
2 (8 oz) pkgs cream cheese, softened and cubed
16 oz sour cream
1 (12 oz) can evaporated milk
1 box (15.3 oz) instant mashed potatoes (I used Hungry Jack but any will do)
Paprika

Preheat oven to 350 degrees. Grease a 9x13 pan. In a large saucepan, heat water, butter, garlic powder, salt and minced onion to boiling. Remove from heat. Stir in cream cheese, sour cream and milk until smooth. Stir in potato flakes until well combined. Spread potatoes into the prepared pan. Sprinkle paprika over the top. Bake 30-45 minutes until bubbling around the edges and golden brown on top. The paprika will help form a nice crust. You can also sprinkle on bacon bits or parsley when you take it out of the oven.

If you want to make this ahead of time, cover and refrigerate up to 48 hours. Remove from fridge, sprinkle with paprika and bake as directed above.

Friday, November 20, 2009

Thanksgiving - We're going to brine the turkey!

As I mentioned before, we're hosting hubby's family next week for Thanksgiving. I haven't cooked many turkeys because usually we're the guests at someone else's home. When I have, it's been just a turkey breast for our little family. But this year, I'm roasting a 13-pounder. And I'm brining it before I roast it!! Yay!

I'd never heard of brining a turkey until a couple of years ago. Alton Brown on the Food Network devoted a show to brining. Soaking the turkey in a salt brine is supposed to make the turkey retain its juices and help it cook faster. So I thought it would be interesting to try one day. Well, one day is here. You can purchase premade brining mixes at the store, but they're expensive, $10 dollars for a packet of herbs! I combed the internet for brining recipes and decided to make my own simple one. Some called for hard-to-find things like juniper berries, but this one has ingredients you probably already have in your kitchen.

I have a hard time serving food to guests that I haven't prepared at least once and taste tested on my family. So I decided to try my hand at brining a whole chicken and see if it worked. My guinea pigs....er, family was eager to try it too. Since the chicken was only 4 pounds, I cut the brining recipe by two-thirds. Didn't want it to be too salty. But for a 13 pound turkey, I'm going with the full recipe.

Simple Turkey Brine

2 gallons water - you can substitute apple juice for some of the water if you like
1 1/2 cups coarse sea salt
3 TBSP minced garlic
1/4 cup worchestershire sauce
1/2 cup brown sugar

Place your turkey in a large bucket with a lid or a hard-side cooler. It must be big enough for your bird and the brining ingredients. Mix the brine and pour over the turkey. Soak the turkey for 24-48 hours. Store in the refrigerator if you have enough space. If you're using a cooler, add enough ice to keep the turkey cold. Change out the ice after 24 hours. Roast or smoke as you normally would, but be aware that it might take less time to cook.

I roasted the whole chicken at 350 degrees for about 90 minutes and it was perfectly cooked. Hubby and I couldn't believe how juicy it was. The kids went back for seconds and thirds. Even the dog got a taste. The juices, however, were a bit salty from the brine, so I don't think it would make good gravy. You might want to take that into consideration if you brine your turkey.

This post is linked to Life as Mom's Frugal Fridays.

Thursday, November 19, 2009

Homemade Apple Pie Filling


Earlier this year we bought a new house. Well, it's not really new. It's 30 years old. But it was new to us, right? We had lived in our previous house for 8 years and had gone from a family of 2 to a family of 4. Not only that, we spent a LOT of time in that house. I homeschooled the children, Charles worked from home. And we were falling all over each other and each other's stuff. Last spring, God opened the doors for us to buy a bigger house. And I do mean bigger. We went from 1200 sq ft of living space to 4000 sq ft! I'll tell you more about the new house in another post.

Because of all the space we have now, we decided to host Thanksgiving with hubby's family and Christmas with my family. Since they all live out of state and will be staying several days, sleeping arrangements had to be taken care of. We finally have enough room to comfortably hold everyone!

I love to cook, so planning meals for a lot of people is fun for me. My father-in-law doesn't care for pumpkin pie, so I'm making apple pie for him. I'm sure he'll share. Here's a recipe for homemade apple pie filling that is delicious and inexpensive. Plus, it makes enough to freeze some for later pies.

Homemade Apple Pie Filling


18 cups sliced apples - I used about 6 lbs of apples, a mix of Gala and Granny Smith
3 TBS lemon juice
Toss the apples with the lemon juice and set aside.

Pour 6 cups of water into a large pot. Add 4 cups of sugar, 1 cup cornstarch, 2 teaspoons of cinnamon and 1 teaspoon of salt. Stir well and bring to a boil. Boil for 2 minutes, stirring constantly. The sauce will thicken up, which is good!

Look at all that cinnamony goodness floating at the top! Don't worry, it will blend in as you stir!

Add apples and stir gently to combine. Return to a boil. Reduce heat, cover and simmer for 6-8 minues or until apples are tender.


See how my pot almost wasn't big enough? Oops! Let the apple filling cool, then ladle into freezer bags or jars. A quart size freezer bag will hold about 4 scoops of filling. This recipe will make enough filling for 5 pies. I froze 4 bags and made a pie right then.


Hubby declared the filling to be delicious. And hopefully his father will think so too!

Now if only the Kitchen Clean-up Fairy will pay me a visit...

For more Thanksgiving recipes, visit Life as Mom

Tuesday, November 17, 2009

Natural Cold and Flu Remedy


I've been trying to avoid using OTC meds for my family as the cold and flu season ramps up. My daughter is allergic to the dyes found in most cold and cough syrups for one thing. And nearly every year, new studies come out showing that these meds don't work that well or have bad side effects for children. So I searched and searched until I found a natural remedy that I could make cheaply and quickly. I found one here.

You probably have most of these ingredients in your kitchen anyway. Fresh ginger, lemon juice, minced garlic and raw honey. That's it.

Boil a quart of water in a teakettle. Meanwhile, grate fresh ginger into a thermos. I have found it easier to freeze the ginger first. Do you still consider that fresh? Ha! Peel about an inch of ginger, then grate it directly into the thermos. Add a few tablespoons of lemon juice, one tablespoon of minced garlic and a tablespoon of honey. Pour the hot water into the thermos and cover for 15 minutes or so. Strain the tea into a cup and recap the thermos to use throughout the day. You might want to add a bit more honey if you have a sweet tooth or if you want to mask the garlic flavor.

The first batch I made was a little too gingery. My son said it was too spicy for him. So I eased off on the ginger and added a bit more garlic. He liked that a great deal better and didn't complain about having to "take his medicine" at all!

Homemade natural cold and flu remedies definitely Work for Me!

Yummy chicken and rice soup - in the crockpot!


Lindsay over at Passionate Homemaking is hosting a Nourishing Crockpot Carnival today to share yummy recipes. Since I use my crockpot quite a bit, I thought I'd join in and share an easy but flavorful soup recipe. It's perfect for these chilly fall nights!


Chicken and Rice Soup

2 cups cooked chicken, diced or shredded
6 cups chicken broth
2 cups water
1 cup chopped carrots
1 cup chopped celery
1 med onion, diced
1 cup brown rice
1 teas dried parsley
1 teas dried oregano
1/2 teas garlic powder
salt and pepper to taste

Put all ingredients in the crockpot. Cover and cook on low for 6-8 hours. The rice will puff up and look "fluffy." You can use whatever veggies your family enjoys and experiment with spices too. This recipe is a great way to use up leftover turkey after Thanksgiving dinner!

Monday, November 16, 2009

Menu Plan Monday


This is my first time participating in Menu Plan Mondays. It's my first day blogging, for heaven's sake! I'm going to go easy on myself and just include dinners.

Monday - Chinese chicken and rice

Tuesday - Pancakes and sausage

Wednesday - Chili with Fritos

Thursday - Roast chicken, Make-ahead mashed potatoes

Friday - Taco salad with homemade salsa

Saturday - Sandwiches

Sunday - Pork roast

For more menu plans, visit Organizing Junkie

I'm a Blogger!

For a couple of years, I've lurked at and read blogs across the internet. I've learned a great deal about cooking, frugality, healthy living, herbs, homeschooling, and even politics. Now it's time for me to share my own thoughts on those subjects. I'm no expert in any of these areas, not by any stretch of the imagination. But I'm hoping to expand my horizons and learn some new skills along the way.