I'm also thankful that this isn't goodbye. I'm thankful for the hope I have in Jesus that she is with Him, and I'll see her again. Yes, there have been tears as we all think of adjusting to life without her here. But as the Princess said, "We're sad for us, but happy for her!" Well said.

Sunday, February 27, 2011
Heaven's a bit sweeter
Thanks to all of you who prayed for my family during this difficult time. My grandma passed away peacefully last night (actually early this morning). I'm thankful that I had the chance to tell her I loved her. Don't know if she heard me, but I needed to say it.


Wednesday, February 23, 2011
A Matter of Time
On Monday my grandma had a massive stroke. She is not expected to live long, and in accordance with her wishes, no life-prolonging procedures will be done. She is 86 years old and in her own words, is "ready to see the Lord." While not unexpected (again, 86 years old), this is sudden and we are trying to balance travel plans with other responsibilities. Your prayers would be appreciated.


Monday, February 21, 2011
White Bean and Spinach Pasta
I've been looking for pasta dishes that don't require tomato-based sauces since the Princess doesn't care for tomato sauce. She likes to eat her pasta plain. That's right - no sauce, no butter. She will let me sprinkle some grated Parmesan cheese on her pasta now and then, but she prefers nothing.
She really liked the Greek Chicken Pasta recipe I found, so I was inspired to try another non-tomato dish with this recipe from the Tasty Kitchen. I tweaked it a bit because I thought the amount of lemon juice was a little much for my kids. It turned out wonderfully and reminded me of spring. And the Princess ate it! And liked it! Another win!
Here's what you'll need:
8 oz uncooked pasta
1 TBSP olive oil
2 garlic cloves, minced (equals about 1 1/2 teaspoons)
1/4 cup finely chopped red pepper
1 can cannellini beans, rinsed and drained
3 cups fresh baby spinach
1/4 cup grated Parmesan cheese
the zest and juice of one lemon
salt to taste
dash of cayenne pepper
Cook the pasta according to the package directions. Drain, reserving one cup of the cooking water. Set aside.
Heat the oil in a large skillet. Add the garlic and cook for a couple of minutes until it really starts smelling good. Add the chopped pepper and cook until soft.

Add the cooked pasta, beans, and spinach. Stir gently until all the spinach is wilted. Now, the next time I prepare this, I'm going to add only the spinach at this time. After it's wilted, I'll add the pasta and beans. It will just make it easier to stir since the skillet was so full.

Now stir in remaining ingredients. If the mixture seems too dry, add a little of the reserved cooking water.

The tang from the lemon really made this dish. It was so fresh-tasting! The beans added a nice, smooth texture, too. This will be showing up on our menu often.
For more yummy recipes, visit Tempt My Tummy Tuesday over at Blessed with Grace.
She really liked the Greek Chicken Pasta recipe I found, so I was inspired to try another non-tomato dish with this recipe from the Tasty Kitchen. I tweaked it a bit because I thought the amount of lemon juice was a little much for my kids. It turned out wonderfully and reminded me of spring. And the Princess ate it! And liked it! Another win!
Here's what you'll need:
8 oz uncooked pasta
1 TBSP olive oil
2 garlic cloves, minced (equals about 1 1/2 teaspoons)
1/4 cup finely chopped red pepper
1 can cannellini beans, rinsed and drained
3 cups fresh baby spinach
1/4 cup grated Parmesan cheese
the zest and juice of one lemon
salt to taste
dash of cayenne pepper
Cook the pasta according to the package directions. Drain, reserving one cup of the cooking water. Set aside.
Heat the oil in a large skillet. Add the garlic and cook for a couple of minutes until it really starts smelling good. Add the chopped pepper and cook until soft.

Add the cooked pasta, beans, and spinach. Stir gently until all the spinach is wilted. Now, the next time I prepare this, I'm going to add only the spinach at this time. After it's wilted, I'll add the pasta and beans. It will just make it easier to stir since the skillet was so full.

Now stir in remaining ingredients. If the mixture seems too dry, add a little of the reserved cooking water.

The tang from the lemon really made this dish. It was so fresh-tasting! The beans added a nice, smooth texture, too. This will be showing up on our menu often.
For more yummy recipes, visit Tempt My Tummy Tuesday over at Blessed with Grace.
Sunday, February 20, 2011
Menu Plan February 20-26
Last week was almost like spring. Temps reached the low 70's nearly every day and the sun shone brightly! It was glorious! Charles decided to grill on Saturday, so he graciously grilled chicken, pork chops and hamburgers to help with this week's menu. Isn't he sweet? And a little smoky too, after all that grilling.
Here's the plan:
Sunday
Grilled hamburgers, tater tots
Monday
Grilled pork chops, corn
Tuesday
Brought to you by the letter E (remember, we're choosing a letter once a month
and planning a menu around it)
So today we're having egg rolls and empanadas with eclairs for dessert
Wednesday
Southwestern Chicken Salad
Thursday
Broccoli cheese soup in bread bowls
Friday
Spaghetti and meatballs, cheesy garlic breadsticks
Saturday
BBQ chicken pizza
If you want to see some more yummy menu plans, head over to Organizing Junkie's Menu Plan Monday.
Here's the plan:
Sunday
Grilled hamburgers, tater tots
Monday
Grilled pork chops, corn
Tuesday
Brought to you by the letter E (remember, we're choosing a letter once a month
and planning a menu around it)
So today we're having egg rolls and empanadas with eclairs for dessert
Wednesday
Southwestern Chicken Salad
Thursday
Broccoli cheese soup in bread bowls
Friday
Spaghetti and meatballs, cheesy garlic breadsticks
Saturday
BBQ chicken pizza
If you want to see some more yummy menu plans, head over to Organizing Junkie's Menu Plan Monday.
Saturday, February 19, 2011
Six Flags Read to Succeed
Have you heard about this program? Six Flags and Discovery Education are partnering with schools to encourage children to read. This year, homeschool kids are eligible, too, if you live within 250 miles of a Six Flags park!
All you have to do is register and keep track of your child's reading. When your child has completed 360 minutes (6 hours) of reading, submit the info online, then you and your child will receive a free Six Flags ticket for the park nearest you! The deadline for submission is March 4, so you've got two weeks to read, read, read!
All you have to do is register and keep track of your child's reading. When your child has completed 360 minutes (6 hours) of reading, submit the info online, then you and your child will receive a free Six Flags ticket for the park nearest you! The deadline for submission is March 4, so you've got two weeks to read, read, read!
Tuesday, February 15, 2011
Mr. Lego's Lego Party
On Saturday, Mr. Lego turned 10. He is so excited to be in double digits!
I made some Lego decorations out of colored paper. I cut sheets of paper in half, then used a paper punch to cut out circles. I attached the circle with pop dots to make them stand out a little.

Here's our Lego building game. Each boy was given a pile of Legos. Then he was handed a card with the name of something he had to build using only Legos from his pile. We had a helicopter, a train, and a robot to name a few. It was fun watching the boys be creative.

We enjoyed a chocolate chip cookie cake complete with a Lego mini figure army. We bought the mini figure mold at the Lego Store. Then it was just a matter of melting some chocolate and pouring it. Charles took care of the army and I made the cookie.

And of course, the Lego loot. The rest of the afternoon was spent putting sets together.

These past 10 years have flown by. I'm so honored to be this guy's mom.

I made some Lego decorations out of colored paper. I cut sheets of paper in half, then used a paper punch to cut out circles. I attached the circle with pop dots to make them stand out a little.

Here's our Lego building game. Each boy was given a pile of Legos. Then he was handed a card with the name of something he had to build using only Legos from his pile. We had a helicopter, a train, and a robot to name a few. It was fun watching the boys be creative.

We enjoyed a chocolate chip cookie cake complete with a Lego mini figure army. We bought the mini figure mold at the Lego Store. Then it was just a matter of melting some chocolate and pouring it. Charles took care of the army and I made the cookie.

And of course, the Lego loot. The rest of the afternoon was spent putting sets together.

These past 10 years have flown by. I'm so honored to be this guy's mom.

Monday, February 14, 2011
West Virginia Pepperoni Rolls
I was born in and spent the first 26 years of my life in Fairmont, West Virginia. I grew up eating pepperoni rolls and thought everyone else in America did, too. My mom made them all the time and they were a lunch box staple for us. We always took them with us on road trips to eat in the car. They even showed up at my wedding reception, only in miniature form. You can buy them in every convenience store in the state, but the best ones are homemade.
These savory little bundles of goodness were invented in my hometown back in the early 1900's. They were created to cater to Italian immigrants who came to that part of the state to work in the coal mines. Thin strips of pepperoni were wrapped in dough and baked until golden. The meat required no refrigeration, so the rolls were perfect for miners who worked long shifts.
Nowadays people use sliced pepperoni instead of strips because of convenience. My family prefers to use thin strips cut from a long stick of pepperoni, so that's what I'll show you.
Here's what you need:

1 9-oz stick of pepperoni
Bread dough of your choice, enough for one loaf
Melted butter
I use my bread machine to mix up the dough, using this recipe and setting it on the dough cycle. While the machine is working, I slice the pepperoni into strips.
First I cut the long stick into 5 pieces. Each of these is sliced in half. Now it's time to peel the skin off the pepperoni. You don't want to chew on that, believe me.

Each half should be cut into four strips. By the time you're done, you should have 40 strips. You're going to need 3 strips for each roll. Since this recipe makes a dozen rolls, you'll have a couple of pepperoni pieces left over. Yum!

Now divide your dough into 12 pieces. Roll each piece out into an oval. On the short side, place on strip of pepperoni and fold the dough over it.

Put your second piece of pepperoni on the dough and roll it over, sealing the edges as you go.

Repeat this with the third strip of pepperoni.

Now pinch all the edges to make sure everything is sealed up tight.

Place seam side down in a greased 9x13 pan. You want three rows of four with the rolls barely touching.
 Cover and let rise in a warm place until doubled in size. This will take about an hour and the rolls will be all squished together. That's how you want them.

Bake at 350 degrees for 25-30 minutes or until golden brown on top. Brush with melted butter immediately after you remove them from the oven.

Allow to rest in the pan for several minutes, then invert onto a cookie sheet and separate. The bottoms of the pepperoni rolls will look orange. That's from the pepperoni grease seeping through the dough. It makes the rolls super yummy!

One of my favorite ways to eat a pepperoni roll is to split it open while it's warm, slather on some jarred sweet peppers with sauce and layer on mozzarella cheese. If you can't find jarred sweet peppers, use some pizza sauce. But plain is good, too. Really, really good!
Note: if you can't find stick pepperoni or don't want to go to the trouble of slicing it into strips, you can use sliced pepperoni. Use 3 slices in place of each strip and fold up as directed above.
For more yummy recipes, visit Miz Helen's Full Plate Thursday.
These savory little bundles of goodness were invented in my hometown back in the early 1900's. They were created to cater to Italian immigrants who came to that part of the state to work in the coal mines. Thin strips of pepperoni were wrapped in dough and baked until golden. The meat required no refrigeration, so the rolls were perfect for miners who worked long shifts.
Nowadays people use sliced pepperoni instead of strips because of convenience. My family prefers to use thin strips cut from a long stick of pepperoni, so that's what I'll show you.
Here's what you need:

1 9-oz stick of pepperoni
Bread dough of your choice, enough for one loaf
Melted butter
I use my bread machine to mix up the dough, using this recipe and setting it on the dough cycle. While the machine is working, I slice the pepperoni into strips.
First I cut the long stick into 5 pieces. Each of these is sliced in half. Now it's time to peel the skin off the pepperoni. You don't want to chew on that, believe me.

Each half should be cut into four strips. By the time you're done, you should have 40 strips. You're going to need 3 strips for each roll. Since this recipe makes a dozen rolls, you'll have a couple of pepperoni pieces left over. Yum!

Now divide your dough into 12 pieces. Roll each piece out into an oval. On the short side, place on strip of pepperoni and fold the dough over it.

Put your second piece of pepperoni on the dough and roll it over, sealing the edges as you go.

Repeat this with the third strip of pepperoni.

Now pinch all the edges to make sure everything is sealed up tight.
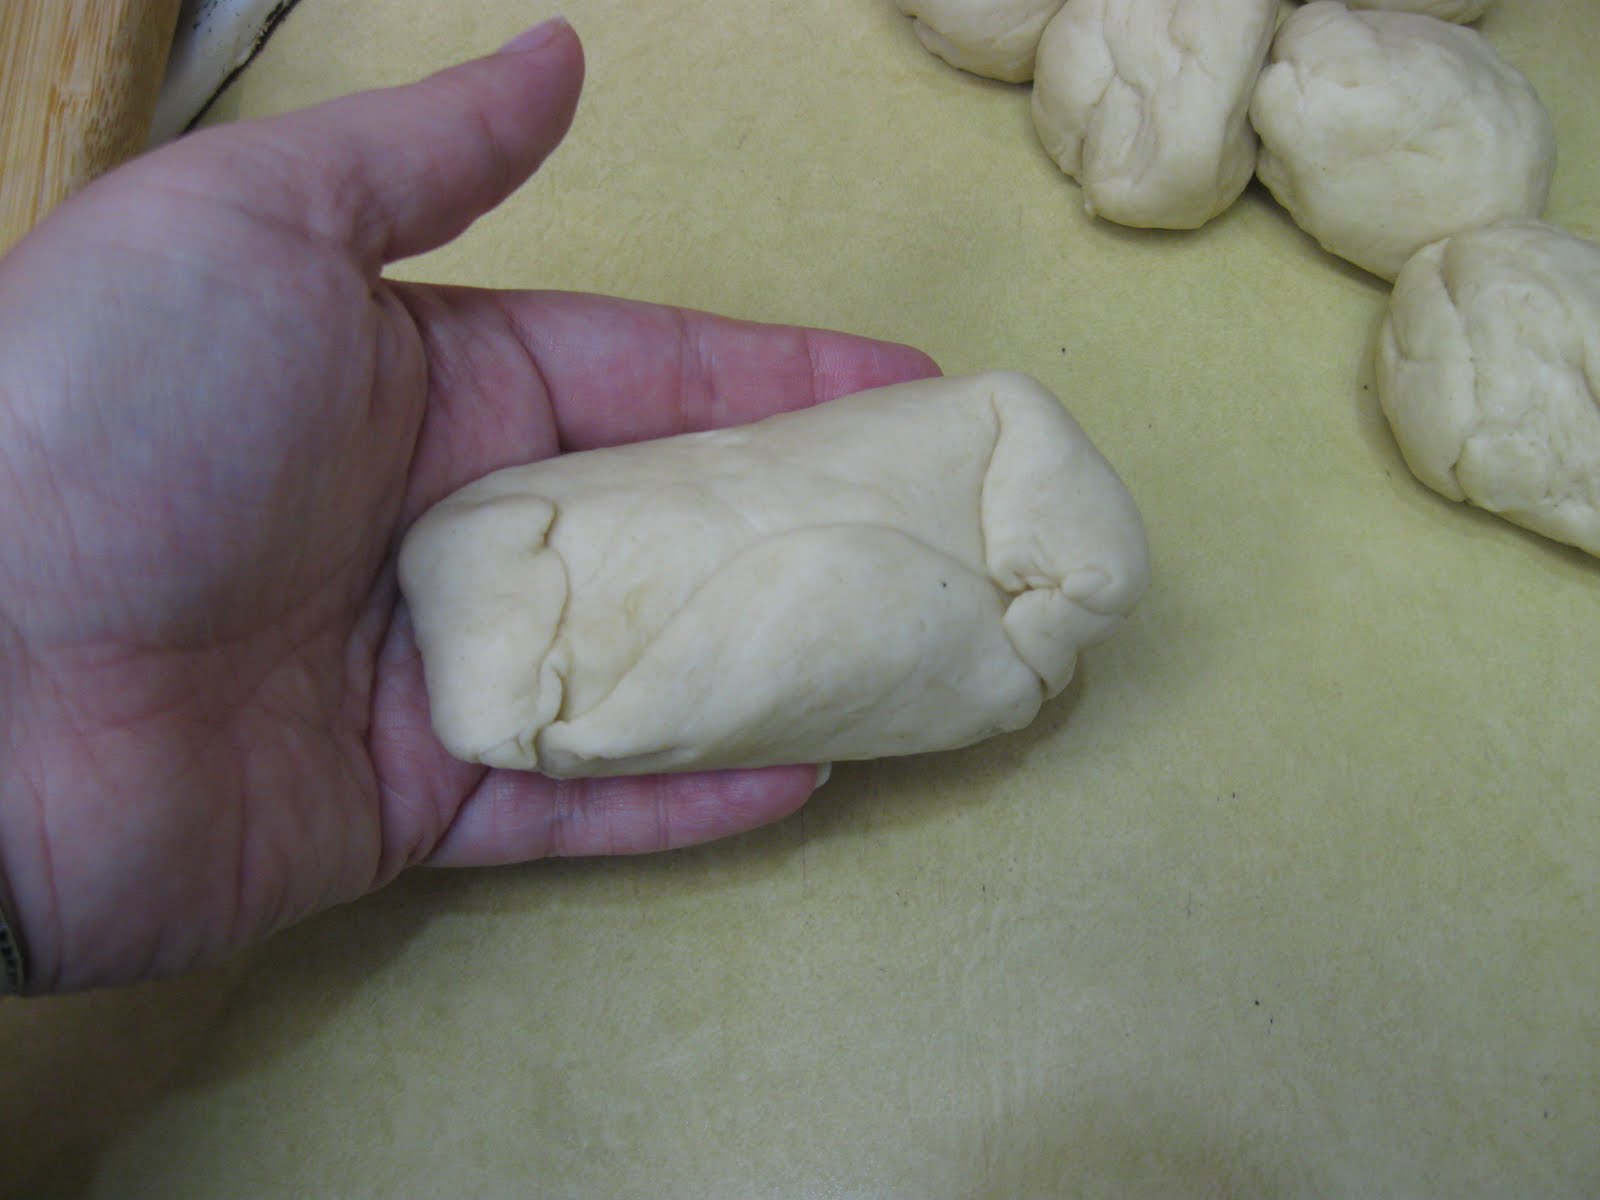
Place seam side down in a greased 9x13 pan. You want three rows of four with the rolls barely touching.
 Cover and let rise in a warm place until doubled in size. This will take about an hour and the rolls will be all squished together. That's how you want them.

Bake at 350 degrees for 25-30 minutes or until golden brown on top. Brush with melted butter immediately after you remove them from the oven.

Allow to rest in the pan for several minutes, then invert onto a cookie sheet and separate. The bottoms of the pepperoni rolls will look orange. That's from the pepperoni grease seeping through the dough. It makes the rolls super yummy!

One of my favorite ways to eat a pepperoni roll is to split it open while it's warm, slather on some jarred sweet peppers with sauce and layer on mozzarella cheese. If you can't find jarred sweet peppers, use some pizza sauce. But plain is good, too. Really, really good!
Note: if you can't find stick pepperoni or don't want to go to the trouble of slicing it into strips, you can use sliced pepperoni. Use 3 slices in place of each strip and fold up as directed above.
For more yummy recipes, visit Miz Helen's Full Plate Thursday.
Subscribe to:
Posts (Atom)