After pretzel bread, this is the bread my family requests the most. The bread is crusty on the outside but soft and tangy on the inside. The vinegar in the recipe lends a sourdough taste to the bread that's fantastic!
This recipe makes two nice-sized loaves. If we're having company, it's definitely nice to have two loaves with only one prep. Sometimes I cut the recipe in half to just make one loaf (I'll share the measurements at the end of this post) if it's only my family. I've never frozen this bread - it usually doesn't last long enough to make it to the freezer. But I imagine it would freeze just fine as long as it's wrapped tightly to prevent freezer burn/drying out.
I will warn you ahead of time, this bread does take a while to prepare. Make this when you have an afternoon to spend babysitting the dough. It's definitely worth the effort!
Here's what you need (2-loaf measurements):
Homemade French Bread - click here for a printable version.
2 1/2 cups warm water
3 TBSP sugar
2 TBSP yeast
2 TBSP white vinegar
1/3 cup olive oil - you can use vegetable or canola oil
6-7 cups flour
1 TBSP salt
In the bowl of a stand mixer, combine the water, sugar, yeast and vinegar. Allow to sit until the mixture is bubbly, about 5 minutes.
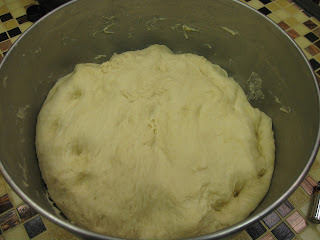
Add the oil, 6 cups of flour and salt. Gradually add more flour until the dough is soft and not sticky. I usually start with about 1/2 cup and work my way up until I've reached 7 cups total. With the dough hook attachment, knead for 5 minutes. If you don't have a stand mixer, you can also do this by hand with a wooden spoon. Transfer to a greased ovenproof bowl if you don't use the stand mixer. You're going to put the dough into a warm oven so it rises quickly, giving it lots of lovely air pockets. If you use the metal bowl that comes with the stand mixer, pour a little olive oil into the bowl and make sure your dough is greased so it doesn't stick.
Make sure your oven has enough room to hold the bowl of dough. I have to move my top rack down to accomodate mine. Now turn your oven on to 200 degrees. While the oven is heating, boil about two cups of water. Pour the water into an ovenproof pan, then pop it into the oven. When the oven reaches 200 degrees, turn it off. Place some foil over your dough bowl, then put the bowl into the oven.
Because the oven is warm, it won't take long for the dough to rise to the top of the bowl. Mine took about 30 minutes. Make sure you use pot holders to remove your metal bowl from the oven. It gets hot. Gently punch the dough down, scraping any dough from the sides of the bowl. Place the foil over it and return to the oven for another rising.
You'll want your dough to rise at least three times in the oven. Once it's risen enough times to suit you, take it out of the bowl and shape into loaves. Put onto baking sheets lined with parchment paper.
Brush with a beaten egg. The egg wash gives the loaves their wonderful shiny crusts. With a sharp knife, make three or four slashes on top of the loaves.
Allow to rise for another 20 minutes. You'll see the slashes expand a little and the loaves might get wider.
Bake at 375 degrees for 25-30 minutes until golden brown. The loaves are done when they sound hollow if you tap the bottoms. This is where the parchment papers comes in handy. You can just tilt the paper a little to give yourself room to tap the bottoms!
Doesn't that look amazing?
This bread is so delicious warm! If you cut it while it's still warm, though, use an electric knife to get even slices and avoid crushing the bread.
Now here are the measurements for one loaf. Just follow the same directions for mixing, kneading, rising, shaping and baking.
One loaf:
1 1/4 cups warm water
1 1/2 TBSP sugar
1 TBSP yeast
1 TBSP white vinegar
2 TBSP + 2 teas oil
3 1/2 cups flour
1/2 TBSP salt
Enjoy!


No comments:
Post a Comment