On Friday our high-speed internet connection went haywire. It won't be fixed until Wednesday, so I don't know if I'll have a chance to post or not after this. Right now I'm using my husband's phone which has its own broadband connection. Thanks, honey!
Here's the menu plan for the week:
Sunday
Leftovers
Monday
Hot dogs, hash brown casserole
Tuesday
Cheeseburger rice, lemon pepper broccoli, homemade bread
Wednesday
Pork loin, parsley potatoes, green beans
Thursday
Spaghetti with veggie sauce, cheesy garlic breadsticks
Friday
Make your own pizza
Saturday
Homemade chicken nuggets, fries
For more meal planning inspiration, visit Organizing Junkie's Menu Plan Monday.

Sunday, May 30, 2010

Thursday, May 27, 2010
Make your own puzzles
I've been trying to come up with things to keep my children occupied this summer. I posted a couple of lists here and here if you're interested. Making puzzles was on the list. Here's what to do.
Cut up a cereal box as the backing for your puzzle. Let your children color a picture of their choosing. The Princess chose to color a dinosaur picture. No big surprise there.

Trim off any parts of the picture you don't want in the puzzle, like all that empty white space. Then glue the picture to the gray side of the cardboard from the cereal box. Press down firmly.

I use a Scotch craft stick, but you can use whatever kind of adhesive you desire. Chances are after your child has played with the puzzle a couple of times, you'll have to glue down the edges of each piece again anyway. The pressure from cutting the cardboard apart causes the picture to pull away. That's okay, just use a little more glue.

Trim away the excess cardboard with scissors or a craft knife.
 Now comes the fun part! Cut the puzzle into pieces. Use all sorts of funny angles and shapes. Why is cutting things up so therapeutic for me?

Here's the Princess putting the pieces back together.

The puzzle Mr. Lego did - Bullet Bill from Super Mario Brothers.


A couple of hints and tricks for you - take a picture of the puzzle before you cut it up. Would you like to try to put a puzzle together without knowing what it's supposed to look like? Even though your child knows today what the picture looked like before it was severed into little pieces, he or she might forget by tomorrow!

Keep each puzzle in a separate Ziploc bag and label it. When you print the picture you took of each puzzle, slide it down in the bag with the pieces for future reference.
 We all enjoyed creating these puzzles together. The kids liked exchanging puzzles and seeing if they could put together the other's creation. And it was great fun having Daddy put the puzzles together, too.
You can also use old calendar pages, cards or posters instead of coloring your own pictures. Anything printed on paper can be recycled into a puzzle.
For more money-saving ideas, visit Life as Mom's Frugal Friday blog carnival.
Cut up a cereal box as the backing for your puzzle. Let your children color a picture of their choosing. The Princess chose to color a dinosaur picture. No big surprise there.

Trim off any parts of the picture you don't want in the puzzle, like all that empty white space. Then glue the picture to the gray side of the cardboard from the cereal box. Press down firmly.

I use a Scotch craft stick, but you can use whatever kind of adhesive you desire. Chances are after your child has played with the puzzle a couple of times, you'll have to glue down the edges of each piece again anyway. The pressure from cutting the cardboard apart causes the picture to pull away. That's okay, just use a little more glue.

Trim away the excess cardboard with scissors or a craft knife.
 Now comes the fun part! Cut the puzzle into pieces. Use all sorts of funny angles and shapes. Why is cutting things up so therapeutic for me?
Here's the Princess putting the pieces back together.

The puzzle Mr. Lego did - Bullet Bill from Super Mario Brothers.


A couple of hints and tricks for you - take a picture of the puzzle before you cut it up. Would you like to try to put a puzzle together without knowing what it's supposed to look like? Even though your child knows today what the picture looked like before it was severed into little pieces, he or she might forget by tomorrow!

Keep each puzzle in a separate Ziploc bag and label it. When you print the picture you took of each puzzle, slide it down in the bag with the pieces for future reference.
 We all enjoyed creating these puzzles together. The kids liked exchanging puzzles and seeing if they could put together the other's creation. And it was great fun having Daddy put the puzzles together, too.
You can also use old calendar pages, cards or posters instead of coloring your own pictures. Anything printed on paper can be recycled into a puzzle.
For more money-saving ideas, visit Life as Mom's Frugal Friday blog carnival.
Happy Anniversary, Mom and Dad!
Today my parents celebrate their 44th wedding anniversary! Marital longevity is rare these days, so I feel blessed to have such a great example.
My mother's parents were divorced, long before it was a common occurrence. She grew up in a broken home and determined that her children would never go through the hurt and confusion she did. I learned from her to let go of the little things about my husband that drive me crazy. It's more important to be happy than to be right all the time (which we all know I am, wink, wink).
My dad always made sure we knew how much he loved Mom, so I grew up feeling secure in my family. I know they had their disagreements but they didn't fight in front of us. There was never a time that I doubted their love for each other. I still don't.
Most importantly, both parents taught me to walk with the Lord. Dad still gets up early every morning to read his Bible and pray. Maybe he didn't think I'd notice as I was growing up, but I did. Mom serves others with a glad heart and prays about everything. Before we left the house each morning for school, she prayed with us and asked God to watch over us. What greater blessing can a parent be to a child?
So thanks, Mom and Dad, for being such godly examples to me. Happy Anniversary! I love you both!
P.S. Did you know that the anniversary gift for 44 years is groceries? No kidding.
Wednesday, May 26, 2010
Homemade Seasoned Salt
I've been trying to make things from scratch as much as possible this year. So I thought, why not try my hand at making my own seasoning blends? So I played around with some seasoned salt blends and this is what I came up with.
In a blender or food processor, combine the following:
5 TBSP coarse sea salt
2 TBSP dried parsley flakes
2 1/2 teas paprika
1 teas dry mustard
1 teas dried thyme leaves
1/2 teas garlic powder
1/2 teas curry powder
1/2 teas onion powder
1/2 teas celery seed
1/2 teas dried oregano
1/8 teas dill weed
Blend until all the spices are about the same size particles. Pour into a shaker container and use in any recipe that calls for seasoned salt. I love to sprinkle this on french fries and other potato dishes. It's also very good on pork chops and chicken.
Tuesday, May 25, 2010
Summertime Boredom Busters Part Two
This is the last week before the unofficial start of summer! Memorial Day Weekend is what most people consider the first weekend of summer, especially hotels which jack up their prices for the season. If your kids are like mine, they're going to play, play, play for the first day or two, then come to you with cries of "I'm bored!"
Last week I shared some fun boredom busters to try with them in Part One. Now on to Part Two.
11. Write a letter to Grandma. Or anyone, really. But Grandmas really like that sort of thing, especially if you and your kids live far, far away like we do. This will give them some handwriting and spelling practice, too. Gotta keep those skills sharp!
12. Build a castle out of cardboard. You can find some really cool instructions here. For a simpler version, go here. You use toilet paper, right? Well, here's a great way to use up those cardboard rolls! And give your kids something constructive to do in the process.
13. Make placemats with their artwork and contact paper. Cut two sheets of contact paper a few inches larger than their pictures. Lay their masterpieces face down on one sheet very carefully to avoid wrinkles. Then cover the back with the other sheet of contact paper. Trim around the edges. You can also use this as a playdough mat to stop those pesky little playdough droppings from sticking to your table!
14. Plan a theme party together. This doesn't have to be elaborate. It can be as simple as having a few of their friends over for sandwiches one afternoon. But pick a theme like a bug party or a water party. You could have a baking party and let your guests create cupcakes or something easy. Have your children design invitations to be sent out. Let them plan games and activities that revolve around the chosen theme. Note - this is NOT a birthday party. Oh, no. This is just because. Mainly because you're a cool mom!
15. Publish a family newspaper. Tell your friends and family all the latest news from your children's perspectives. We did this a few weeks ago - it was Mr. Lego's idea. His headline? "Dad fixes sink!" He also drew some pretty interesting stick figure illustrations. What would a newspaper be without the funny pages? Let them draw cartoons or write jokes. Include favorite family recipes, too. The Princess was a little too eager to inform the general public of her brother's misdeeds, so we left the crime report out.
16. Whip up a batch of salt dough and let them create. Here's a basic recipe:
Dissolve 1 cup of salt in 1 1/4 cups water. Stir in 3 cups of flour, one cup at a time, until a nice soft dough forms. Now you have a substance similar to Sculpey clay. You can roll this out and cut into shapes, or you can let them create anything from a bouquet of salty flowers to a zoo full of little animals. You can even make salt dough beads for jewelry! Bake their creations at 200 degrees for about an hour or until dry and hard. Allow to cool, then paint.
17. Design a puzzle. There are two ways to start this project. You can let them color a picture from a coloring book or they can draw and color their own picture. Either way, it's their creation. Once they have their design, cut apart a cereal box and glue the picture to the cardboard. Let them cut the picture into 20-30 pieces. Now they have their own personal puzzle!
18. Maintain a journal. Give each child their own spiral notebook. Once or twice a week, write a question down in the notebook for them to answer. It can be silly like "What kind of super power do you wish you had?" to serious such as "What quality to you admire most about your Dad?" Google "children's journaling prompts" for hundreds of ideas for questions. Even when summer is over, you can incorporate the journal into your weekly routine and let them write down invaluable memories and thoughts about their childhoods.
19. Set up an obstacle course in the backyard. Use chairs, cones, even pool toys to create zig zags, hurdles and race courses. Time each competitor with a stop watch. Then run the courses backwards. Not in reverse. I mean, turn around and run backwards! Reward each athlete with a popsicle or snow cone!
20. Put together an "All About Me" collage. Get a piece of poster board for each child and let them tell about themselves through pictures, drawings, or lists. Include their height and weight, as well as eye color, hair color, how many teeth they have missing, etc. Make lists of their favorite things. Cut pictures out of magazines of their favorite foods. Write the date on the back so you know when they created it. Next year, make another collage. It will be fun to see how much they've grown and changed.
I hope I've given you some inspiration to try new things with your kids this summer. As we do these things, I'll post pictures and tips, too!
If you have an awesome idea for keeping your kids from being bored this summer, please share! Please!
For more helpful tips and hints, visit We are THAT Family's Works for Me Wednesday.
Monday, May 24, 2010
Cookie Dough-topped Brownies
 I love brownies. Probably more than cookies. And I love cookies a lot, so that's saying something!
This recipe combines two of my favorites - brownies and chocolate chip cookie dough. Only this cookie dough has no eggs so there's no need to worry about salmonella. Dig in, baby!
No, really, don't dig in. You won't have enough cookie dough to cover your brownies. Unless you double the cookie dough recipe. But don't tell anyone I told you to do that.
Here's what you need:
A 9x13 pan of brownies, baked and cooled - use your favorite recipe or mix. I use a mix and add chocolate chips to it.

Now on to the good stuff, the cookie dough:
1/2 cup butter, softened
3/4 cup packed brown sugar
3 TBSP milk
1 teas vanilla extract
1 cup flour
1 cup chocolate chips
In a mixing bowl, cream the butter and sugar together until smooth. Add the milk and vanilla extract.

Add the flour and mix well. Stir in the chocolate chips.

Drop the cookie dough onto the brownies by the spoonful. Then carefully spread it over the entire pan. If the brownies are the slightest bit warm, the cookie dough will stick and not want to spread. So make sure your brownies are completely cooled.


Cut into squares, pour yourself a tall glass of ice cold milk and enjoy! If your kitchen is warm like mine, you might want to store these in the fridge so the cookie dough "icing" doesn't melt.
For more yummy recipes, visit Blessed with Grace's Tempt My Tummy Tuesday.
Sunday, May 23, 2010
Menu Plan May 23-29
Well, here we are. The last full week of May. We've finished school for the year and are looking forward to a busy summer. Now that the weather has heated up (we had 95+ temps today. In May.) I'm trying to double up on grilled meals to avoid having a heat stroke in the kitchen.
For instance, on Wednesday we're going to have grilled pizza. While the grill is hot, we'll go ahead and grill the chicken for Thursday's meal. On Friday, we'll use some of the chicken for the Santa Fe Chicken Salad. I've just gotten three meals out of one grill session. How cool is that? At least it will be cooler in the kitchen!
Here's the plan for the week:
Sunday
Pulled pork, tater tots
Monday
Cheese and bean quesadillas, Mexican rice
Tuesday
Sausage veggies calzones, fried potatoes
Wednesday
Grilled pizza
Thursday
Grilled chicken, white bean salad
Friday
Santa Fe Chicken Salad, tortilla chips and bean dip
Saturday
Smoked turkey legs (we're going to a Renaissance festival!)
For more great menu plans, visit Organizing Junkie's Menu Plan Monday. You'll find tons of links and ideas to help your own menu planning.
Friday, May 21, 2010
Warm Bacon Cheese Dip
Whenever we have guests over for dinner, I try to set out an appetizer or two for them to munch on while I put the final touches on the meal. I love this one because I can throw it together in the crock pot and forget about it. Okay, I really don't forget about it. I stir it a couple of times and sneak a taste or two. Aren't you supposed to taste something before you allow your honored guests to eat it?
Here's what you need:
2 pkgs cream cheese (8oz each)
4 cups shredded cheese (I use a mixture of cheddar and jack)
1 cup half and half
2 teas Worchestershire sauce
1 teas dried minced onion
1 teas mustard
10 bacon strips, cooked and diced
Combine the first 6 ingredients in a small crockpot. Cover and set on low for 2 hours or until cheeses are melted. Stir a couple of times. Just before serving, stir in the bacon. Serve warm with crackers or tortilla chips.

This recipe can be easily halved if you're feeding a small crowd.
If you don't keep half and half on hand (which I don't), here's a substitution tip. Melt a tablespoon of butter in a microwaveable measuring cup. Add enough milk to equal one cup. Works great!
Wednesday, May 19, 2010
Encouraging success in your children
Last week I went to a homeschooling conference where Jeannie Fulbright was one of the keynote speakers. I learned so much in her sessions that I wanted to share some of it with you. Much of it is geared toward homeschooling, but many of the principles I learned can be applied to all our of children.
The first session, "Encouraging Success in Your Children," was especially helpful to me. Here's why.
I'm a comparer. That means that deep down I worry my kids aren't measuring up academically with their classroom schooled counterparts. I'm afraid they won't succeed in life because I won't have equipped them properly. This session pretty much shot down all of my doubts and helped me see that God's definition of success is usually much different than most standards of success we see in today's world.
First, what is success? Most people would define success as getting a decent job and making enough money to maintain a certain standard of living. But that's not God's view. God has a purpose for each of our children to fulfill. When they've accomplished that, they are successful in His eyes.
Our job as parents is to cooperate with God by helping them find His purpose. We're not supposed to choose the path for them! It's so easy to fall into the trap of pushing them toward getting a job we think might be good for them. Instead, we need to let God lead them and show them how to be sensitive to His calling.
Here are some practical ways to do that.
1. Nurture their talents and gifts. God gave them those abilities for a reason. Allow them time to pursue their passions. Take the time for music lessons or sports if that's what they're good at. Focus on the mastery of their talents because that's what they'll use in the future to fulfill God's purpose for their lives.
2. Don't focus on their weaknesses. Lovingly work to bring them up to par, but don't spend so much time on their worst subject that they end up feeling like failures. No one has to learn everything before graduating from high school.
3. Adjust your expectations. Just because you loved a certain subject doesn't mean your child will. Don't expect them to be you. What you envision for their future might not be God's vision for them. You may dream of your son becoming a doctor or your daughter becoming an attorney. God might want them to work for a non-profit organization making next to nothing. If that is His design for them, they are successful whether they're bringing in the big bucks or not.
4. Give them the freedom to change directions if necessary. Some children say they know what they want to be when they grow up and never waver from that goal. Others change their minds every week. Right now the Princess wants to be a ballerina, then an ice skater, and later a paleontologist. Make sure your children know you support them as they seek God's will. Pray with them and ask God for guidance. Each step they take is molding them into the person God wants them to be.
5. Most importantly, teach them to walk with God. Academics are important, but it's vital that your children know God. Discuss spiritual truths with them, not just Bible stories they know by heart. Delve into the lessons of those stories. If they're going through a rough time spiritually, set the academics aside until the spiritual battle is won. Their relationship with God is more important than the grade they make on a quiz or test.
Whoa! That last one is tough for me! I don't have time to deal with a bad attitude....we MUST finish our math lesson! How many times have I done that? Gulp!
I know I have a lot to work on to encourage my children to be successful. I want my view of success (and theirs) to be in line with God's view.
Tuesday, May 18, 2010
Summertime Boredom Busters Part One
Summer's nearly upon us and along with it comes the inevitable cries of "Mom! I'm bored!" I mean, here are these kids who've whined about having to study and do schoolwork now wanting me to give them something to do! What's up with that?
I've been compiling a list of activities I'm going to try with my kids - or have already tried - to combat the boredom. Some of them actually will keep their reading and writing skills honed for the summer. Hee hee, they're doing schoolwork without even realizing it! Some of these activities are just for the fun of it. Every child needs memories of summer time fun, even if I do have to prompt them to do it!
So far, I've got twenty different things for the kids to do. I figure we'll do two a week. I'm going to break the list down into more manageable posts, so check back next week for Part Two.
Here's Part One:
1. Make a craft box available. Put paper, glue, scissors, pens, string, crayons, tape, stickers.....anything you can think of that your children can cut or glue. I went through my scrapbook stash and found tons of paper and stickers I haven't used and probably won't. But I know two kids who will! The Princess has already availed herself of the box and created some pretty interesting things. I'm starting to rethink including glitter, though. Here's a tip....check out the Dollar Spot at Target for some cheap supplies. Or the Dollar Store. The sky's the limit with what you can include in the box, and hopefully your child's creativity will soar!
2. Invest in a couple of new board games. One of our favorites is Doodle Dice. We have the standard Clue, Monopoly, Sorry and Dominoes, too. But this summer we're going to try some new ones for variety, such as Apples to Apples and Guess Who. I also want to get Zobmondo. Keep your eye out for games at yard sales and thrift stores, too. If you don't want to spend the money on a new game, have your children invent one.
3. Have a water gun fight. What's summer without getting wet? I know it can be a pain to clean up after dripping wet kids, but it's something they'll remember. Don't stand on the sidelines, either! Grab a gun and start squirting! If you don't have water guns available, try water balloons. And if you really want to live on the edge, plan to ambush Dad when he gets home from work. Only if he's not carrying his laptop or important papers, though.
4. Act out a favorite story. All kids have books they read over and over again. Let them dress up and portray their favorite characters. It's amazing how closely they can recreate the dialogue and actions they love so much in books! Much better then Hollywood! Try to act out your favorite Bible story, too. And don't forget to take pictures!
5. Make ice cream in a bag. We love homemade ice cream around here, but we don't have an ice cream maker. So I found a recipe that all of us could help with. It makes about 1 cup which will serve two people.
Ice Cream in a Bag
1 gallon Ziploc bag
1 quart Ziploc bag
1/4 cup rock salt
1 cup milk
1 teas vanilla
2 TBSP sugar
ice
Pour the milk, vanilla and sugar into the quart bag. Squeeze out as much air as possible, then seal the bag. Make sure it's sealed tight. Place the smaller bag inside the gallon bag. Cover with ice and seal.
Shake, toss, or flip the bag for 10 minutes. You can wrap a dish towel around the bag if it's too cold. You will see the milk start to freeze, but don't stop shaking for at least 10 minutes.
Open the bags and spoon ice cream into cups or bowls.
For chocolate ice cream, omit the vanilla and 1 TBSP of sugar. Add 2 TBSP (or as much as you like!) chocolate syrup. Then shake, shake, shake!
6. Send the kids on scavenger hunts. Go ahead and print out several lists of things for them to find, indoors or out. Make each one a little different. Have them find things like a yellow flower, a paperclip, a quarter from your state, etc. You could modify this to include a picture scavenger hunt. Send them with a digital camera to take photos of certain flowers or people - but only if you feel they're responsible enough to handle the camera! Then you can take the pictures and have them document the fun they had in a scrapbook! Which leads me to my next point....
7. Let them create a scrapbook of favorite memories. Supply them with pictures of your last vacation or Christmas or field trip, anything. Let them create their own scrapbook page to preserve their memories of that special time. Encourage them to write the who, where, when, why and how of the picture somewhere on the page. (See, keep them writing even though they're out of school!)
You could continue this throughout the summer and by the time school starts again, your children will have a keepsake of their childhood. Don't just scrap special occasions, either. Let them have pictures of the family pet, their grandparents, house, whatever might spark their interest.
8. Design a driveway city with sidewalk chalk. Challenge them to draw enough buildings to fill the entire driveway. Then add cars, flowers, trees and even people. I'm sure my daughter will have a castle or two in hers! Just a thought...let them do this in the morning before the sun has a chance to heat the pavement!
9. Plan dinner and help Mom cook it. If you're like me, you have tons of cookbooks and recipe magazines on hand. Give them to your kids and let them pick a recipe or two that they might like. Help them make a grocery list, then take them to the store to shop for ingredients. Not only will they realize how much effort you put into cooking for them, it will give them a sense of accomplishment. And who knows? Maybe they'll try something new and actually like it because they prepared it!
10. Check out "how to draw" books from the library. Then let your children draw, draw, draw. Praise their efforts and display their drawings. Have a family art show to highlight their work. Invite some friends to participate, too.
Hopefully you can save your sanity this summer by offering some fun, new things for your kids to do. I'll have ten more activities to try next week.
For more helpful tips, visit Works for Me Wednesday over at We are THAT Family. You'll find tons of hints to make your life easier!
Monday, May 17, 2010
Homemade No Bake Granola Bars
I found this recipe over at Between the Lines about a month ago and couldn't pass it up! I mean, who wouldn't love to make homemade granola bars that won't heat up the kitchen? Especially when they're this easy!!
Of course, I played around with the recipe a bit and tweaked it to my family's preferences. But thanks to Kel, who inspired me.
Here's what you need for my version:
2 1/2 cups Rice Krispies
2 cups oats
1/4 cup wheat germ
1/2 cup packed brown sugar
1/2 cup honey
1/2 cup peanut butter
Chocolate chips
In a large bowl, combine the cereal, oats and wheat germ.

Stir together the brown sugar and honey in a sauce pan. Heat until just boiling. See the little bubbles around the edges? That's right when you want to take it off the heat.

Stir in the peanut butter and keep stirring until it's melted and smooth.

Pour over the cereal mixture and mix well. You want all the dry ingredients to be well coated so they'll stick together.

Press into a greased 9x13 pan. I use my hands, but you can use a spoon. Keep pressing until the mixture is firmly in place.

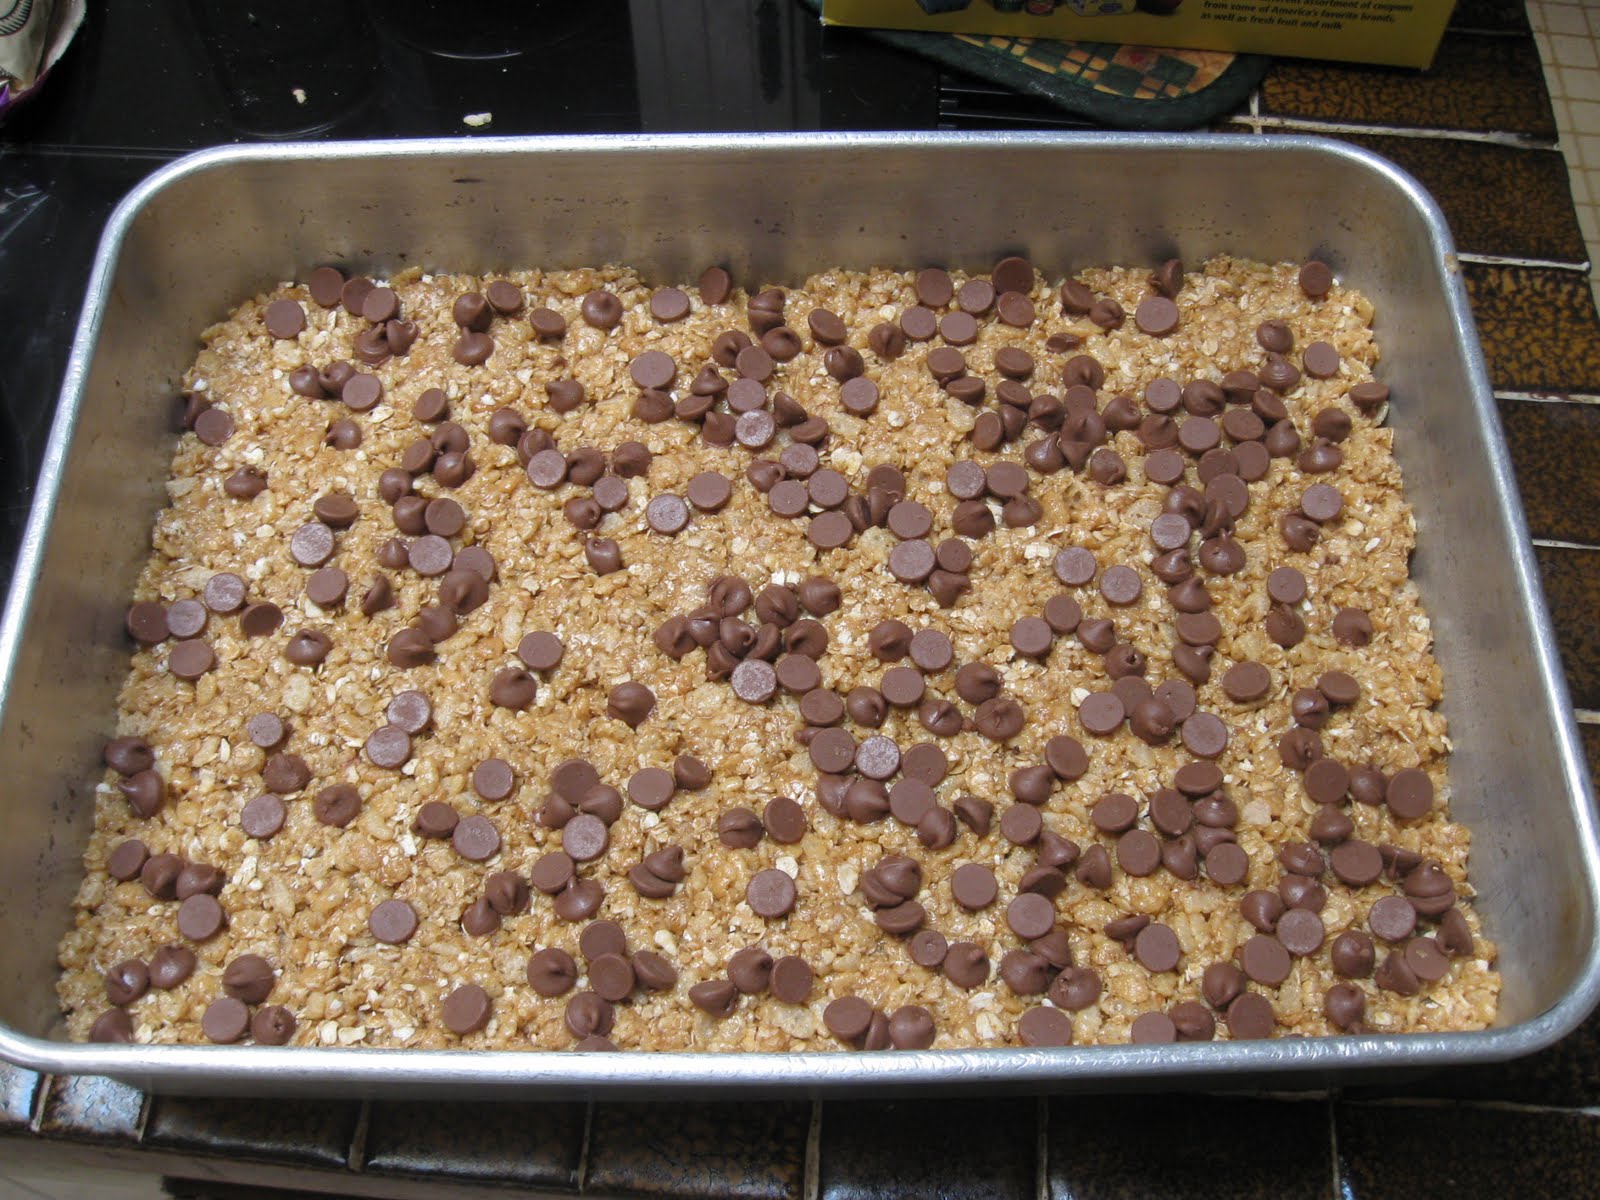
Now sprinkle some chocolate chips over the top and lightly press them into the bars. The mixture might still be warm, so the chips may get a little melty. That's okay. When they cool, it will help them stick.

Allow to cool completely, then cut into bars or squares - whatever you prefer. I cut this batch into bars and put them in snack size baggies to take on a trip. You can store them in the pan, covered, or in a Ziploc bag.

I just adore the chewiness of these bars. No crunching or crumbling! And you can customize them to your own family's likes and dislikes. Just try to keep the ratio of dry ingredients to sticky ingredients the same so you don't end up with bars that fall apart.
This recipe is linked to Blessed with Grace's Tempt My Tummy Tuesday. Head over there to check out some more yummy recipes.
Of course, I played around with the recipe a bit and tweaked it to my family's preferences. But thanks to Kel, who inspired me.
Here's what you need for my version:
2 1/2 cups Rice Krispies
2 cups oats
1/4 cup wheat germ
1/2 cup packed brown sugar
1/2 cup honey
1/2 cup peanut butter
Chocolate chips
In a large bowl, combine the cereal, oats and wheat germ.

Stir together the brown sugar and honey in a sauce pan. Heat until just boiling. See the little bubbles around the edges? That's right when you want to take it off the heat.

Stir in the peanut butter and keep stirring until it's melted and smooth.

Pour over the cereal mixture and mix well. You want all the dry ingredients to be well coated so they'll stick together.

Press into a greased 9x13 pan. I use my hands, but you can use a spoon. Keep pressing until the mixture is firmly in place.

Now sprinkle some chocolate chips over the top and lightly press them into the bars. The mixture might still be warm, so the chips may get a little melty. That's okay. When they cool, it will help them stick.
Allow to cool completely, then cut into bars or squares - whatever you prefer. I cut this batch into bars and put them in snack size baggies to take on a trip. You can store them in the pan, covered, or in a Ziploc bag.

I just adore the chewiness of these bars. No crunching or crumbling! And you can customize them to your own family's likes and dislikes. Just try to keep the ratio of dry ingredients to sticky ingredients the same so you don't end up with bars that fall apart.
This recipe is linked to Blessed with Grace's Tempt My Tummy Tuesday. Head over there to check out some more yummy recipes.
Sunday, May 16, 2010
Menu Plan - May 16-22
Last week flew by, probably because I was getting ready for the CHEF Homeschool Convention. I had a wonderful time and will post more about it later this week. One of the highlights was the great food served by the camp staff. Although I love to cook, it was nice to take a break!
Now on to this week's menu:
Sunday
Taco soup, quesadillas (a fundraising dinner at church)
Monday
Tori no kara-age, fries
Tuesday
Rice and bean burritos, tortilla chips, salsa
Wednesday
Grilled burgers and brats, macaroni and cheese
Thursday
Pulled pork on soft sandwich rolls, green beans
Friday
Crockpot pizza, cheesy garlic breadsticks
Saturday
Leftover buffet
For more meal planning inspiration, visit Organizing Junkie's Menu Plan Monday. You'll find hundreds of recipes links and ideas that will kick start your own menu planning.
Friday, May 14, 2010
Off to the CHEF Convention
The Christian Home Educators Fellowship of Alabama is hosting its annual convention this weekend at beautiful Camp Sumatanga in central Alabama, and I'm on my way there!
One of the keynote speakers is Jeannie Fulbright of Apologia. I'm really looking forward to hearing her speak.
And I'm taking some of these homemade granola bars with me. I'll post a recipe when I get back!

Have a great weekend!
One of the keynote speakers is Jeannie Fulbright of Apologia. I'm really looking forward to hearing her speak.
And I'm taking some of these homemade granola bars with me. I'll post a recipe when I get back!

Have a great weekend!
Thursday, May 13, 2010
Crispy Chocolate Clusters
Here's another quick, no-bake treat for you with loads of chocolate and peanutty goodness! Unfortunately, I forgot to take pictures until I was completely done. I guess I was focused on getting these yummy little morsels made so I could eat them! The combination of sweet and salty is delicious, but I also really, really like the crispiness and crunchiness, too!
Here's what you need:
1 cup chocolate chips
1 cup peanut butter chips
1 cup Rice Krispie cereal
1 cup salted peanuts
In a microwave-safe bowl, melt the chocolate chips and peanut butter chips together. You could also do this step on the stove top in a pan if you want. Stir together until smooth. Add the cereal and the peanuts. Stir to coat well.
Drop by tablespoonfuls onto cookie sheets lined with wax paper. Put in the fridge for about 15 minutes until set. Then enjoy!

Just a note, these will get melty in your hands, so eat them quickly. Like that will be a problem! Also, they'll keep fine in an airtight container on the counter, but if your kitchen is hot like mine is, you might want to store them in the fridge.
Wednesday, May 12, 2010
Works for Me Wednesday - Homemade Brown Sugar
Have you ever decided to bake cookies and assumed you had the brown sugar you needed but didn't? I know I have - countless times. Instead of making a mad dash to the store for brown sugar, why not make your own?
All you need is white sugar and molasses. After all, molasses is a byproduct of making sugar. You're just going to add it back in.
You'll need one tablespoon of molasses for every cup of white sugar.

Start mixing together with a fork. It will clump up at first, but keeping mixing.

Almost there! Try to make sure every white crystal is coated and no clumps remain.

And now you have homemade brown sugar! It tastes just like store bought (only fresher) and you can use it just the same. The whole process takes about five minutes - a lot less time than it takes to run to the store!

For more helpful tips, visit We are THAT Family's Works for Me Wednesday.
Monday, May 10, 2010
Chocolate Mint Freeze
The weather is heating up and I'm starting to dread turning on the oven. We have this huge skylight in our kitchen, and while I love the light it allows in, the heat is something else! We're looking for a shade to fit across the inside to help keep out the heat. This skylight is the reason for the funky shadows and lighting in some of my food pics. Yeah, I blame it on the skylight!

So I've been searching for some sweets to share that don't require heating up the kitchen. And if you've been looking for a cool, refreshing treat to serve when the summer's heat gets to be too much, look no further. This is a creamy blend of chocolate and mint that will cool you (and your kitchen) down in no time.
Here's what you need:
1 1/2 cups cold milk
1 pkg instant chocolate pudding (4-serving size)
1 cup heavy whipping cream
1/4 teas peppermint extract
In a large bowl, whisk the milk and pudding mix together for 2 minutes. Let stand for 2 minutes or until soft set.

While the pudding is setting up, beat the whipping cream until it begins to thicken. Remember my tip for the best whipped cream! Add the peppermint extract and beat until soft peaks form. Fold into the pudding.

Spread the mixture into a greased 8x8 pan and cover with plastic wrap. Freeze for at least 2 hours.

Remove from the freezer 15 minutes before serving. Cut into 9 squares.

This is so good! It's not the same texture as ice cream. It's more like a fudgesicle on a plate. With just a hint of mint, enough to make it seem colder than it is. Perfect for a warm summer evening!
For more yummy recipes, visit Blessed with Grace's Tempt My Tummy Tuesday!
Sunday, May 9, 2010
Grilled Asparagus with Bacon
I've never been a huge fan of asparagus, but I saw a Food Network show that combined asparagus with bacon and decided I had to try it. I think it was the Neeleys' show. And according to them, bacon makes everything better! In this case, I agree.
Here's what you need:
20 fresh asparagus spears
10 slices of bacon
olive oil
salt and pepper to taste
First, trim the asparagus. Try to get the spears about the same length.

Place on a baking sheet and drizzle with olive oil. Sprinkle with salt and pepper.

Cut the bacon in half and wrap a strip around each asparagus spear. The recipe said to skewer them together, one skewer through the top and one through the bottom.

This took forever, so after 10 asparagus spears I just decided to throw the rest in a grill basket and see how they turned out! Okay, I didn't throw them, I place them neatly side by side.

Grill over medium heat for 15 minutes or until the bacon is crisp. If you're using the skewers, turn once. The ones in the grill basket couldn't be turned without losing the bacon, so we didn't turn them. And they turned out just fine. We did leave them on the grill a little longer, though. Maybe a couple of minutes. Here are the skewered ones along side the chicken. Yum!

Menu Plan - May 9-15
I hope you had a lovely Mother's Day! We did our traditional take out from Olive Garden. Hubby calls our order in before we leave church, then we pick it up on our way home. Today we had to wait for a few minutes, but it beats the 1-hour 45-minute wait for a table at the restaurant.
This week will be busy, as always. I'm going to our state's homeschool convention on Friday and Saturday with my friend Suzanne. Charles and the kids will have to fend for themselves while I'm gone. Should be interesting!
Here's the plan:
Sunday
Olive Garden take out
Monday
Chicken stir-fry, rice
Tuesday
Pasta with veggie sauce, garlic bread
Wednesday
Steak kabobs, white bean salad
Thursday
Sushi, vegetable tempura (I'll use this batter but with veggies)
Friday
Homeschool convention
Saturday
Homeschool convention
For more yummy menu plan ideas, head over to Organizing Junkie's Menu Plan Monday.
Also, take a look at my SpellQuizzer giveaway. It ends today!
Saturday, May 8, 2010
Happy Mother's Day!
To all my bloggy friends who are moms, I want to wish you a Happy Mother's Day!
To my own mom, thanks for always being there for me. You're the best! Happy Mother's Day!
Lord, thank You for letting me be a mom. I love the gifts You gave me.

To my own mom, thanks for always being there for me. You're the best! Happy Mother's Day!
Lord, thank You for letting me be a mom. I love the gifts You gave me.

Thursday, May 6, 2010
Have you read the last chapter?
Okay, I admit it. I'm a last chapter reader. If I get bogged down in a book and it starts to lose my interest, I'll flip to the last chapter and see if it's worth my time to continue. I know, some avid readers are horrified by the very thought, but I need to know I'm not wasting my precious reading time (precious because there's so very little of it!) with a substandard or bad book.
That's a lot like my life. I look around at the world today and sometimes wonder, "What's the point? Good is called evil and evil good. Why try to take a stand for the Lord? It's not going to matter anyway!"
But it does matter. You want to know how I know? I've read the last chapter!!!
Good does triumph over evil! No matter how discouraged I may be now, as a Christian I'm on the winning side. God still reigns and will forever. Satan knows his days are numbered, so it's no wonder that he's working overtime to ruin lives and take as many people with him as he can.
That's why it is important to stand firm and not give up. That's why I need to do what I can to bring people to Jesus. So they can be on the winning side, too.
How about you? Have you read the last chapter? Are you on the winning side?
Wednesday, May 5, 2010
Works for Me Wednesday Backwards Edition
Every week Kristen at We are THAT Family hosts a meme "Works for Me Wednesday." Readers share tips that help make their lives easier, and I've learned a great deal of helpful things from them.
This week, the theme is asking for tips from our readers. So I need to know - what are your best tips are for taking care of cast iron cookware? I've never used cast iron until recently (I got a skillet with my birthday money!) and I want to be sure I don't ruin it. I know to wash and dry it thoroughly, but anything else?
Thanks a bunch!
To see if you can help other moms who need a tip or to ask for a tip yourself, visit Works for Me Wednesday.
Tuesday, May 4, 2010
SpellQuizzer Review and Giveaway!
If you were to ask my children what their least favorite subjects in school were, spelling would be one of them. Neither of them like to learn how to spell words. In fact, when they're writing, they'll often ask me how to spell a word they just learned LAST WEEK! Talk about frustrating!
Well, SpellQuizzer is here to help me and other parents out! This is an easy to use spelling software program designed to help children learn their spelling and vocabulary words while reducing tears and frustration. And it works with any spelling curriculum so you simply add it as a helpful tool to whatever you already have.
Here's how simple it is. You input your child's spelling words into the program. Using an inexpensive microphone, record a pronunciation of the word, along with a sample sentence. The child is then asked to type the word. If he does so correctly, he moves on to the next word. If he spells the word incorrectly, a box pops up with the correct spelling and then he moves on. He will have the opportunity to spell the word correctly at the end of the quiz. If he gets all of the words right the first time, a box will pop up and the crowds will cheer! Seriously, there's a cheering sound effect that my kids LOVED!
If you don't have a microphone, you can also type in a clue phrase so the child knows which word he is to spell. But as cheap as the microphones are, it's worth the investment. Plus, I like recording funny little sentences to make my kids laugh!
SpellQuizzer offers a video demo that can better show you how the program works. I'm a visual person, so this was extremely helpful to me. I think you'll find the video demo does a great job of walking you through the program instead of me typing out step-by-step instructions.
If you like what you see in the demo, SpellQuizzer offers a free 30-day trial. This will give you an opportunity to try it out with your kids and see how it works. Honestly, I think you'll be amazed at how much your child will benefit from this program. Mr. Lego declared it to be "Excellent, Mom!"
SpellQuizzer has several other helpful features, too. For instance, there are premade spelling lists you can download such as holiday words, commonly misspelled words and spelling bee practice words. You can import and export spelling lists to share with other users. And while your children are practicing their spelling, they're also learning computer and typing skills! Not only that, but they're able to do this independently and can practice whenever they want. If your kids are anything like mine, they want computer time OFTEN!
Thanks to the generosity of SpellQuizzer, I'm going to give away a copy of this program to one of my lucky readers! Remember, you don't have to be a homeschool parent to use this. Any child at any age can benefit from SpellQuizzer!
To enter, simply leave a comment on this post. The giveaway ends on Monday, May 10 at 11:59pm. I'll randomly draw a winner on Tuesday, May 11.
Good luck!
Homemade Cream of Mushroom Soup
Years ago I found a recipe for homemade cream of mushroom soup and thought, "Hey, I should try that!" I just never got around to it. Besides, who can beat the convenience of soup in a can? Then I started noticing prices creeping up. And up. Not to mention the long list of unpronounceable ingredients in each serving!
So I took the plunge and tried to make it myself. It turned out thick and creamy, just like I wanted. And best of all, it can be made a few days ahead of time.
This is where menu planning comes in handy. I looked at my weekly menu and saw that I would need cream of mushroom in a recipe. So while I had a few minutes (and it only takes a few), I whipped some up and put in the fridge to use later in the week. Also, if you have mushrooms that need to get used up, make this soup and freeze it for when you need it.
Here's what you need:
2 TBSP butter
2 TBSP finely chopped mushrooms
2 TBSP flour
1 cup milk
1/2 teas salt (more or less to your taste)
dash of pepper
In a saucepan, melt the butter over medium. Add the mushrooms and saute for a couple of minutes until tender.

Add the flour, one tablespoon at a time, and whisk together. Keep stirring so the mixture doesn't burn.

When the mixture starts to bubble, gradually add milk. Keep stirring until the flour and butter mixture is incorporated.

Reduce the heat and continue stirring slowly. You will see the soup start to thicken. When it starts to bubble, cook for one more minute.

Remove from the heat and stir in the salt and pepper. Use immediately or allow to cool, then store in the fridge. This recipe will replace one can of soup.
See how easy that was? You can also use this basic recipe for other "cream of" soups. To make cream of chicken, use cooked chicken in place of the mushrooms and substitute 1/2 cup chicken broth for 1/2 of the milk. For cream of celery, use 2 TBSP chopped celery and a little veggie broth. And if you want gluten-free, replace the flour with gluten-free flour.
Sunday, May 2, 2010
Gyros
The first time I had a gyro (pronounced year-o) was on my honeymoon in Washington, DC. Hubby took me to the Old Post Office Pavilion to eat and climb the clock tower for a fantastic view of the city. If you're ever in DC, stop by and explore this cool historic attraction.
It wasn't until much later that I thought about making my own gyros. I searched the internet for recipes and found a few that were doable. Hey, when I have to raise and slaughter my own lamb, that's a little out of my doable range. After testing a few recipes, I came up with my own version that is pretty tasty.
Side note - do not take your small animal-loving daughter with you to the grocery store when you have to ask the meat counter guy for a pound of ground lamb. It leads to all sorts of unpleasant questions and declarations of vegetarianism on the part of said daughter. Don't say I didn't warn you.
For the sauce:
1/2 cucumber, peeled and seeded
1 container (6 oz) plain Greek yogurt (I used Chobani)
2 teas lemon juice
1 TBSP minced fresh mint leaves
dash of salt
Anyway, start by making the tzatziki sauce so the flavors have a chance to blend. Place the cucumber in a small food processor and pulse until finely chopped. Squeeze as much liquid out as you can with paper towels.

Place in a small bowl and add remaining ingredients. Cover and place in the fridge.

For the gyro meat:
1 lb ground lamb
1 lb ground turkey
1 TBSP minced onion
2 teas dried oregano
2 teas minced garlic
1 teas dried thyme
1/2 teas salt
Additional toppings : feta cheese, tomatoes, lettuce
In a large bowl, mix the meat and seasonings. Shape into a loaf and place in a greased crockpot.
 Cover and cook on low for 6 hours or until cooked all the way through. It smells so yummy while it cooks! Carefully remove from the crockpot (I use 2 spatulas and it works just fine) and let sit for 15 minutes. Cut into slices of desired thickness.

Slather a piece of flatbread or a pita with the tzatziki sauce. Add a slice or two of gyro meat, tomatoes, and feta cheese. You can also use lettuce too.

The meat is juicy and drips so eat over a plate! And while I'll always have fond memories of the Old Post Office gyro place, these homemade ones are much, much better!
It wasn't until much later that I thought about making my own gyros. I searched the internet for recipes and found a few that were doable. Hey, when I have to raise and slaughter my own lamb, that's a little out of my doable range. After testing a few recipes, I came up with my own version that is pretty tasty.
Side note - do not take your small animal-loving daughter with you to the grocery store when you have to ask the meat counter guy for a pound of ground lamb. It leads to all sorts of unpleasant questions and declarations of vegetarianism on the part of said daughter. Don't say I didn't warn you.
For the sauce:
1/2 cucumber, peeled and seeded
1 container (6 oz) plain Greek yogurt (I used Chobani)
2 teas lemon juice
1 TBSP minced fresh mint leaves
dash of salt
Anyway, start by making the tzatziki sauce so the flavors have a chance to blend. Place the cucumber in a small food processor and pulse until finely chopped. Squeeze as much liquid out as you can with paper towels.

Place in a small bowl and add remaining ingredients. Cover and place in the fridge.

For the gyro meat:
1 lb ground lamb
1 lb ground turkey
1 TBSP minced onion
2 teas dried oregano
2 teas minced garlic
1 teas dried thyme
1/2 teas salt
Additional toppings : feta cheese, tomatoes, lettuce
In a large bowl, mix the meat and seasonings. Shape into a loaf and place in a greased crockpot.
 Cover and cook on low for 6 hours or until cooked all the way through. It smells so yummy while it cooks! Carefully remove from the crockpot (I use 2 spatulas and it works just fine) and let sit for 15 minutes. Cut into slices of desired thickness.
Slather a piece of flatbread or a pita with the tzatziki sauce. Add a slice or two of gyro meat, tomatoes, and feta cheese. You can also use lettuce too.

The meat is juicy and drips so eat over a plate! And while I'll always have fond memories of the Old Post Office gyro place, these homemade ones are much, much better!
Subscribe to:
Posts (Atom)