I've joined the children's ministry at our church and we're gearing up to start a new year. In the process, the leaders are receiving some training and evaluating our own spiritual lives so we can better minister to these kids. I'm seeing areas that I need to change and ways I can draw closer to God.
When I was growing up, my church put a great deal of emphasis on the outward appearance. Girls didn't wear pants, boys had to have short hair, no shorts for either group. And so I watched as people who conformed outwardly were patted on the back by the church leadership, knowing that they were as rebellious as the non-conformists. I also watched many people who wanted to serve the Lord turned away because they didn't hold the same dress standards. Spirituality was measured by how one looked and dressed, not by a person's love for Jesus. It was discouraging for many young believers, to say the least.
I'm determined that in my own children, I will do my best to foster a love for God, knowing that is the first and great commandment. Do I want them to abide by our family's rules? Yes. But I want them to do it because they love the Lord and want to honor Him, not because they want to "perform" for us. I want them to look and act like Christians, of course. But more important than their outward appearance, I want God to have their hearts. The rest will fall into place as the Holy Spirit leads them.
And so I want to carry that over to our children's ministry. We're going to emphasize heart knowledge and not just head knowledge of Jesus. We're going to teach the young ladies to be modest and feminine. We're going to help the boys become gentlemen. We want them all to live their lives to the glory of God. But we're going to do it from the inside out.
Thursday, July 29, 2010

Tuesday, July 27, 2010
Mixbook.com Works for Me!

I love to scrapbook. I really do. But it takes a great deal of time, creativity (which I lack), and supplies. After our family's first trip to Disney World in 2007, it took me nearly two years to create two books. I barely finished in time for our trip in October of last year.
So I decided this time I'd use an online photo book maker like Shutterfly or Snapfish. But as I looked over their background options, I wasn't really happy with what I saw. I wanted a more "scrapbooky" look.
And I found it with Mixbook.com. They have several themes and layouts to choose from. I love that I can fit multiple pictures on a page, something that would be hard to do the old-fashioned way with paper and pictures.

Mixbook offers digital elements to enhance your pages, too. This gives them a more scrapbooky feel.

Don't you just love my new word - scrapbooky?
Anyway, the Disney book I created was 20 pages, about the same amount I'd use in a scrapbook album. I chose an 8x8 format, but there are other sizes such as 12x12 and 8 1/2 x11. My book cost about $30 with shipping, which is cheaper than I could buy an album, papers, and embellishments for the same size book. I saved hours and hours in putting it together. And the memories contained in the Mixbook are no less memorable because I didn't scrap them myself.
Will I give up paper scrapbooking all together? Probably not until I use up my stash of supplies. In the meantime, Mixbook.com works for me!
For more helpful tips, visit We are THAT Family's Works for Me Wednesday.
Mexican Dip
I found this recipe last week over at my friend Wendy's blog, Faith's Firm Foundation. I knew I had to try it, especially since we were expecting company and I needed a quick munchie to have on hand.
I tweaked the recipe a bit based on what I had on hand, and my guests devoured it! This was all that was left.

Here's what I used:
1 (8oz) pkg cream cheese, room temperature
1/2 cup sour cream
1 TBSP taco seasoning
1 cup salsa (I used Newman's Own)
1 can black beans, drained and rinsed
2 green onions, thinly sliced
2 cups shredded cheddar cheese
In a bowl, beat the cream cheese until smooth. Combine with the sour cream and taco seasoning. Then stir in the remaining ingredients and refrigerate until serving. How simple is that?
I served mine with Fritos Scoops and regular tortilla chips. This would also make an excellent spread for quesadillas or a tortilla roll-up. You could add lettuce and olives like Wendy does in hers. And if you like some spice, use a hot salsa. Make this dip your own. But just go make it! You'll love it!
Sunday, July 25, 2010
Menu Plan July 25-31
It's the last week of July! The last week! And it's been hot. The last four days we've been under a heat advisory with temps reaching 100 with heat indexes of 110. Ugghh! I just melt in this kind of weather.
So I'm trying to stay cool in the kitchen. We bought a little oscillating fan that I keep on the counter by the stove. That little thing's been a HUGE blessing, keeping me cool while I cook. I've had to resort to keeping my stash of mini Reese cups in the fridge so they don't melt! Ha ha!
Here's the somewhat cool menu plan for the week.
Sunday
Sausage veggie calzones (didn't get to this last week)
Monday
Grilled burgers and brats, hash brown casserole, orzo salad
Tuesday
Baked egg rolls
Wednesday
Homemade chicken nuggets, fries
Thursday
Pasta with veggie sauce
Friday
Taco soup, homemade bread
Saturday
Chicken strips, mashed potatoes, green beans
For more meal planning ideas, head over to Organizing Junkie's Menu Plan Monday. You'll find tons of inspiring menus and recipes to jumpstart your own meal plans. Have a great week!
Saturday, July 24, 2010
Baked Egg Rolls
I love to make Chinese food at home. But I wanted to try baking egg rolls instead of frying them. Who needs the extra calories from frying anyway?
Here's what you need:
1 lb ground pork, cooked and drained
1 pkg cole slaw mix
2 TBSP soy sauce
1/4 teas ground ginger
1/4 teas garlic powder
1/4 teas salt
1 pkg egg roll wrappers (you'll find these in the produce section of your grocery stores)

Combine the cooked pork and cole slaw mix in a pan and cook until the cabbage in the slaw mix is softened. Add the soy sauce and spices and stir well.

Remove the wrappers from the package and fill one at a time. They dry out easily, so keep them covered until you're ready to use them. Place the wrapper in front of you so it looks like a diamond. Arrange about 2 TBSP of filling across the widest part of the diamond.

Fold the sides and bottom to cover the filling. It will look like an envelope. Wet the edges with a little water so they stick together.

Now start at the bottom and roll up tightly. Add a little more water around the edges if necessary.

Place on a greased baking sheet seam side down. Repeat with the remaining wrappers and filling. I think the package has 20 wrappers and I only used 14. If you used less filling in each egg roll, you could probably stretch it to make all 20.

Brush the tops of each roll with a little olive oil. Bake at 375 degrees for 10 minutes. Then flip over and bake an additional 10 minutes or until the egg rolls have reached desired level of crispiness.

The kids devoured these! They were just the right mix of meat and veggies. You could, of course, leave out the meat and add in more cole slaw or carrots to make a vegetarian egg roll. Or you could swap out the ground pork for shrimp or chicken. The possibilities are endless. And no calories from frying!
 For an easy sweet and sour dipping sauce, combine 1/2 cup vinegar with 1/3 cup sugar in a small sauce pan. Whisk in 1 TBSP soy sauce, 3 TBSP ketchup and 1/2 teaspoon garlic powder. Bring to a boil, then simmer for a couple of minutes until thickened.

Update for freezing instructions: If you want to freeze these for later, follow the directions up until baking. Lay the egg rolls on a pan lined with waxed or parchment paper and flash freeze for a couple of hours until solid. Then place in a freezer bag and squeeze out as much as air as possible. When ready to serve, pull out as many egg rolls as you need and place on a baking sheet. Allow to thaw on the counter for about 10 minutes, then brush with oil and bake as directed.
Here's what you need:
1 lb ground pork, cooked and drained
1 pkg cole slaw mix
2 TBSP soy sauce
1/4 teas ground ginger
1/4 teas garlic powder
1/4 teas salt
1 pkg egg roll wrappers (you'll find these in the produce section of your grocery stores)

Combine the cooked pork and cole slaw mix in a pan and cook until the cabbage in the slaw mix is softened. Add the soy sauce and spices and stir well.

Remove the wrappers from the package and fill one at a time. They dry out easily, so keep them covered until you're ready to use them. Place the wrapper in front of you so it looks like a diamond. Arrange about 2 TBSP of filling across the widest part of the diamond.

Fold the sides and bottom to cover the filling. It will look like an envelope. Wet the edges with a little water so they stick together.

Now start at the bottom and roll up tightly. Add a little more water around the edges if necessary.

Place on a greased baking sheet seam side down. Repeat with the remaining wrappers and filling. I think the package has 20 wrappers and I only used 14. If you used less filling in each egg roll, you could probably stretch it to make all 20.

Brush the tops of each roll with a little olive oil. Bake at 375 degrees for 10 minutes. Then flip over and bake an additional 10 minutes or until the egg rolls have reached desired level of crispiness.

The kids devoured these! They were just the right mix of meat and veggies. You could, of course, leave out the meat and add in more cole slaw or carrots to make a vegetarian egg roll. Or you could swap out the ground pork for shrimp or chicken. The possibilities are endless. And no calories from frying!


Update for freezing instructions: If you want to freeze these for later, follow the directions up until baking. Lay the egg rolls on a pan lined with waxed or parchment paper and flash freeze for a couple of hours until solid. Then place in a freezer bag and squeeze out as much as air as possible. When ready to serve, pull out as many egg rolls as you need and place on a baking sheet. Allow to thaw on the counter for about 10 minutes, then brush with oil and bake as directed.
Friday, July 23, 2010
New Look! And a Giveaway!
So, I've got a new look around here. What do you think?
I adore it! The colors, the graphics, the button! I love it all!
It was created for me by Lisa of My Trendy Blogs. She was simply a dream to work with! She captured my personality and vision for this blog perfectly. In honor of her wedding anniversary coming up, Lisa is giving away a FREE blog makeover. Whoo hoo!
Head over to My Trendy Blogs and enter the giveaway by leaving a comment. You can receive extra entries by blogging, tweeting or Facebooking about the giveaway, too.
Thank you, Lisa, for your hard work and creativity! This has been a pleasant experience from start to finish. May God bless your all of your endeavors!
Tuesday, July 20, 2010
Helpful Hint - Filling Ziploc Bags
I don't know about you, but when I'm putting liquids or messy ingredients into a Ziploc bag, I can't help but get it all over me. For instance, I make my own chicken broth and ladle it into bags to freeze. No matter how careful I am, it splashes everywhere! And freezing homemade pizza sauce? Let's not even go there.
It seems I don't have the coordination to hold the bag open and upright without letting the contents spill out while putting more contents in. Does anyone?
But I found a solution! And it was so simple, I almost smacked myself upside the head and said "Duh!"
Place the Ziploc bag (quart size) into a wide-mouthed glass jar with the top of the bag hanging over the edges. Screw the metal ring over the bag and start filling! How easy is that?
 The wide-mouthed jar makes it so easy to ladle, scoop or pour right into the bag. And the ring keeps the bag open without me having to hold on to it! Above is a picture of funnel cake batter I put into a Ziploc so I could squeeze it out into a frying pan. It was so messy trying to get it in the bag until I did it this way. Now there's no mess!
For more helpful hints, head over to We are THAT Family's Works for Me Wednesday.
Monday, July 19, 2010
Lemon Berry Cream Pie
Lemon and blueberry is quickly becoming one of my favorite flavor combinations lately. My local store has had blueberries on sale for cheap the past few weeks, so I've been buying them like crazy and freezing some for later. Now that I have them, I need to use them. This creamy pie is just the ticket!
Here's what you need:
1 pie crust, already baked (I used a graham cracker crust instead)
8 oz. cream cheese, softened
1 can (14 oz) sweetened condensed milk
3/4 cup cold water
1 pkg. instant lemon pudding mix
1 cup heavy whipping cream, whipped
1 cup fresh blueberries
In a large bowl, beat the cream cheese until smooth. Add the condensed milk, water and pudding mix. Beat until thickened. Fold in the whipped cream.
Spread half the lemon mixture in the pie crust. Top with blueberries. Carefully spread the remaining lemon mixture over the berries. Refrigerate until ready to serve. Garnish with additional blueberries if desired.

For more delicious recipes, visit Blessed with Grace's Tempt My Tummy Tuesday.
Sunday, July 18, 2010
Menu Plan July 18-24
This weekend we got rain! Yay! Bad news for hubby who needs to mow the grass, but great news for the garden and those of us who were wilting in the heat! This week we'll be having some overnight visitors, so I'm breaking out my crockpot and letting it do some of the work for me.
Here's the plan:
Sunday
Grilled chicken sandwiches, hash browns
Monday
Lentil rice burritos, corn
Tuesday
Grilled hamburgers, fries
Wednesday
Pulled pork sandwiches, roasted potatoes, peach berry cobbler
Thursday
Skillet lasagna, cheesy garlic breadsticks
Friday
Sausage veggie calzones, chips
Saturday
Deep dish pizza
For more inspiring menu plan ideas, visit Organizing Junkie's Menu Plan Monday.
Thursday, July 15, 2010
Sloppy Joes
Let me just say straight up that I've never been a fan of sloppy joes. Mainly because they're sloppy. And the juice from the meat turns the buns into soggy messes. I do not like soggy buns. My husband always has a good laugh over that when I say it. "She doesn't like soggy buns....ha, ha, ha!"
So in all of our married life I've never made sloppy joes. If I didn't like them, why make them? Well, I recently learned that Charles loves sloppy joes. And he wanted some. Oh dear, what's a good wife to do?
Well, she makes sloppy joes and hopes her kids don't like them either! Ha ha! Unfortunately for me, the kids loved them and ate two apiece. Great. I made them from scratch - no Manwich in this house! - and they really turned out well. I learned that if I toast my buns before slathering on the sloppy joe filling, the buns don't get soggy. Not if I eat them quickly.
Here's what you'll need:
1/2 onion, diced
1/2 green pepper, finely diced
1 lb ground beef
1 8oz can tomato sauce
2 TBSP ketchup
1 teas chili powder
1 teas garlic powder
1/2 teas cumin
1/2 teas salt
1/4 teas pepper
In a skillet, cook the ground beef, onions and green pepper. Drain well. Add the remaining ingredients and mix well. Heat through, then served on toasted buns.

You can use ground turkey in place of the ground beef, but add a little water because ground turkey tends to be drier.
Wednesday, July 14, 2010
Chocolate Banana Pops
It's been hot here in the Deep South. Really hot. So cool treats from the freezer are nice to keep on hand. And here's a recipe you'll love because it's so simple and yummy.
Here's what you need:
4 firm bananas, sliced in half width-wise
8 popsicle stickes
6 oz chocolate chips (that's half a bag)
1/3 cup peanut butter
Sprinkles
Insert the popsicle sticks into the bananas. Melt the chocolate chips and stir in the peanut butter until smooth. Using a spoon, spread the chocolate mixture over the bananas and roll the sprinkles. Place on a waxed paper lined cookie sheet.

Freeze for about an hour, then remove from the tray and place in a freezer bag. Now you can grab them and go! These don't last very long around here.

You can use chopped peanuts or crushed granola instead of sprinkles. Whatever suits your fancy.
Monday, July 12, 2010
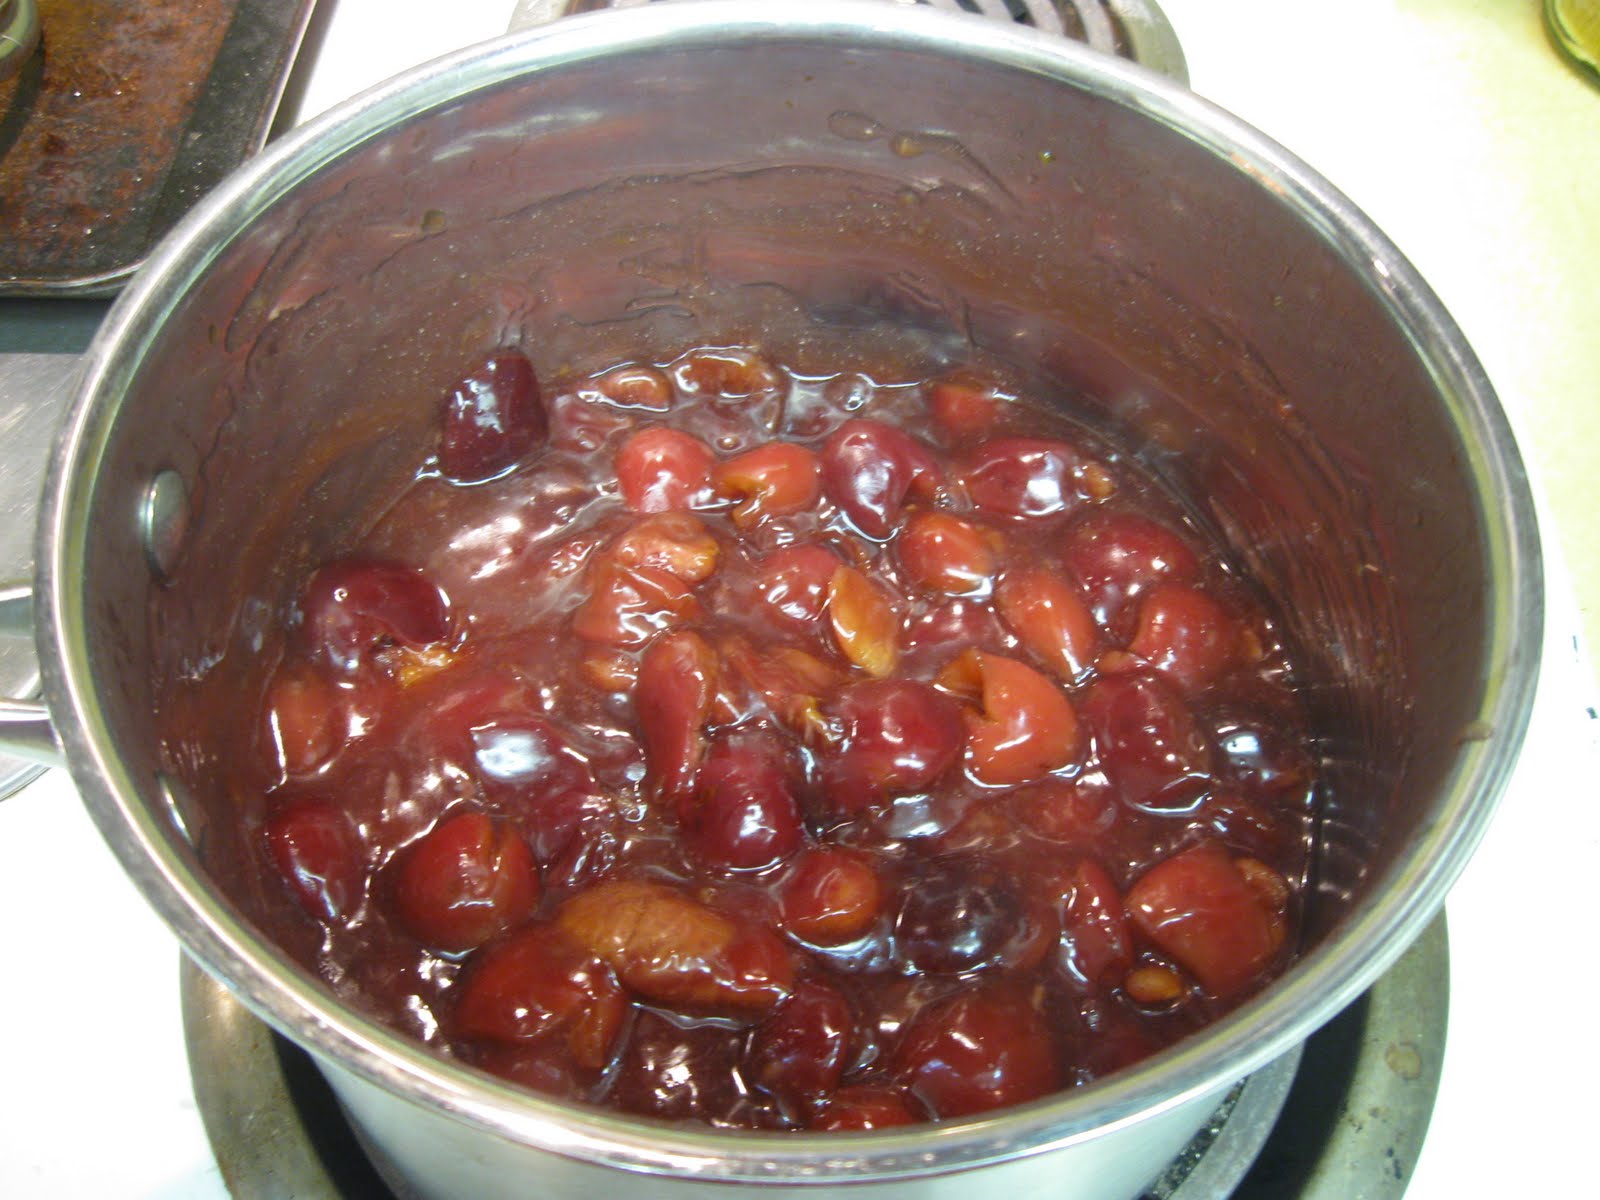
Homemade Cherry Pie Filling
If you're looking for a not-too-sweet cherry pie filling, look no further. I made this pie filling over the weekend and the family loved it! It's so simple, too. The hardest part was pitting the cherries. I don't have a cherry pitter. I just use the tip of my vegetable peeler to dig the pit out. Once the cherries are pitted, it's easy as, well, pie.
Here's what you need for a 9-inch pie:
4 cups pitted cherries
1 cup water
1 cup sugar
1/4 cup cornstarch
In a saucepan, cook the cherries in the water for about 10 minutes, or until the cherries reach desired tenderness.

In a bowl, mix the sugar and cornstarch together. Add to the cherries. Cook until the mixture thickens. This only takes a few minutes.

Cool slightly before using. If you're not going to use the pie filling right away, store in the fridge for up to a week.
For more delicious recipes, visit Blessed with Grace's Tempt My Tummy Tuesday.
Here's what you need for a 9-inch pie:
4 cups pitted cherries
1 cup water
1 cup sugar
1/4 cup cornstarch
In a saucepan, cook the cherries in the water for about 10 minutes, or until the cherries reach desired tenderness.

In a bowl, mix the sugar and cornstarch together. Add to the cherries. Cook until the mixture thickens. This only takes a few minutes.
Cool slightly before using. If you're not going to use the pie filling right away, store in the fridge for up to a week.
For more delicious recipes, visit Blessed with Grace's Tempt My Tummy Tuesday.
Menu Plan Monday July 11-17
It's been hot, hot, hot down here in the Deep South. I've tried to stay cool in the kitchen, but it hasn't been easy. This week I'm trying to keep the oven off as much as possible.
Here's the plan:
Sunday
Sloppy joes, corn
Monday
Black bean burgers, fries
Tuesday
Grilled pizza
Wednesday
Spaghetti, grilled garlic bread
Thursday
Refried beans on corn tortillas
Friday
Ground turkey gyros on flatbread
Saturday
Philly cheese steaks, pasta salad
For more meal planning inspiration, visit Organizing Junkie's Menu Plan Mondays.
Sunday, July 11, 2010
Black Bean Burgers
Ever since I read Angie's post on making black bean burgers, I knew I wanted to try them. Go over to Angie's Healthy Living Blog and take a peek around. She's got some great recipes if you're trying to incorporate meatless meals into your meal planning.
The first time I made them, I followed the recipe closely because I had never made black bean burgers before. They were really, really good. The second time I made them, I played around a bit and liked them even better.
Here's what you need for my version:
1 can black beans, rinsed and drained
1 slices wheat bread, torn into pieces
2 mushrooms, diced
1 stalk celery, cut into 1-inch pieces
2 teas minced garlic
2 TBSP fresh cilantro
1 egg
1 TBSP minced onion
1 TBSP McCormick's Grill Mates Hamburger Seasoning
1/2 cup shredded cheddar cheese
In a bowl, mash the black beans. If you want a smooth texture, mash until smooth. If you want a little more hamburger-like texture, leave a few chunks of beans.
In a food processor, chop up the bread crumbs, veggies, and cilantro.

Add to the beans and mix well. In a small bowl, combine the egg, minced onion and seasoning. Here's the Hamburger Seasoning. It gives the burgers a grilled flavor which is amazing.

Add the egg mixture to the bean mixture, then add the cheese. Mix well by hand.

Form into patties (4 large ones) and place on a greased baking sheet. The bean mixture will be very loose, but don't worry. As it bakes, the burgers firm up. Bake at 350 degrees for 8-10 minutes, then carefully flip and bake for another 8-10 minutes.

Top with your favorite burger toppings and enjoy. Charles went all out with his - ketchup, mustard, mayo, tomatoes, pickles. I ate mine with steak sauce.

Thursday, July 8, 2010
Today my baby turns 8!
I can't believe how quickly the years have flown by and that my sweet baby girl is now eight. She was an unexpected blessing, a strong-willed toddler who has developed into a caring, giving child. Oh, she still has her strong-willed days, but she's growing and learning how to be a godly young lady.

Happy Birthday, my sweet Princess.

Happy Birthday, my sweet Princess.
Wednesday, July 7, 2010
Time to get the kids
The kids have spent a glorious 2 1/2 weeks at Grandma's. Today we go to retrieve them. It's been quiet and I've gotten a lot done. But I've missed 'em something terrible!
Do you think they had time to miss me?


Do you think they had time to miss me?


Tuesday, July 6, 2010
CSN Stores Review
A while back I was contacted by CSN Stores to do a review of one of their products. If you've never checked out CSN Stores, you should. They have over 200 online shops with items from kitchen ware to dining room sets to doggie beds. I mean, they have everything!
I've been cooking for years and never have owned a wooden block set of knives. Can you believe it? So I chose to review the Ronco Six Star Cutlery Set with the Ronco Rocker Knife.

This set comes with 20 knives of varying sizes and uses. I love that the knives themselves are labeled with numbers and names that correspond to their slots in the wooden block. What a great idea! Perfect for someone like me who can't remember where anything goes!

The knife handles are made of plastic and are lightweight, which some people might find unusual. But they are very well made and triple-riveted to the blades for durability. I can't say enough about the blades! I spent the better part of the weekend chopping up vegetables and cheese, not to mention bread and chicken. Each knife I used was a dream! The steak knives cut through cooked meat like butter.
I've seen knives of this quality sell for tons of money, but I got the Ronco Six Star set with wooden block for only $44.95. I think I got my money's worth this weekend alone, as much as I used them!If you're looking for an affordable, durable set of knives, I highly recommend this product.
The CSN site was very easy to navigate and the checkout process was smooth and simple. I had my knives in less than a week after I ordered them, too. I can tell you, this won't be the last time I order from CSN Stores. Christmas is coming and I'm going to start shopping early this year!
Disclaimer: I received no compensation for this review, other than a set of knives with which to conduct the review. All opinions are strictly my own and others may have different opinions about this product.
Monday, July 5, 2010
Blueberry Lemon Squares
Blueberries are in season now and I can buy them very cheaply at our local farmer's market. I could eat a gallon of them myself! But I don't. I make treats to share with others. Ha ha! I'm so giving.
Charles really liked these bars because they're not overly sweet. I liked them because of the subtle lemon flavor and slight crunch to the crust. They're the perfect choice for picnic fare because they hold together well and don't require refrigeration.
Here's what you'll need for the crust:
1 cup butter, softened
1 cup powdered sugar
1 teas vanilla
2 cups flour
With an electric mixer, beat together the butter, powdered sugar and vanilla until fluffy. Add the flour and beat just until the mixture forms small crumbs.

Press about two-thirds of the mixture into a greased 9-inch pan. Bake at 400 degrees for 12-15 minutes or until lightly browned. Reduce the temperature to 350 degrees.

While the crust is baking, prepare the filling. You'll need:
1/2 cup sugar
3 TBSP flour
juice and zest of 1 lemon
1/8 teas salt
3 eggs
2 cups blueberries
Combine the sugar, flour, lemon zest and salt. Add the eggs and lemon juice. Whisk until smooth.

Spread the blueberries evenly across the crust. Pour the filling over the blueberries.

Sprinkle the leftover crumb mixture over the top. Bake for 30 to 40 minutes or until the topping is golden and the filling is puffed. Don't forget to turn the oven temp down to 350!

Cool completely, then cut into squares. I cut 12 squares, then cut each one of those in half when we got to our destination.

Simply delicious!
For a printable copy of this recipe, click here.
Menu Plan Monday - July 4-10
I hope y'all had a wonderful Fourth of July! Our church held the morning service outdoors under some shady pecan trees. Everyone came dressed in picnice attire and brought lawn chairs to sit in. After the patriotic-themed service, we had a potluck dinner and enjoyed some great fellowship. We are truly blessed to be Americans!
This week we'll be traveling to pick up our kids, who've spent the last two weeks at Grandma's. I can't wait to see them. It's been so quiet around here, and though I accomplished a bit of work and reading, I missed them more than I can say. But I'm happy they were able to make some lifelong memories with my parents.
Here's the menu plan:
Sunday
Potluck at church - I made Blueberry Lemon Squares
Monday
Refried beans and homemade tortillas (from my cooking lesson)
Tuesday
Out with friends
Wednesday
On the road
Thursday
Cookout at my brother's
Friday
Chinese chicken, rice
Saturday
Homemade pizza
Hope y'all have a great week!
Sunday, July 4, 2010
Happy Birthday, America!

It never should have happened. A rough collection of thirteen colonies should never have been able to defeat the largest empire in the world. Britain had the best army, the best navy, and seasoned commanders. America had the light of freedom illuminating the hearts and souls of her soldiers and citizens.
That light still beckons people to come here and enjoy the liberty our forefathers fought so hard for. May we always be thankful for their courage and determination, and may we guard those freedoms vigilantly ourselves.
God Bless America!
Saturday, July 3, 2010
Veggie Bruschetta
Bruschetta is an appetizer from central Italy that consists of bread, tomatoes, herbs and cheese. I made a variation of bruschetta today with fresh veggies and it was delicious! We ate it for lunch and had a snack of the leftovers later. It was so, so good! By the way, did you know that the Italian pronunciation of bruschetta is "Bru-sketta" not "Bru-shetta" like we usually say here in the US? Just thought I'd throw that out there.
Here's what I used:
8 slices of Italian bread, sliced 1-inch thick
2 TBSP olive oil
1 teas sea salt
1/2 teas garlic powder
2 Roma tomatoes, diced
1/2 green pepper, diced
1/2 cucumber, seeded and diced
2 TBSP fresh minced basil
1/4 cup feta cheese, crumbled
shredded mozzarella cheese
Combine the olive oil, sea salt and garlic powder. Brush over both sides of the bread and place on a baking sheet. Okay, I know there are 9 slices of bread in this picture. One was the tiny little heel of the bread, so I just toasted it and ate it.

Toast at 425 degrees for about 5 minutes, or until the bread is browned. While the bread is doing its thing in the oven, mix the veggies, basil and feta cheese together.

Take the bread out of the oven and top with the veggie mixture. Follow that with a little mozzarella cheese on each slice.

Pop back into the oven for about 5 minutes until the cheese is melty.

The feta cheese gave this a wonderful Mediterranean flair. Everything blended together perfectly to make a light, tasty lunch. If I wanted to serve these as appetizers, I would use a French baguette and slice them more thinly. They would make the perfect appetizer for a summer get-together.
For more delicious recipes, visit Blessed with Grace's Tempt My Tummy Tuesday.
Thursday, July 1, 2010
It's a Social Parade!

I love meeting fellow bloggers and finding new blogs to follow. Smart and Trendy Moms is hosting a Social Parade so I do just that. Why don't you join in and link up your blog, too?
If you're new here, poke around a bit and check out some recent posts.
This one is a timely one about water safety. Not a pleasant thing to think about, but so very important!
And you can find some great summer recipes like Strawberry Angel Food Cake and Grilled Veggies . I've got tons of other great recipes, too. If you're looking for some fun activities for your kids, take a look at my posts on summertime boredom busters here and here.
Leave me a comment so I know you stopped by and have a wonderful, safe Fourth of July weekend!
Cooking Lesson!
Today I went over to my friend Cris' house for a cooking lesson. Her name is really Crisilda -isn't that a pretty name? Cris' parents immigrated to Texas from Mexico and raised a family of 8 children near San Antonio.
Cris is a legend in our church for her homemade burritos, tamales, and fajitas. She also makes killer breakfast burritos! I begged Cris to show me how to make tortillas after I got a tortilla press for Christmas. And today was the day! Yay!
Now, Cris cooks like I do, rarely measuring out ingredients, just eyeballing it until she gets it right. I'm going to have to practice a LOT to get as good as she is, though. As soon as I perfect a recipe, I'll share it with you.
But I'll leave you with a few cool tips she shared with me.
First, don't try to make flour tortillas in a tortilla press. They need to be rolled out. When rolling them, roll out away from you only. Turn the tortilla a quarter turn and roll again. Keep turning and rolling until you have a circular shape.

Cris could whip these babies out in no time! It took me longer and mine weren't as pretty as hers. But she assured me that practice makes perfect, so I'll be working on that skill often!
When shaping dough balls to be rolled out for flour tortillas, form a domed shape instead of a round ball. Like this.
 It reminded me of a mushroom! Then turn the dome shape over to roll out. This prevents the edges of the tortilla from splitting and cracking. Cool tip, huh?
A tip for using a tortilla press is to place a a bread bag (cut open and flattened) on the press. Wet it with a little water so the corn dough doesn't stick. Then peel the plastic off the tortilla after your press them. Perfect every time!

I learned so much from Cris and had a ton of fun cooking with her. I'm really excited to try making these on my own!
Subscribe to:
Posts (Atom)