On this night before we celebrate Christmas, may we reflect on the greatest Gift ever given. Though it's important to remember Jesus' birth, it's even more important to remember why He came - to bring us eternal life. Thank you, Jesus!
Friday, December 24, 2010

Thursday, December 23, 2010
Cute Sock Cupcakes

These adorable little sock cupcakes make a simple, inexpensive gift for friends and family. Fuzzy socks work best, but you can use baby socks for a baby shower or athletic socks for the athlete in your life.
Here's what you need:
1 pair fuzzy socks
1 rubber band
1 pom pom for the cherry on top
1 paper cupcake wrapper - I used this template and some scrapbook paper
Wavy scissors or border punch
1 cellophane treat bag and ribbon to tie it
Scotch tape
Lay the socks flat and overlap a little.
 Start with the top of the sock and roll tightly. Secure with a rubber band. Separate the layers slightly and fold over a couple of the edges to add some fullness.
Cut out the wrapper and use the wavy scissors or punch on one edge. Wrap around the cupcake and secure with tape. Push the pom pom down into the top of the cupcake and add a little piece of tape so it stays in place.
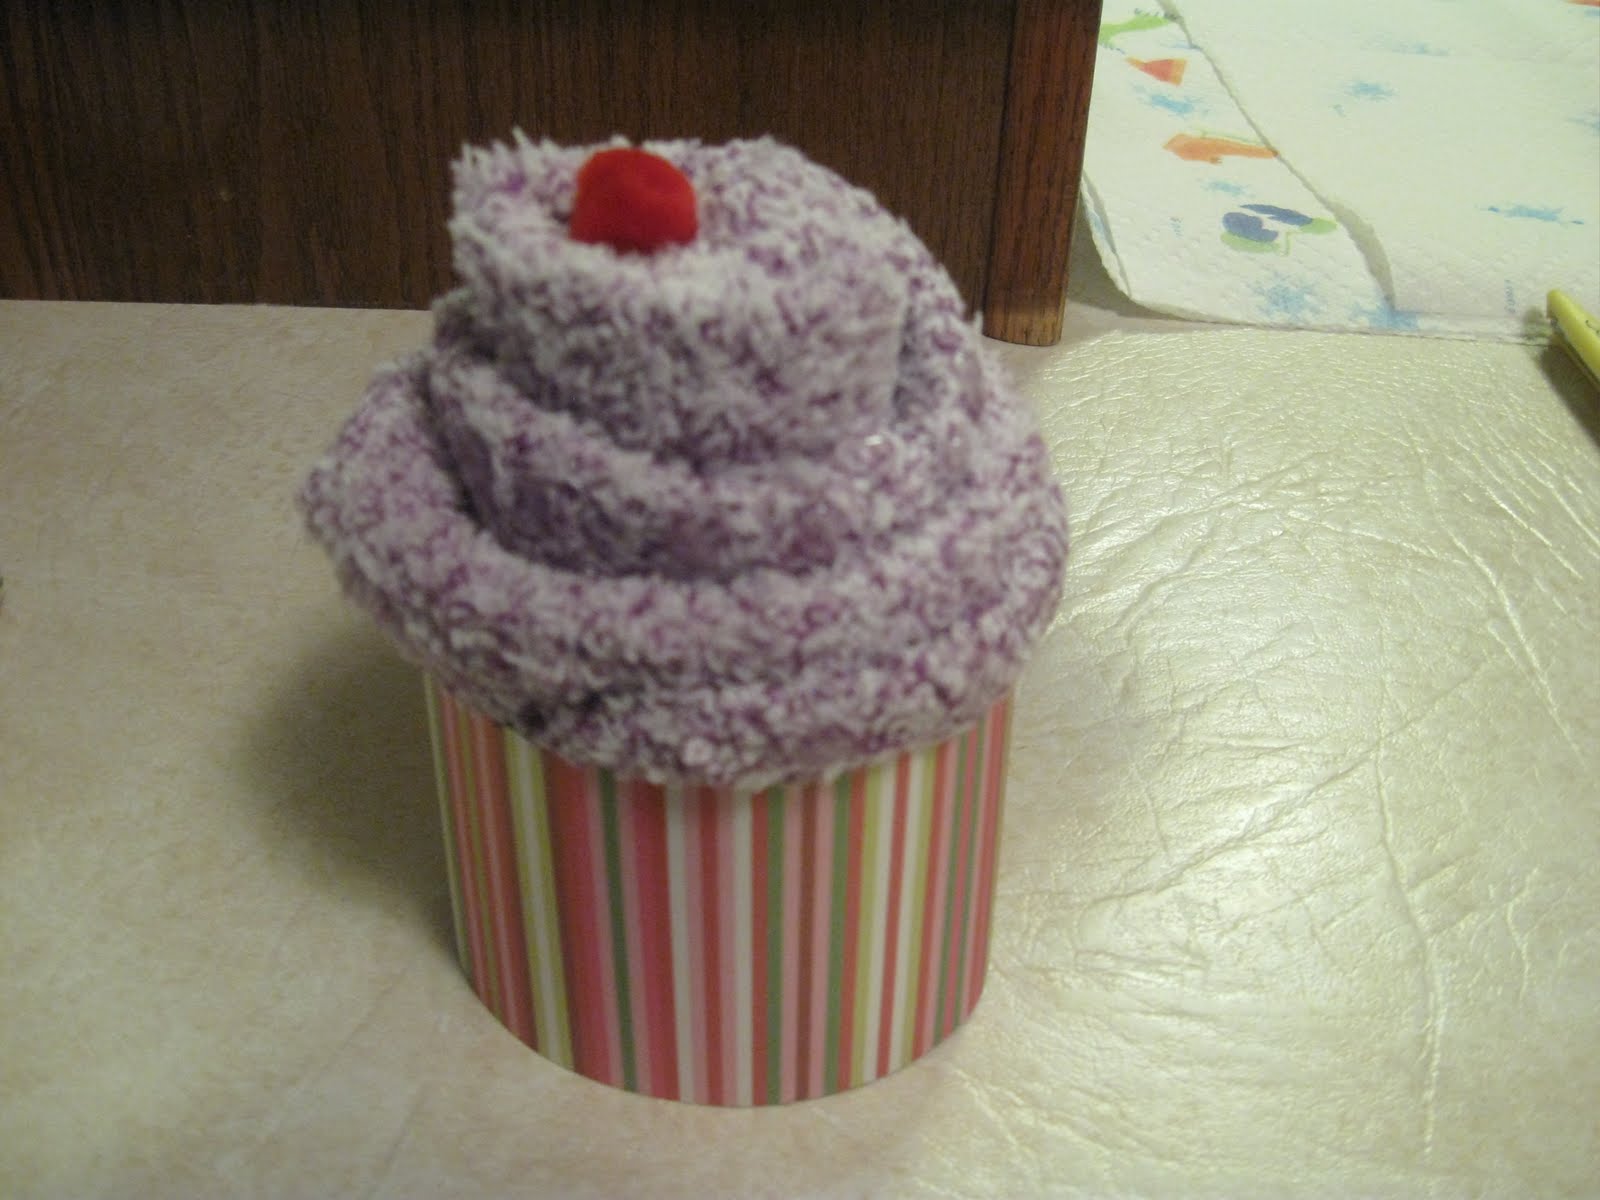
Slide the wrapped cupcake into the treat bag and tie up with a ribbon.

Could these cupcakes be any cuter? I can tell you they're simple and fun. I have plans to make more for a baby shower next month and for a spa gift set for a friend. Right after Christmas is a great time to stock up on fuzzy socks, too!
Tuesday, December 21, 2010
Seen from the Kitchen Window
 We've been visiting my folks in West Virginia. Here's a view from my mom's kitchen window last week. The kids were delighted to get such a close-up look at these beautiful animals.
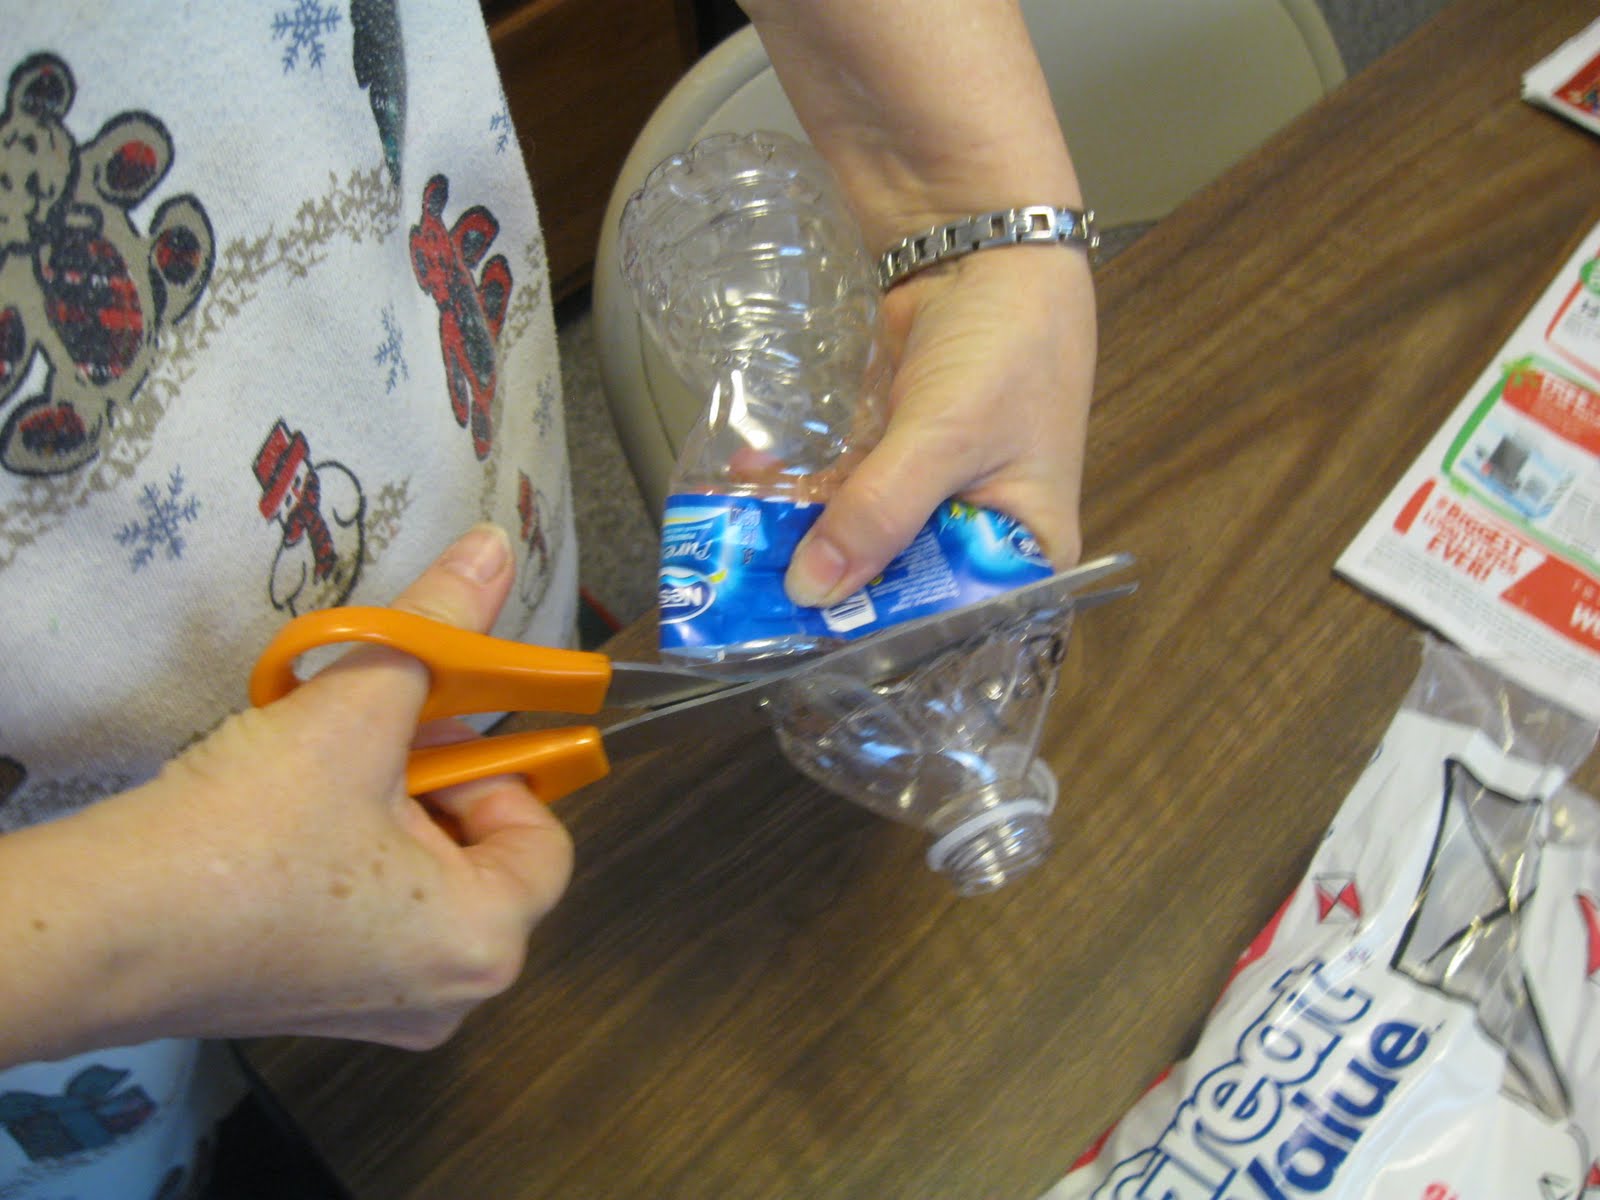
Recycle Plastic Bottles into Bag Toppers and Spill Stoppers
My mom shared this great tip with me, and I want to share it with you. If your cupboards look anything like mine do, you have opened bags of rice or beans or marshmallows that you fold down in hopes that they don't spill. And then you clean up all the little grains of rice that have leaked out because they DO spill.
Well, here's a great solution. Cut the top off a plastic bottle. You can use a 2-liter top for bigger bags like marshmallows or a water bottle for things like rice or beans.

Thread the top of the opened bag through the bottle top. Fold the bag down over the bottle top like you fold down a sock.

Twist the top of the bottle on over the bag.

No more spills in the cupboard!
For more helpful tips, visit Works for Me Wednesday over at We are THAT Family.
Well, here's a great solution. Cut the top off a plastic bottle. You can use a 2-liter top for bigger bags like marshmallows or a water bottle for things like rice or beans.
Thread the top of the opened bag through the bottle top. Fold the bag down over the bottle top like you fold down a sock.

Twist the top of the bottle on over the bag.

No more spills in the cupboard!
For more helpful tips, visit Works for Me Wednesday over at We are THAT Family.
Friday, December 17, 2010
Easy Bottle Cap Necklaces

If you need a quick, easy, cheap gift for a little girl in your life, I have a great idea for you.
I bought bottle cap bezels with the vague intention of creating some kind of pendant for my daughter. I thought maybe I'd use her initial or perhaps a picture of a horse or ballerina, then fill in the bezel with Glossy Accents. I set the supplies aside and forgot about doing it.


The bezels already had jump rings attached, so I simply strung them on black cord and knotted it.
I got the bezels for half price, so they cost 25 cents each. The tube of marbles was 99 cents and I used maybe 1/4 teaspoon for each one. It barely made a dent in the amount in the tube! The black cord was $2 and it was enough for 4 necklaces with enough left over to make at least one more. The cost of the Glossy Accents glaze was $5. It has lasted me a long time. So I estimate the cost of each necklace to be around 75 cents. Not bad for a cute gift!
Then the Princess asked to make something for her friends for Christmas. I was busy, busy, busy and we were pinching pennies. I frantically rummaged through my craft stuff and found the bezels. Aha!!! Inspiration struck and since that doesn't happen often, I jumped on it.
Along with the bezels, I found some tiny little marbles in my stash. I mean, these things are tiny! But oh so cute! I had royal blue and multi-colored. The Princess chose multi-colored.
Using a small paintbrush, I spread a thin layer of clear-drying glue in the bezel. A toothpick would work, too.
Then I poured in the tiny marbles, making sure the entire surface was covered. I let this dry for several minutes. I shook off the excess marbles that didn't adhere.
Starting around the outside, I filled in the bezel with the Glossy Accents. This stuff dries clear and shiny. You can see tiny air bubbles in this picture. Wait for them to come to the surface, then pop them with a straight pin or toothpick.
Allow the glaze to set overnight. Then apply another layer for more shine and dimension.
The bezels already had jump rings attached, so I simply strung them on black cord and knotted it.
I got the bezels for half price, so they cost 25 cents each. The tube of marbles was 99 cents and I used maybe 1/4 teaspoon for each one. It barely made a dent in the amount in the tube! The black cord was $2 and it was enough for 4 necklaces with enough left over to make at least one more. The cost of the Glossy Accents glaze was $5. It has lasted me a long time. So I estimate the cost of each necklace to be around 75 cents. Not bad for a cute gift!
Tuesday, December 14, 2010
Sorry it's been so long
It's been a week since I posted! Usually by now I've posted my menu plan for the week. But guess what? I'm at my Mama's and she's cooking for us! We were able to travel to West Virginia early this year due to a work project hubby has in the next town over from my parents'. So his company actually paid for us to spend the holidays with family! Love it!
We've gotten a little snow since we've been here, which the kids have loved. I'll post some snow pics later.
Just wanted you to know I haven't fallen off the face of the earth!
Tuesday, December 7, 2010
Double Chocolate Cake
I needed a dessert for some hungry men and children while I and some girlfriends went to a Ladies Night Out party. I didn't have time to run to the store, so I had to rely on pantry ingredients I already had. I found this recipe in Dining on a Dime by Tawra Kellem and Jill Cooper and adapted it a little to suit my style of baking.
Judging by the crumbs that were left when I got home, the cake was delicious!
Here's what you'll need:
2 cups flour (I used half white, half white wheat)
1 cup sugar
1 1/2 teas baking powder
1 1/2 teas baking soda
4 TBSP cocoa
1 cup cold water
1 cup mayo
2 teas vanilla
In a mixing bowl, combine the dry ingredients.

In a separate bowl, stir the water and may together, then add the vanilla. Mix into the dry ingredients until smooth. Spread into a greased 13x9 pan. The batter will be thick.

Bake at 350 degrees for 25-30 minutes or until a knife inserted in the center comes out clean. Poke holes in the cake with a fork. All over, even to the edges. Then go back and poke some more holes! It's fun!

Now prepare the frosting. Melt 1/2 cup (1 stick) butter in a saucepan. Stir in 1 cup sugar, 1/4 cup cocoa, and 1/4 cup milk. Bring to a boil, then boil for one minute.

Pour over the cake and spread to cover. Oh my yum!

Here's a link to a printable recipe.
Sunday, December 5, 2010
Menu Plan December 5-11
This week will be cheap and easy. We had a major plumbing disaster last week that took a huge chunk out of the budget. What am I saying? It BLEW the budget all to pieces! So I'm trying to use up what I have on hand and save a little money in the process.
Here's the plan:
Sunday
Crockpot potato soup (I subbed bacon for the ham)
Monday
Hot dogs, chips
Tuesday
Chili made with lentils instead of ground beef, cheesy biscuit bites
Wednesday
Pizza pasta, green beans
Thursday
Oatmeal pancakes, sausage links
Friday
Chicken nuggets, fries
Saturday
Sunday School Christmas party
For more meal planning inspiration, please take a peek at Organizing Junkie's Menu Plan Monday. You can find gluten-free, low cal, leftovers - just about any kind of menus you're looking for.
Have a great week!
Wednesday, December 1, 2010
Sedimentary Rock Bars
We're studying rocks in science this month and the kids are loving it! We've found all sorts of neat online activities and games, as well as pictures and information. I'll share some interesting links in another post.
This post is about the food! Our science book had a recipe for Sedimentary Rock Bars to help illustrate the layers that make up this type of rock. I figured if they were yummy, the kids would remember how sedimentary rocks are formed.
Well, the bars are yummy. And the kids do remember. Mission accomplished!
To quote Mr. Lego -"These bars rock!" Oh, the dry sense of humor.
You don't have to be studying the formation of rocks to appreciate this delicious recipe, though. You probably already have the ingredients in your pantry. Or if you don't, you can substitute like I did.
Here's what you need:
1/2 cup butter, melted
1 1/2 cup vanilla wafer crumbs (I had none, so I used a combo of graham cracker and Ritz crackers)
1 (14 oz) can sweetened condensed milk
1/2 cup chocolate chips
1/2 cup peanut butter chips
1 cup chopped nuts
This is the Princess crushing up crumbs for me. The kids loved helping make these.

Pour the melted butter into a 9x13 pan. Sprinkle evenly with the crumbs. I liked having the Ritz crumbs in here. There was a slightly salty taste that really helped control the sweetness. I think I'll go with Ritz instead of vanilla wafers from now on.

Slowly pour the condensed milk over the crumbs. Try to make sure the whole pan is covered. Layer the chocolate chips and peanut butter chips next.

The last layer is the nuts. Sprinkle evenly over the top and gently press down.

Bake at 350 degrees for 20 minutes. Remove from the oven and let cool a little before cutting into bars.

See all those layers? The nuts on top really do resemble rocks! We loved making these and loved eating them even more. Nothing like a hands-on project to reinforce learning.

I love homeschooling!
Tuesday, November 30, 2010
Easiest Cookie in a Jar Recipe
When I was teaching in a Christian school, I used to make cookies in a jar for all of my fellow teachers for Christmas. They all loved receiving a gift they could use during the holidays.
I'd set up an assembly line in the kitchen, packing down the ingredients and trying not to make a huge mess. I'd measure out flour for each jar, then sugar, then the next ingredient and so on until the jars were filled instead of trying to fill them one at a time.
There had to be an easier, quicker way. But I couldn't come up with one.
Until I started thinking about my recipe for cake mix cookies. Why not combine the recipe with the jar idea?
So that's what I did!
All you need is a cake mix, 1 teaspoon of baking powder, 1 cup of mix ins (refer to the recipe linked above for ideas), and a quart jar. You'll also need to print or write out the instructions and attach the to the jar.
Start by making sure your jar is clean. Pour about half of the cake mix into the jar and pack it down. I use my Pampered Chef tart shaper, but anything like a spatula or spoon will do. Add the baking powder next. Then add the rest of the cake mix and pat, pat, pat. I'm using a spice cake mix for this jar.

Layer your mix-ins next. I put 1/2 cup nuts in, then 1/2 cup butterscotch chips. Toffee bits would also be good with the spice cake mix. To give the jar a more interesting layered look, you could put half the cake mix, then half the mix-ins and repeat the layers. It's up to you!

Print the instructions onto cardstock and attach them to the jar. I punched a hole in the cardstock and used a simple curling ribbon to attach it. You can get as fancy as you want to.

The recipe instructions read as follows:
Pour the jar contents into mixing bowl. Add 2 eggs and 1/2 cup vegetable oil. Stir until well combined. Drop by rounded spoonfuls onto ungreased cookie sheets. Bake at 350 degrees for 8-10 minutes. Yield: 3 1/2 dozen.
I can't tell you what a timesaver this is! It used to take me all evening to fill jars, now it takes just minutes! I got cake mixes on sale for $.68, so it's pretty cheap too!
For more holiday tips and gift ideas, head over to Works for Me Wednesday hosted by We are THAT Family.
Monday, November 29, 2010
Cream Cheese Cookies
If you're looking for a fantastic addition to your holiday cookie trays, I've got the recipe for you. These simple yet elegant cookies are buttery and creamy. And addictive. You won't be able to eat just one.
Here's what you need:
1 cup butter, softened
3 oz cream cheese, softened
1 cup sugar
1 egg yolk
1 teas vanilla
2 1/2 cups flour
In a mixing bowl, cream the butter and cream cheese together. Slowly add the sugar and beat until fluffy. Beat in the egg yolk and vanilla.

Mix in the flour.

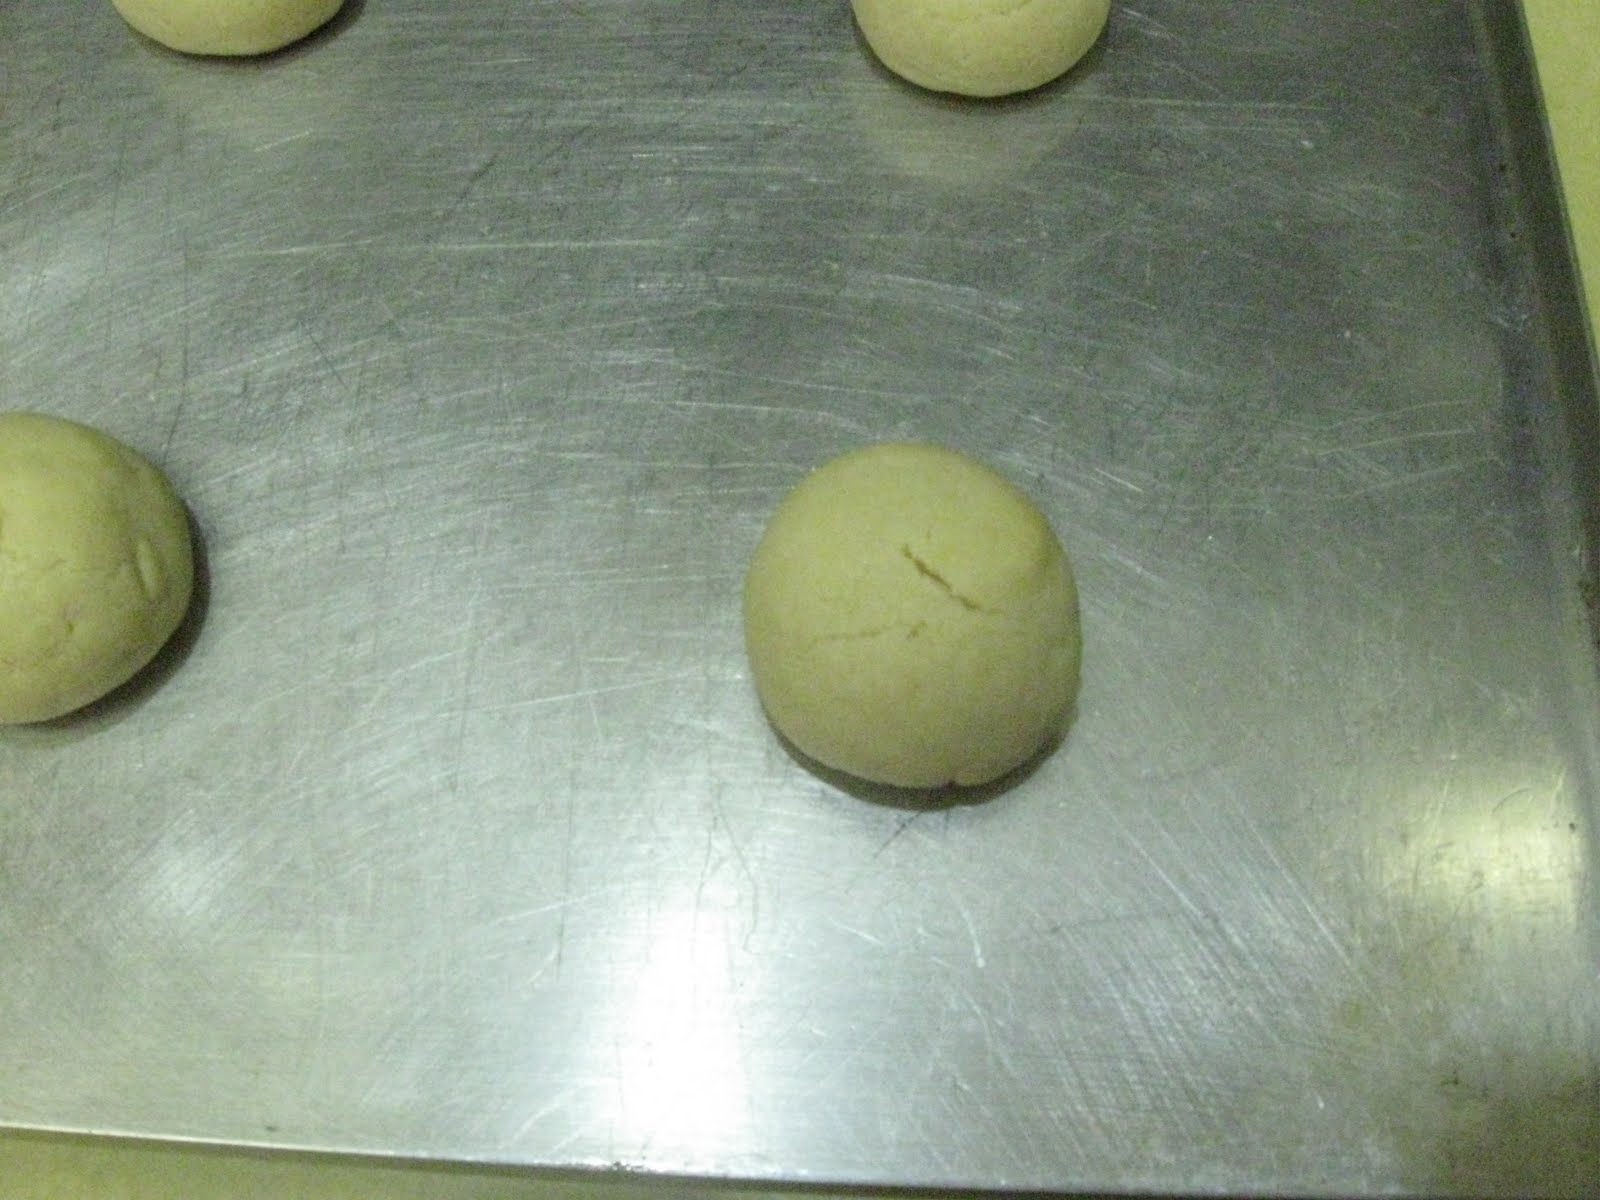
Form the dough into a ball and wrap in plastic wrap. Chill in the fridge for at least an hour. Doesn't this ball of dough kinda look like a brain?

Shape the dough into one-inch balls. Place on greased cookie sheets and bake at 325 degrees for 12-15 minutes.

The tops might crack just a little bit and that's okay. But watch them carefully and don't them brown too much. Overbaking will cause the cookies to be dry. Also, don't expect these cookies to spread out much. They will keep their ball shape well.
The original recipe I used called for a lemon powdered sugar glaze. Charles and I thought this was completely unnecessary and took away from the creamy-tasting cookie. This is a delightful little morsel that doesn't need any dressing up to be special. Its simplicity is what makes it so.
For more yummy recipes, visit Tempt My Tummy Tuesday over at Blessed with Grace.
Here's what you need:
1 cup butter, softened
3 oz cream cheese, softened
1 cup sugar
1 egg yolk
1 teas vanilla
2 1/2 cups flour
In a mixing bowl, cream the butter and cream cheese together. Slowly add the sugar and beat until fluffy. Beat in the egg yolk and vanilla.

Mix in the flour.

Form the dough into a ball and wrap in plastic wrap. Chill in the fridge for at least an hour. Doesn't this ball of dough kinda look like a brain?

Shape the dough into one-inch balls. Place on greased cookie sheets and bake at 325 degrees for 12-15 minutes.
The tops might crack just a little bit and that's okay. But watch them carefully and don't them brown too much. Overbaking will cause the cookies to be dry. Also, don't expect these cookies to spread out much. They will keep their ball shape well.
The original recipe I used called for a lemon powdered sugar glaze. Charles and I thought this was completely unnecessary and took away from the creamy-tasting cookie. This is a delightful little morsel that doesn't need any dressing up to be special. Its simplicity is what makes it so.
For more yummy recipes, visit Tempt My Tummy Tuesday over at Blessed with Grace.
My New Island!
In October I got a new tile floor in the kitchen. I love it! But hubby had to go out of town for work and my center island didn't get reinstalled.
It needed a makeover. Badly. The previous owner had installed an indoor electric grill in the island which I wasn't fond of. We tried it out once, and it smoked up the house so terribly we decided it had to go.
So dear Charles removed the grill parts and was left with a huge whole in the middle. He covered it over with a board, then tiled the top for me. We chose a backsplash tile, the kind that is already connected in one sheet. It took five sheets to completely cover the island, then Charles had to grout and seal it.
This is the finished product!
 The colors of the tile completely match the weird color combo already in the kitchen. We have two-tone cabinets of dark wood with cream doors. The counter tops are sunny yellow. The dishwasher and oven are black. And we have a copper glazed accent wall in the adjoining breakfast nook. Every color is represented in the tile!

I'm thrilled with it! And I'm thankful that my husband took the time to make it for me.
It needed a makeover. Badly. The previous owner had installed an indoor electric grill in the island which I wasn't fond of. We tried it out once, and it smoked up the house so terribly we decided it had to go.
So dear Charles removed the grill parts and was left with a huge whole in the middle. He covered it over with a board, then tiled the top for me. We chose a backsplash tile, the kind that is already connected in one sheet. It took five sheets to completely cover the island, then Charles had to grout and seal it.
This is the finished product!
 The colors of the tile completely match the weird color combo already in the kitchen. We have two-tone cabinets of dark wood with cream doors. The counter tops are sunny yellow. The dishwasher and oven are black. And we have a copper glazed accent wall in the adjoining breakfast nook. Every color is represented in the tile!
I'm thrilled with it! And I'm thankful that my husband took the time to make it for me.
Sunday, November 28, 2010
Menu Plan November 28-December 4
Thanksgiving was a lot of fun. A lot of work, but a lot of fun! We had friends over for dinner, then had more friends over to play games that night. All weekend long we ate leftovers and more leftovers. So I really haven't cooked since Thursday! Yay!
But it's a new week, and my leftovers are depleted. Time to cook again.
Here's the plan for the week:
Sunday
Pan-seared tilapia (we didn't get to this last week), green beans
Monday
Tori No Kara-age, rice
Tuesday
Homemade pizza
Wednesday
Quesadillas, Mexican rice
Thursday
Pancakes, bacon
Friday
Bacon Ranch Chicken, mashed potatoes
Saturday
Sloppy joes, french fries
For more meal planning inspiration, visit Organizing Junkie's Menu Plan Monday.
Wednesday, November 24, 2010
Happy Thanksgiving, friends!

Tuesday, November 23, 2010
Pumpkin Pie Cupcakes
You will never find an easier recipe for cupcakes. Ever.
There are only two ingredients, three if you decide to frost them. Four if you count the sprinkles.
Here's what you need:
1 spice cake mix
1 (15 oz) can pumpkin
That's it!
Combine the cake mix and pumpkin. The easiest way to do this is to use a mixer. Divide the mixture among 18 paper-lined muffin cups. Bake at 350 degrees for 15-18 minutes. Let cool then frost if desired. Dip in sprinkles if you want!
I used cream cheese frosting and it was delectable! I had some fall leaves/orange sprinkles that I poured into a shallow dish, then dipped the tops of the cupcakes into the dish . It's so much easier to dip than to shake the sprinkles onto the frosting. More sprinkles stick that way, too!

The muffins were so moist and delicious. You could use a yellow cake mix instead of spice cake, but note that you'd have to add pumpkin pie spice and cinnamon to the batter.

The frosting is optional, but not really. Have you ever eaten cupcakes without frosting? I think they're called muffins if you eat them that way!
Sunday, November 21, 2010
Menu Plan November 21-27
Thanksgiving is almost here! I love this time of year. I enjoy taking time out of our busy schedule to pause and reflect on God's blessings in our lives. I've tried to keep this week's menu simple since I've got lots of other prep work to do for Thanksgiving dinner.
Here's the menu:
Sunday
Spaghetti
Monday
Coconut Chicken Curry, rice
Tuesday
Pan-seared tilapia, broccoli
Wednesday
Beef stew
Thursday
Thanksgiving Dinner
Friday
Leftover casserole
Saturday
Turkey rice soup
For more meal planning inspiration, visit Organizing Junkie's Menu Plan Monday.
Here's the menu:
Sunday
Spaghetti
Monday
Coconut Chicken Curry, rice
Tuesday
Pan-seared tilapia, broccoli
Wednesday
Beef stew
Thursday
Thanksgiving Dinner
Friday
Leftover casserole
Saturday
Turkey rice soup
For more meal planning inspiration, visit Organizing Junkie's Menu Plan Monday.
Saturday, November 20, 2010
Thanksgiving Prep - Do it now!
We're having some dear friends over for Thanksgiving, but we started preparing today. By preparing, I mean my husband washed the china and glassware we'll be using. Tomorrow he'll do the silverware. Why don't I do it, you ask? Well, he actually likes to do it. So I graciously give him the joy of doing it for me.
Besides giving your tableware a quick cleaning, here are some more tips to save yourself some effort and headache on the big day.
1. Thaw the turkey. I know this sounds like a no-brainer, but you'd be surprised how many cooks forget until the day before. And if you have a large turkey, that's not going to be long enough. Allow one day for each 5 lbs of bird. Since I'm brining ours, I'll start thawing it now, then place it in the brine Tuesday night. Should be perfect. (If you've never brined a turkey, I cannot urge you strongly enough to try it! It makes such a huge difference in the moistness of the meat. The salt solution actually helps seal in the juices.)
2. Bake your pies ahead of time. This is such a huge time saver when it comes time to get the meal ready. Stick them in the freezer until Wednesday night. Place them in the fridge and they'll be wonderfully thawed by morning. If you like your pies warm, just pop them into the oven at 350 degrees until warmed through.
3. Write down each dish and the ingredients that go into each one. Check to make sure you have all the ingredients you need. Again, sounds like a no-brainer. But I know from experience that if I don't glance over the recipes and take note of the ingredients, inevitably on Thanksgiving Day, I'm going to realize I don't have the sage or cranberries or something that I need. Check off each ingredient as you verify its presence on your cupboard or purchase it from the store.
4. Make your place cards. If you're having guests, place cards add such a special touch to the table. I mean, how often do you use place cards when you sit down to dinner? Your family knows where to sit, right? But when you have guests, it's nice to have a place already in mind for them.
We're going to use the Martha Stewart printable ones here.
Here is some more inspiration from TipJunkie.
And if you want your kids to get involved, you'll find some fingerprint turkeys here and here.
5. Determine if you can prepare any dishes in advance. Cranberry sauce can be made a day or two ahead. Casseroles can be put together the night before then baked when needed on Thanksgiving Day. Even dinner rolls can be prepared early and reheated in the oven prior to serving. Look at your menu to see if there are any shortcuts that can be done before Thanksgiving.
What about you? Do you have any tips to share that make your Thanksgiving prep easier?
Friday, November 19, 2010
Bacon Ranch Chicken
I first tried this recipe a couple of months ago after seeing it on this blog. The combination of ingredients intrigued me. I mean, who would put ranch dressing and teriyaki sauce in the same dish?
But I have to say that nothing about this reminded me of a cheeseburger, other than the cheese. So I renamed it Bacon Ranch Chicken. Maybe Bacon Ranch Teriyaki Cheesy Chicken would be more accurate. Too many syllables, huh?
We all really loved this dish. Even the kids, who don't typically like sauce on anything, ate this right up. When the Princess found out it had ranch dressing in it, she practically licked her plate. It seemed a sin to waste even one drop of the delicious sauce!
Here's what you need:
2 TBSP olive oil
1 teas minced garlic
4 boneless, skinless chicken breasts, sliced in half length-wise
1/2 cup ranch dressing (I used homemade)
1/4 cup teriyaki sauce (again, I used homemade)
6 slices of bacon, cooked and crumbled
1-2 cups shredded cheddar cheese (I've also used jack cheese, and it's yummy!)
In a skillet, heat the oil. Add the minced garlic and cook for a couple of minutes. Add the chicken halves and brown on both sides. You don't want to cook it all the way, just get a nice color on the meat.

Place the browned chicken in a greased 13x9 pan. Pour the teriyaki sauce over all, then cover with the ranch dressing.

On top of that layer the shredded cheese and bacon.

Pop into a 350-degree oven and bake for 25-30 minutes. The cheese should be all gooey and melty and the bacon will be amazingly crisp. Just how you want it!

I'm not exactly sure how all of these flavors came together to make this so delicious, but they did. I didn't mention to the family what was in it until they had all taken a bite and declared it to be yummy because I didn't want any preconceived ideas about the mixing of flavors. My fears turned out to be for naught, since everyone loved it!

Tuesday, November 16, 2010
Sweet Buttermilk Cornbread
I've never really been a fan of cornbread. My exposure to it was limited to Jiffy mix which often turned out dry and crumbly. Imagine my relief when my husband told me shortly after we were married that he didn't like cornbread either! Whew!
Then I stumbled on this recipe and I thought I'd give cornbread another try. Hubby agreed to try, too. To my surprise, this recipe won him over. But it's the only way he'll eat cornbread now. This cornbread is moist and flavorful with a sweet undertone.
Now this recipe calls for buttermilk, and I do think it makes a difference in the taste. But I don't regularly keep buttermilk on hand. Instead, I measure 1 tablespoon of vinegar into a measuring cup and then fill with enough milk to equal one cup total liquid. I let this sit for a few minutes. It tastes just like buttermilk!
Here's what you'll need:
1/2 cup butter (1 stick), melted
2/3 cup sugar
2 eggs
1 cup buttermilk
1/2 teas baking soda
1 cup cornmeal
1 cup flour
1/2 teas salt
Stir melted butter and sugar together. Add eggs and beat until well blended. Add the baking soda to the buttermilk, then stir into the butter mixture. In a separate bowl, combine cornmeal, flour and salt. Mix with wet ingredients until well blended and there are few lumps.
Pour batter into a greased 8-inch square pan. Bake at 375 degrees for 30 minutes or until a knife inserted in the center comes out clean. If the top browns too quickly, cover loosely with foil.

After I take the cornbread from the oven, I like to brush with a little more melted butter. Yum!

Monday, November 15, 2010
Rustic Apple Tart
Apple pie is one of my all-time favorite desserts. I just love it. But I wanted to make something a little different than a traditional apple pie. So I tried my hand at making an apple tart. Charles promptly asked why I hadn't made one before and could I make one again really soon! I guess it was a hit.
If you want to make this completely from scratch, by all means do so. Use your favorite one-crust pie dough recipe. You can also use your own apple pie filling, too. I've got a recipe here if you want to try it. I'm going to make a big batch this week to have on hand for holiday baking.
But this recipe is quick and easy. It goes together in no time and is perfect when you want something yummy and sweet without a lot of prep work.
Here's what you need:
1 refrigerated pie crust, room temperature
1 can apple pie filling
1 teas cinnamon
1/4 - 1/2 cup chopped walnuts
3/4 cup powdered sugar
2 TBSP milk
Roll out the pie crust to fit a baking stone or pizza pan. Spread the pie filling over the crust, leaving about 2 inches around the edges. Sprinkle with cinnamon and nuts.

Fold the edges up over the filling, crimping a little as you go. The dough will overlap and form a nice ring around the filling. Isn't that pretty?

Bake at 400 degrees for about 20 minutes or until the crust is golden brown. Let cool. Mix together the powdered sugar and milk. Drizzle over the tart. Use a pizza cutter to slice into wedges and serve.

For more yummy recipes, visit Tempt My Tummy Tuesday over at Blessed with Grace.
Sunday, November 14, 2010
Menu Plan Monday November 14-20
Last week was so wonderful! Hubby was home after three straight weeks away. Things run so much more smoothly when my teammate is here. And we make a great team, if I do say so myself.
And I fixed everything on last week's menu. That's a rare occurrence! It eases my mind so much to have meals planned and ingredients on hand. If you don't regularly plan your weekly menus, now is a great time to start. With the holiday rush breathing down our necks, it's so reassuring to write things down and know you've got meals covered.
Now here's this week's plan:
Sunday
Out to eat
Monday
Garlic lime tilapia, mashed potatoes
Tuesday
Pizza pasta, broccoli, homemade bread
Wednesday
Cheeseburger rice, green beans
Thursday
Sausage veggie calzones, french fries
Friday
Pizza
Saturday
Broccoli cheese soup, herbed rolls
For more meal planning inspiration visit Organizing Junkie's Menu Plan Monday.
Thursday, November 11, 2010
Amazon.com Update
Last night I posted about the disgusting pedophile's guide that was available for sale on Amazon. Well, thanks to pressure from their customers, Amazon has removed the book! I received email notification from them this morning. The page is no longer available.
I'm glad that people were willing to stand up for children. I'm still angry that Amazon didn't immediately get rid of the book when it was brought to their attention. Only when it started to affect their bottom line did they pull it. Not because it was the right thing to do but because they didn't want to face a boycott.
I'm still debating about whether or not I want to buy from them in the future. What do you think about it?
A Salute to our Veterans

To our men and women in uniform, past and present, thank you for your service. I know the sacrifices you and your families have made and appreciate them tremendously.
May God bless you on this Veterans Day and the great country you serve.
Wednesday, November 10, 2010
Amazon.com needs a good swift kick!
I'm not generally a boycotter, but this has gotten me angry.
Amazon is selling an e-book entitled "The Pedophile's Guide to Love and Pleasure." I'm not kidding. You can read about the controversy here.
This really, really gets my blood boiling!!! Amazon is knowingly encouraging pedophilia!!! Their defense of the author's First Amendment rights sounds noble, but what happens if someone takes this writer's advice and a child is hurt?
I buy a lot of stuff from Amazon. Or at least I did. If they do not stop selling this vile publication, they will permanently lose me as a customer.
This time of year is their biggest money-making season. Let's show them that we mothers WILL NOT stand for this. Our children's well-being and safety is more important than getting a good Christmas bargain. Please let Amazon know that you won't be purchasing from them until they stop selling this.
Ancient Egypt Lapbook
This year we're using The Mystery of History Volume I as our history curriculum. We've really enjoyed it so far, but we're not doing such a good job of keeping to the suggested schedule. We like to stop and explore certain topics further. And that's one of the joys of homeschooling! We can do just that!
The kids were really very interested in learning more about ancient Egypt. We checked out several books from the library and watched a couple of videos to enhance our understanding of the culture. My husband was in Egypt back in the late '90's as part of a military exercise and has several pictures of the pyramids and King Tut display at the Cairo Museum. The kids loved looking at those. And our local history museum has a great Egyptian display that we enjoy visiting, too.
To tie everything together, the kids created one-folder lapbooks to show what they learned. I found the templates here at Homeschool Share, my favorite lapbook resource.

On the front cover, the kids wrote their names in hieroglyphics. I got the idea from Jimmie at The Heart of the Matter Online. We used the cartouche generator she suggested to see what their names would look like. Then they copied the hieroglyphics onto their own cartouches.

After learning the basics of hieroglyphics, they then proceeded to write secret messages to each other and Daddy. So cute!
Here's the Princess with her lapbook.

We've moved on and are studying the Exodus of the Hebrews from Egypt and their subsequent wanderings in the wilderness. Maybe another lapbook will be forthcoming. We'll see.
Subscribe to:
Posts (Atom)