I'm also thankful that this isn't goodbye. I'm thankful for the hope I have in Jesus that she is with Him, and I'll see her again. Yes, there have been tears as we all think of adjusting to life without her here. But as the Princess said, "We're sad for us, but happy for her!" Well said.

Sunday, February 27, 2011
Heaven's a bit sweeter
Thanks to all of you who prayed for my family during this difficult time. My grandma passed away peacefully last night (actually early this morning). I'm thankful that I had the chance to tell her I loved her. Don't know if she heard me, but I needed to say it.

Wednesday, February 23, 2011
A Matter of Time
On Monday my grandma had a massive stroke. She is not expected to live long, and in accordance with her wishes, no life-prolonging procedures will be done. She is 86 years old and in her own words, is "ready to see the Lord." While not unexpected (again, 86 years old), this is sudden and we are trying to balance travel plans with other responsibilities. Your prayers would be appreciated.


Monday, February 21, 2011
White Bean and Spinach Pasta
I've been looking for pasta dishes that don't require tomato-based sauces since the Princess doesn't care for tomato sauce. She likes to eat her pasta plain. That's right - no sauce, no butter. She will let me sprinkle some grated Parmesan cheese on her pasta now and then, but she prefers nothing.
She really liked the Greek Chicken Pasta recipe I found, so I was inspired to try another non-tomato dish with this recipe from the Tasty Kitchen. I tweaked it a bit because I thought the amount of lemon juice was a little much for my kids. It turned out wonderfully and reminded me of spring. And the Princess ate it! And liked it! Another win!
Here's what you'll need:
8 oz uncooked pasta
1 TBSP olive oil
2 garlic cloves, minced (equals about 1 1/2 teaspoons)
1/4 cup finely chopped red pepper
1 can cannellini beans, rinsed and drained
3 cups fresh baby spinach
1/4 cup grated Parmesan cheese
the zest and juice of one lemon
salt to taste
dash of cayenne pepper
Cook the pasta according to the package directions. Drain, reserving one cup of the cooking water. Set aside.
Heat the oil in a large skillet. Add the garlic and cook for a couple of minutes until it really starts smelling good. Add the chopped pepper and cook until soft.

Add the cooked pasta, beans, and spinach. Stir gently until all the spinach is wilted. Now, the next time I prepare this, I'm going to add only the spinach at this time. After it's wilted, I'll add the pasta and beans. It will just make it easier to stir since the skillet was so full.

Now stir in remaining ingredients. If the mixture seems too dry, add a little of the reserved cooking water.

The tang from the lemon really made this dish. It was so fresh-tasting! The beans added a nice, smooth texture, too. This will be showing up on our menu often.
For more yummy recipes, visit Tempt My Tummy Tuesday over at Blessed with Grace.
Sunday, February 20, 2011
Menu Plan February 20-26
Last week was almost like spring. Temps reached the low 70's nearly every day and the sun shone brightly! It was glorious! Charles decided to grill on Saturday, so he graciously grilled chicken, pork chops and hamburgers to help with this week's menu. Isn't he sweet? And a little smoky too, after all that grilling.
Here's the plan:
Sunday
Grilled hamburgers, tater tots
Monday
Grilled pork chops, corn
Tuesday
Brought to you by the letter E (remember, we're choosing a letter once a month
and planning a menu around it)
So today we're having egg rolls and empanadas with eclairs for dessert
Wednesday
Southwestern Chicken Salad
Thursday
Broccoli cheese soup in bread bowls
Friday
Spaghetti and meatballs, cheesy garlic breadsticks
Saturday
BBQ chicken pizza
If you want to see some more yummy menu plans, head over to Organizing Junkie's Menu Plan Monday.
Saturday, February 19, 2011
Six Flags Read to Succeed
Have you heard about this program? Six Flags and Discovery Education are partnering with schools to encourage children to read. This year, homeschool kids are eligible, too, if you live within 250 miles of a Six Flags park!
All you have to do is register and keep track of your child's reading. When your child has completed 360 minutes (6 hours) of reading, submit the info online, then you and your child will receive a free Six Flags ticket for the park nearest you! The deadline for submission is March 4, so you've got two weeks to read, read, read!
All you have to do is register and keep track of your child's reading. When your child has completed 360 minutes (6 hours) of reading, submit the info online, then you and your child will receive a free Six Flags ticket for the park nearest you! The deadline for submission is March 4, so you've got two weeks to read, read, read!
Tuesday, February 15, 2011
Mr. Lego's Lego Party
On Saturday, Mr. Lego turned 10. He is so excited to be in double digits!
I made some Lego decorations out of colored paper. I cut sheets of paper in half, then used a paper punch to cut out circles. I attached the circle with pop dots to make them stand out a little.

Here's our Lego building game. Each boy was given a pile of Legos. Then he was handed a card with the name of something he had to build using only Legos from his pile. We had a helicopter, a train, and a robot to name a few. It was fun watching the boys be creative.

We enjoyed a chocolate chip cookie cake complete with a Lego mini figure army. We bought the mini figure mold at the Lego Store. Then it was just a matter of melting some chocolate and pouring it. Charles took care of the army and I made the cookie.

And of course, the Lego loot. The rest of the afternoon was spent putting sets together.

These past 10 years have flown by. I'm so honored to be this guy's mom.

Monday, February 14, 2011
West Virginia Pepperoni Rolls
I was born in and spent the first 26 years of my life in Fairmont, West Virginia. I grew up eating pepperoni rolls and thought everyone else in America did, too. My mom made them all the time and they were a lunch box staple for us. We always took them with us on road trips to eat in the car. They even showed up at my wedding reception, only in miniature form. You can buy them in every convenience store in the state, but the best ones are homemade.
These savory little bundles of goodness were invented in my hometown back in the early 1900's. They were created to cater to Italian immigrants who came to that part of the state to work in the coal mines. Thin strips of pepperoni were wrapped in dough and baked until golden. The meat required no refrigeration, so the rolls were perfect for miners who worked long shifts.
Nowadays people use sliced pepperoni instead of strips because of convenience. My family prefers to use thin strips cut from a long stick of pepperoni, so that's what I'll show you.
Here's what you need:

1 9-oz stick of pepperoni
Bread dough of your choice, enough for one loaf
Melted butter
I use my bread machine to mix up the dough, using this recipe and setting it on the dough cycle. While the machine is working, I slice the pepperoni into strips.
First I cut the long stick into 5 pieces. Each of these is sliced in half. Now it's time to peel the skin off the pepperoni. You don't want to chew on that, believe me.

Each half should be cut into four strips. By the time you're done, you should have 40 strips. You're going to need 3 strips for each roll. Since this recipe makes a dozen rolls, you'll have a couple of pepperoni pieces left over. Yum!

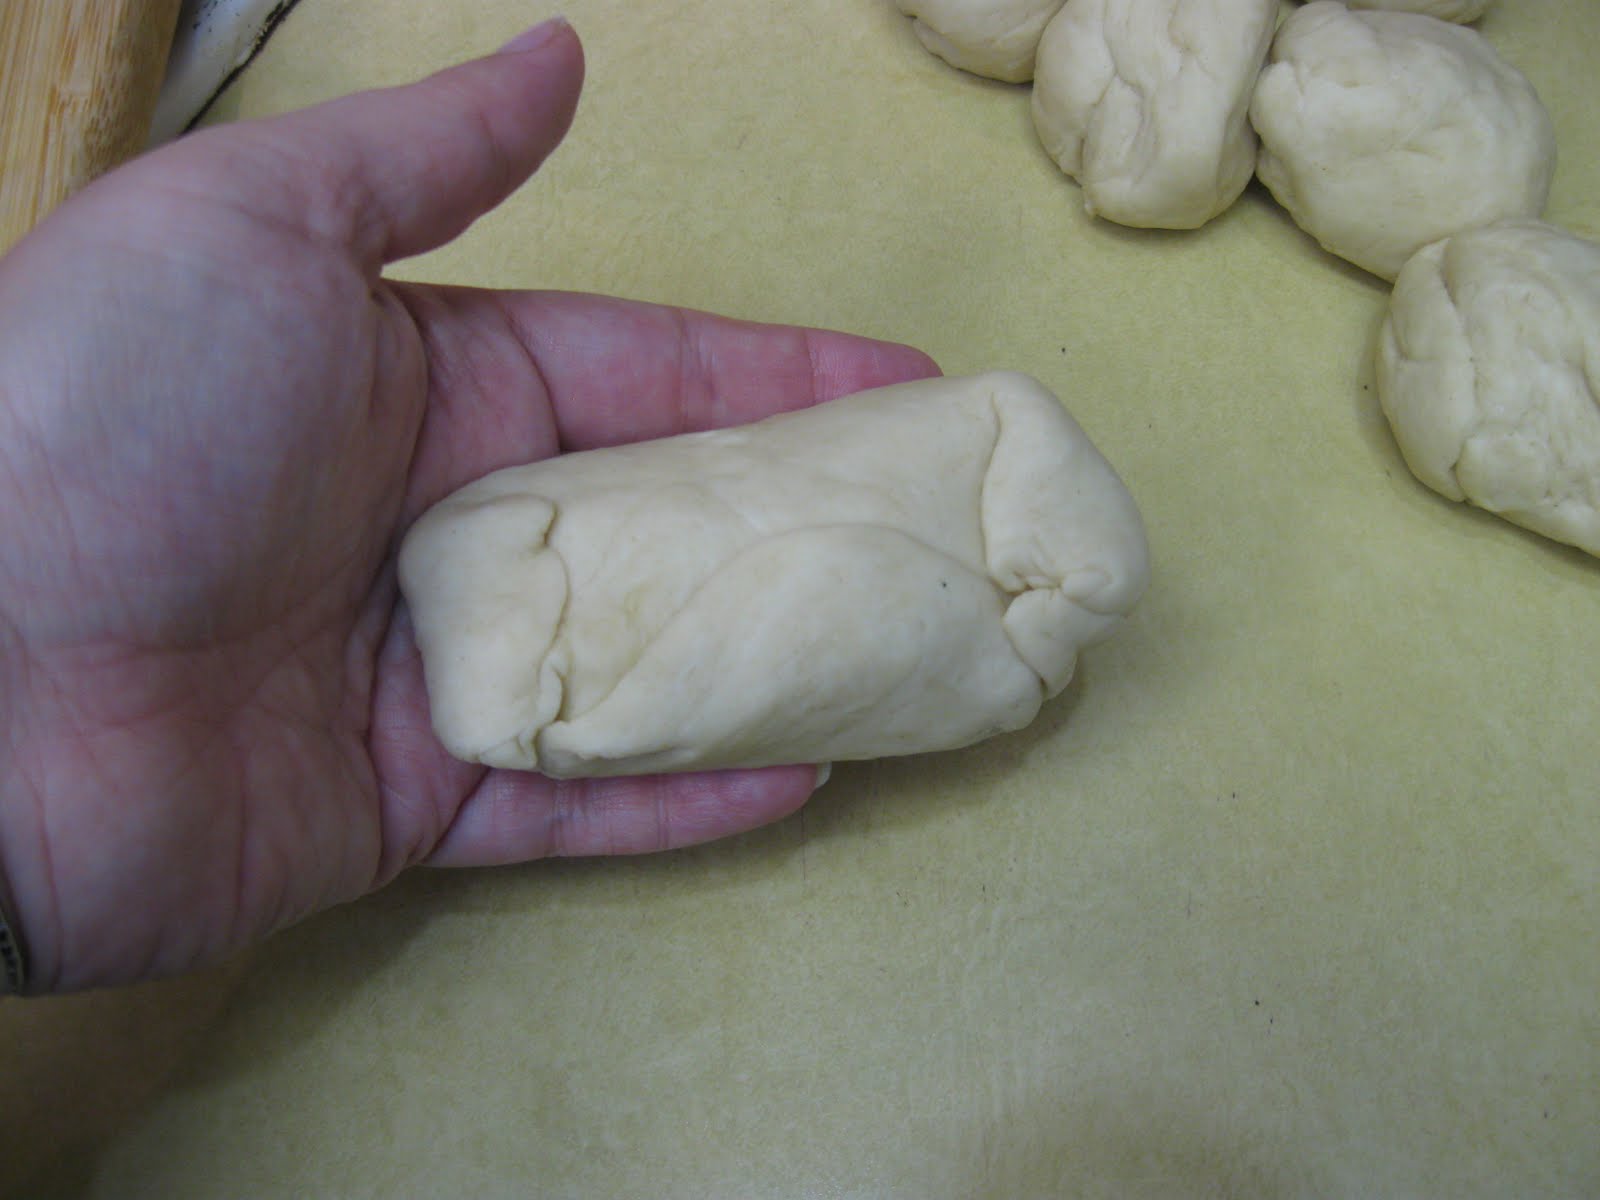
Now divide your dough into 12 pieces. Roll each piece out into an oval. On the short side, place on strip of pepperoni and fold the dough over it.

Put your second piece of pepperoni on the dough and roll it over, sealing the edges as you go.

Repeat this with the third strip of pepperoni.

Now pinch all the edges to make sure everything is sealed up tight.

Place seam side down in a greased 9x13 pan. You want three rows of four with the rolls barely touching.
 Cover and let rise in a warm place until doubled in size. This will take about an hour and the rolls will be all squished together. That's how you want them.

Bake at 350 degrees for 25-30 minutes or until golden brown on top. Brush with melted butter immediately after you remove them from the oven.

Allow to rest in the pan for several minutes, then invert onto a cookie sheet and separate. The bottoms of the pepperoni rolls will look orange. That's from the pepperoni grease seeping through the dough. It makes the rolls super yummy!

One of my favorite ways to eat a pepperoni roll is to split it open while it's warm, slather on some jarred sweet peppers with sauce and layer on mozzarella cheese. If you can't find jarred sweet peppers, use some pizza sauce. But plain is good, too. Really, really good!
Note: if you can't find stick pepperoni or don't want to go to the trouble of slicing it into strips, you can use sliced pepperoni. Use 3 slices in place of each strip and fold up as directed above.
For more yummy recipes, visit Miz Helen's Full Plate Thursday.
These savory little bundles of goodness were invented in my hometown back in the early 1900's. They were created to cater to Italian immigrants who came to that part of the state to work in the coal mines. Thin strips of pepperoni were wrapped in dough and baked until golden. The meat required no refrigeration, so the rolls were perfect for miners who worked long shifts.
Nowadays people use sliced pepperoni instead of strips because of convenience. My family prefers to use thin strips cut from a long stick of pepperoni, so that's what I'll show you.
Here's what you need:

1 9-oz stick of pepperoni
Bread dough of your choice, enough for one loaf
Melted butter
I use my bread machine to mix up the dough, using this recipe and setting it on the dough cycle. While the machine is working, I slice the pepperoni into strips.
First I cut the long stick into 5 pieces. Each of these is sliced in half. Now it's time to peel the skin off the pepperoni. You don't want to chew on that, believe me.

Each half should be cut into four strips. By the time you're done, you should have 40 strips. You're going to need 3 strips for each roll. Since this recipe makes a dozen rolls, you'll have a couple of pepperoni pieces left over. Yum!

Now divide your dough into 12 pieces. Roll each piece out into an oval. On the short side, place on strip of pepperoni and fold the dough over it.

Put your second piece of pepperoni on the dough and roll it over, sealing the edges as you go.

Repeat this with the third strip of pepperoni.

Now pinch all the edges to make sure everything is sealed up tight.
Place seam side down in a greased 9x13 pan. You want three rows of four with the rolls barely touching.
 Cover and let rise in a warm place until doubled in size. This will take about an hour and the rolls will be all squished together. That's how you want them.
Bake at 350 degrees for 25-30 minutes or until golden brown on top. Brush with melted butter immediately after you remove them from the oven.

Allow to rest in the pan for several minutes, then invert onto a cookie sheet and separate. The bottoms of the pepperoni rolls will look orange. That's from the pepperoni grease seeping through the dough. It makes the rolls super yummy!

One of my favorite ways to eat a pepperoni roll is to split it open while it's warm, slather on some jarred sweet peppers with sauce and layer on mozzarella cheese. If you can't find jarred sweet peppers, use some pizza sauce. But plain is good, too. Really, really good!
Note: if you can't find stick pepperoni or don't want to go to the trouble of slicing it into strips, you can use sliced pepperoni. Use 3 slices in place of each strip and fold up as directed above.
For more yummy recipes, visit Miz Helen's Full Plate Thursday.
Sunday, February 13, 2011
Menu Plan February 13-19
This weekend was a whirlwind of activity! We had Mr. Lego's birthday party, out-of-town family visiting, and a Valentine's banquet at church. And that's not including the time it took us to get ready for all of that fun! I'm hoping this week will be a little less busy. I'm trying a few new recipes since I'll have some more prep time.
Here's the menu for this week:
Sunday
Out to eat with friends
Monday
Steak sandwiches, crispy potato wedges
Tuesday
Cheeseburger casserole, lemon pepper broccoli
Wednesday
Chicken rice soup, herb bubble bread
Thursday
Penne with white beans and spinach, green beans
Friday
Homemade pizza
Saturday
Leftovers
Wednesday, February 9, 2011
Greek Chicken Pasta
Trying a new dish can always be a tricky thing in our house. I have to take a close look at the ingredients and see which ones I can substitute or leave out all together to satisfy my crew. This recipe required a few changes on my part. The results were delicious.
I guess what I'm trying to say is this - it's all right to play around with a recipe and modify it to suit your family's tastes. I'm generally a rule follower - if the sign in front of WalMart says "no parking," I will not park there under any circumstances. But when it comes to following a recipe, I do take a few liberties. That's okay. I know my family's preferences better than a magazine editor or cookbook author. Why spend the time and money preparing a recipe I know they won't like because of one or two ingredients?
It doesn't offend me in the least if someone changes a recipe I've shared. Just come back and tell me 'cause I might like your version better than mine! Ha ha!
Now on to the Greek Chicken Pasta. Here's what you'll need:
8 oz uncooked pasta - I used bowties because they're pretty
2 cloves of garlic, minced
1/2 onion, chopped
3 boneless, skinless chicken breasts, cut into bite-sized pieces
1 large tomato, chopped or 1/2 cup canned diced tomatoes
1/3 cup white cooking wine or chicken broth
3 TBSP lemon juice
2 teas dried parsley flakes
2 teas dried oregano
sale and pepper to taste
crumbled feta cheese
Cook the pasta according to the package directions. Drain.
While the pasta is cooking, heat some olive oil in a large skillet. Add the onions and garlic. Saute for a couple of minutes, then add the chicken pieces. Cook until the chicken is no longer pink, about 8 minutes.

Add the tomatoes, white wine, lemon juice and herbs. Stir to coat the chicken.

Stir in the cooked pasta, then season with salt and pepper.

The original recipe called for the feta cheese to be added to the skillet, too. But neither of the kids care for it, so I left it out. I did, however, sprinkle some cheese over my individual serving, as well as hubby's. It added a lovely tang that made the whole dish incredible! Even without the feta, the kids enjoyed it, too.
This recipe is linked to Full Plate Thursday over at Miz Helen's Country Cottage. Stop by there for some more yummy recipes.
Monday, February 7, 2011
Cinnamon Sugar Almonds
It's hard to improve on the taste of almonds, but this recipe does just that! And it's easy to make, too! I made a batch for our Super Bowl party and they were a hit. They're also perfect to make around the Christmas holidays as a snack or to package up and give away. Throw them on a salad to add a yummy crunch!
Here's what you'll need:
1 cup sugar
1/2 cup water
4 cups whole almonds
1 TBSP cinnamon
1 teas salt
Combine the sugar and water in a skillet. Bring to a boil over medium heat.
 Add the almonds to the skillet and coat with the sugar mixture.

Keep stirring until most of the liquid has evaporated. This will take about 5 minutes or so. Add the cinnamon and salt and mix well. Continue to stir until the almonds start to look dry. Dump the almonds out onto a cookie sheet covered with wax paper and allow to cool. Store in an airtight container.

These little goodies are addictive! The sugar and cinnamon turn the almonds into a flavorful treat!
Here's what you'll need:
1 cup sugar
1/2 cup water
4 cups whole almonds
1 TBSP cinnamon
1 teas salt
Combine the sugar and water in a skillet. Bring to a boil over medium heat.
 Add the almonds to the skillet and coat with the sugar mixture.
Keep stirring until most of the liquid has evaporated. This will take about 5 minutes or so. Add the cinnamon and salt and mix well. Continue to stir until the almonds start to look dry. Dump the almonds out onto a cookie sheet covered with wax paper and allow to cool. Store in an airtight container.

These little goodies are addictive! The sugar and cinnamon turn the almonds into a flavorful treat!
Sunday, February 6, 2011
Menu Plan February 6-12 and Super Bowl Party
After church tonight we had some good friends over to watch the Super Bowl with us. I should say, with me because Charles doesn't do football. The food was great and the company was pretty good, too. Although we had some non-Steeler fans sneak in and root for the Packers! Sadly, my Steelers didn't win, but the fun we had with our friends made up for it. Look at the some of the yummy snacks we enjoyed- sausage balls, cookies, caramel corn, coffee cake, and pigs in a blanket to name a few.
 And here are the special cupcakes my friend Suzanne brought. Aren't they adorable? She used marshmallows to form the popcorn! Awesome!

Now on to the menu for this week:
Sunday
Mulligatawny soup, bread
Monday
Pizza sloppy joes, fries
Tuesday
Greek chicken pasta, green beans
Wednesday
White chicken chili - didn't get to this last week
Thursday
Homemade chicken nuggets, crispy potato wedges (family favorite)
Friday
Pepperoni rolls
Saturday
Roast and potatoes in the crockpot
If you want some more meal planning inspiration, take a look at Organizing Junkie's Menu Plan Monday. You'll find tons of interesting menu plans and recipes on hundreds of blogs.
 And here are the special cupcakes my friend Suzanne brought. Aren't they adorable? She used marshmallows to form the popcorn! Awesome!
Now on to the menu for this week:
Sunday
Mulligatawny soup, bread
Monday
Pizza sloppy joes, fries
Tuesday
Greek chicken pasta, green beans
Wednesday
White chicken chili - didn't get to this last week
Thursday
Homemade chicken nuggets, crispy potato wedges (family favorite)
Friday
Pepperoni rolls
Saturday
Roast and potatoes in the crockpot
If you want some more meal planning inspiration, take a look at Organizing Junkie's Menu Plan Monday. You'll find tons of interesting menu plans and recipes on hundreds of blogs.
Thursday, February 3, 2011
My Valentine Tree
Let me just start off by saying I'm no Martha Stewart. Or any kind of crafty person, for that matter. But sometimes I get the urge to create something, so I put my meager crafting skills to work. Though I rarely decorate for Valentine's Day, this year I had the creating urge. Hence the Valentine tree.
The first step was finding a branch with many, um, branches. That was easier said than done! Though we have a forest of trees in our backyard, none of their branches were low enough for me to reach. And before Christmas we had cleaned up the front yard and removed any fallen branches. All of that meant I couldn't find anything bigger than a twig to use for my Valentine tree.
My friend Suzanne came to the rescue! She lives out in the boonies and is surrounded by branches. She very kindly cut a fantastic branch off a scrub tree and presented me with it. She even supplied me with white spray paint to paint the branch with, too! Love that girl!
So I spray painted the branch and let it dry. I wasn't going for a snow-white look, so I left so some of the natural wood color showing through. Of course, if you want the branch to be eye-popping white, just keep adding more coats of paint until you get the look you want.
Charles anchored the now-white branch in a planter for me and filled it up with landscaping gravel. I had some river rocks from the craft store I was going to use, but I liked the tiny gravel better.
Then came the fun part, decorating the tree! I used sparkly foam hearts from the Dollar Tree, hand-stitched felt hearts I had made, and some vintage Valentines I had printed out and laminated. Oh, and some lips. Those were Charles' idea.

I'm not all that fond of sewing, but making the felt hearts and lips was fun and easy. I used a blanket stitch for some and a whipstitch for others. I wasn't going for perfect stitches, either, as you can see. I stuffed the hearts with cotton balls that I pulled apart to look like batting. And finally, I hand stitched ribbon to the backs of the felt decorations so I could hang them from the tree.

My lovely Valentine tree is sitting on the library table in our foyer now to welcome guests.

I love how it turned out! So how do you decorate for Valentine's Day?
Wednesday, February 2, 2011
Chewy Caramel Popcorn
This Sunday night after church, we're going to have friends over to watch the Super Bowl. It's our first time hosting a Super Bowl party, which is really weird since I love football. And I love the Pittsburgh Steelers. Have since I was a kid in the 70's when the Steel Curtain and Terrible Towel were the stuff of legend.
Charles couldn't care less about sports. But he graciously allows me to watch and yell at the TV when my favorite teams are playing. And somehow I managed to get him to invite people over to yell with me. Oh, how I love that man!
We're just going to have finger foods and munchies, with everyone bringing a culinary contribution. Here is one of mine - chewy caramel popcorn. This is incredibly easy and yummy. It only takes about 10 minutes to make the delicious caramel coating - unlike the crunchy caramel corn recipes that require an hour or more in the oven. Who wants to wait that long for caramel popcorn?
What you'll need:
1/2 cup unpopped popcorn
4 TBSP butter
1 cup brown sugar
1/2 cup corn syrup
1/ 2 teas baking soda
1/2 teas salt
The first thing you need to do is pop the 1/2 cup of kernels. I use a hot air popper, but the stovetop method would work, too. For the stovetop method, simply cover the bottom of a large pot with vegetable oil. Pour in the kernels and place a lid on the pot. It will take several minutes for the oil to heat up, but once the kernels start to pop, they'll be done quickly. Shake the pot a few times to make sure all the kernels get in the oil. When the pops start to taper off, remove the pot from the heat. That's it!
Now place the popped corn in a large greased bowl. You'll want to grease it so the caramel coating sticks to the popcorn and not the sides of the bowl!

Now melt the butter in a medium saucepan over low heat. Stir in the brown sugar and keep stirring until the sugar melts. The mixture will be thick, but the sugar should lose some of its graininess as you keep stirring.

Stir in the corn syrup and keep stirring until the mixture is smooth. Add the baking soda and salt. Now the mixture is going to bubble up a bit and turn a lighter color. Stir for another two minutes.

Pour the caramel mixture over the popcorn and stir gently until all the popcorn is covered.

Spread the caramel corn onto a cookie sheet covered with wax paper. Allow to cool, then transfer to an airtight container.
Happy Munching!
Winner of the CSN Stores giveaway
Congratulations to Corrie, our winner!
Thanks to everyone who entered. Y'all are the best!
Thanks to everyone who entered. Y'all are the best!
Subscribe to:
Posts (Atom)