For many years, my ability to make biscuits depended on how well I could crack open a can of Pillsbury. But when we decided to start cutting out processed foods, I knew I'd have to start making my own biscuits.
I experimented with a dozen recipes but discarded each one. This one was too dry or that one tasted too much like baking powder. Or they didn't rise and looked like mini frisbees instead of biscuits.
So I came up with a recipe that worked for my family. And I learned the secret to making biscuits rise. Here it is : don't twist your biscuit cutter (or drinking glass or whatever you use). Just press gently down into the dough and lift up.
See, if you twist the cutter, you seal the edges of the dough. The dough then has to struggle to rise while baking and often just gives up. If you lift the biscuit cutter without twisting, you leave the dough open ended and it can soar!
Okay, so here's what you need:
1 cup unbleached all purpose flour
1 cup white wheat flour
4 teas baking powder
1/2 teas salt
4 TBSP butter, cubed
1 cup milk
1 TBSP butter, melted
In a mixing bowl, stir together the flour, baking powder and salt. Cut in the butter until the mixture resembles crumb. Stir in the milk and gently combine.
The dough will be sticky, so flour your hands and a cutting board. Gently pat the dough into a rectangle about 1/2 inch thick. Using a biscuit cutter or drinking glass dipped in flour, cut out biscuits. Lift the biscuits with a spatula to a baking sheet. Gently press together any remaining dough scraps and cut into biscuits. Try not to overhandle the dough.
Bake at 425 for 10-12 minutes or until golden brown. Brush the tops of the biscuits with the melted butter.
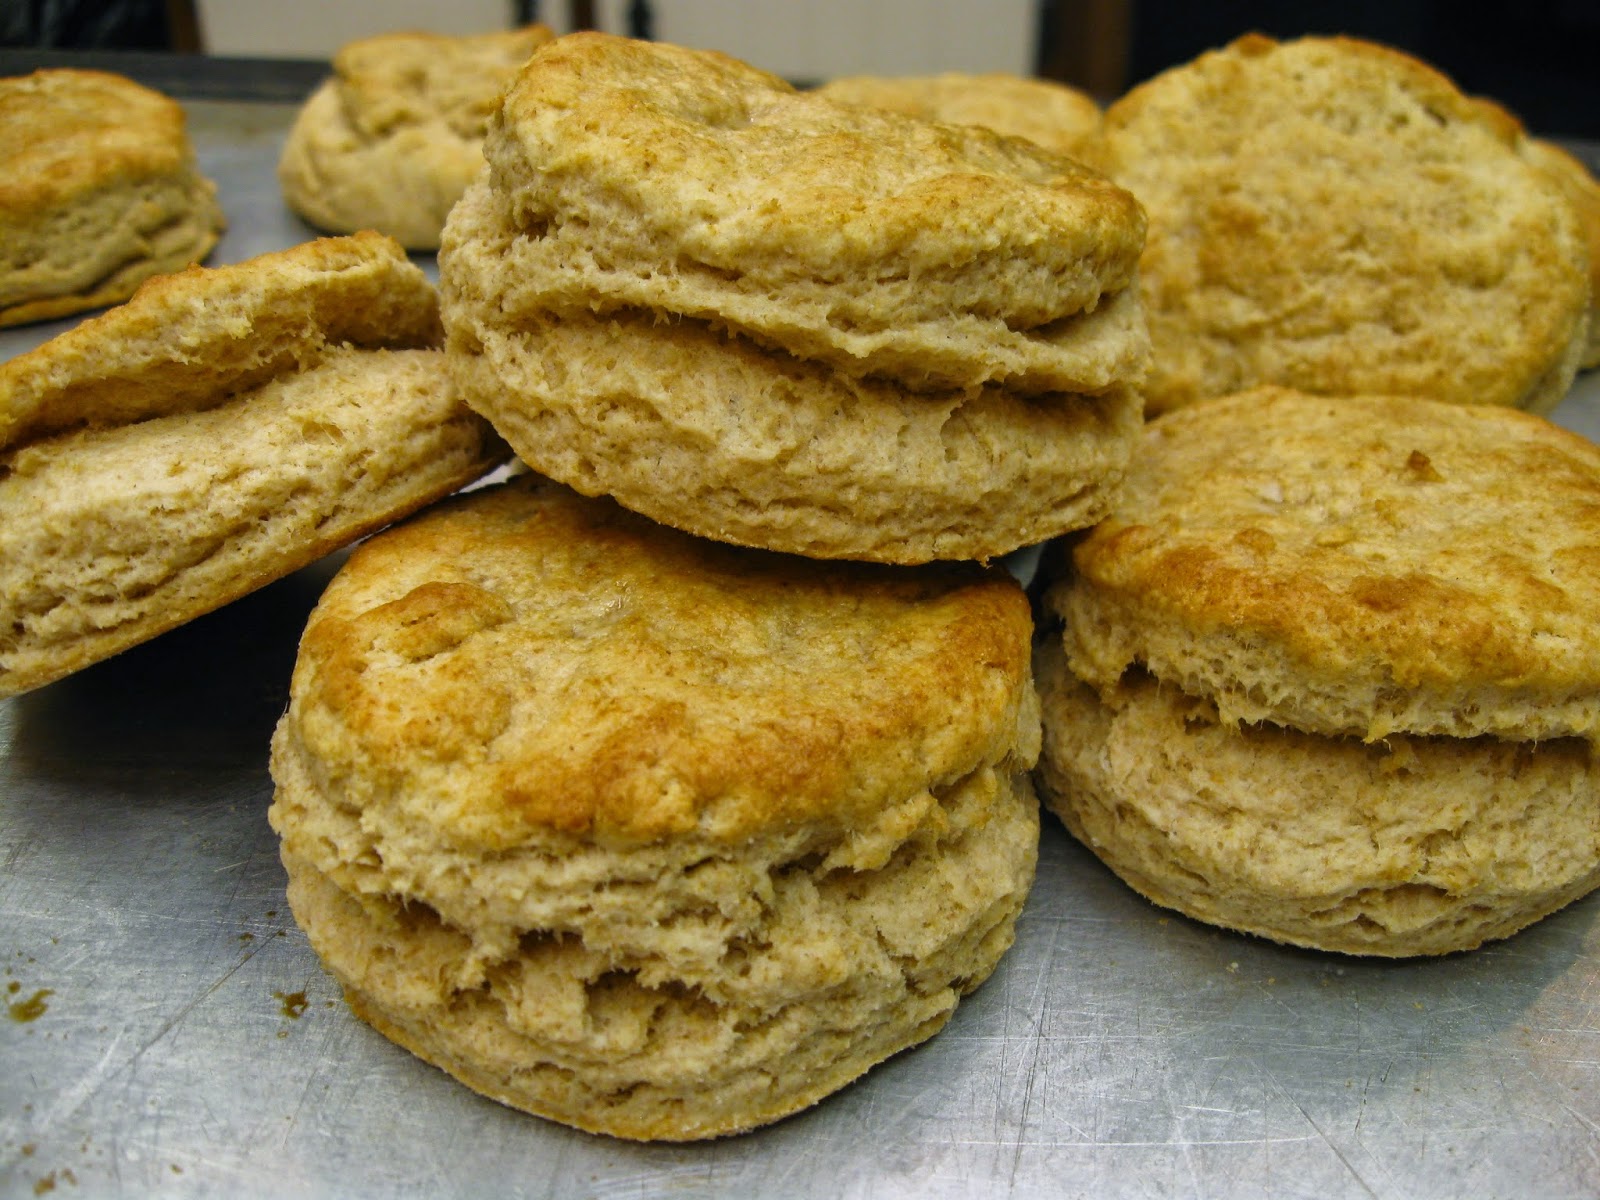
See all the flaky layers in this fluffy biscuit? And did you notice how many times I used the word gently in the directions? Being gentle and not twisting the biscuit cutter will yield some pretty awesome biscuits!
Showing posts with label bread. Show all posts
Friday, April 17, 2015
Friday, November 14, 2014
Homemade Rye Bread
I've always liked rye bread - the crunch of the caraway seeds and the overall tang in the bread.
I've made it my bread machine before, but it always turned out dense. This recipe, however, is lighter and not dense at all. It's not a dark rye loaf. And I really, really like it that way.
We eat this bread along soup or as the base for a good pastrami or BLT sandwich. It's perfectly tangy, too, from the addition of pickle juice! So good!
Here's what you need:
1 cup warm water
2 1/2 teas yeast
1 1/2 TBSP sugar
1/4 cup olive oil or melted butter
1/4 cup dill pickle juice (I just strain it straight from the pickle jar)
2 cups unbleached bread flour (I use King Arthur)
1 cup rye flour
2 TBSP vital wheat gluten
2 TBSP caraway seeds
1 1/2 teas sea salt
In the bowl of a stand mixer, combine the water, yeast and sugar. Allow to stand for about 5 minutes or until puffy.
Stir in the remaining ingredients. Using the dough hook, mix the dough until it's combined but still a little sticky and shaggy looking. Cover and let rise for 30 minutes.
After 30 minutes, knead with the dough hook again until smooth, adding a little more flour if necessary. Place the dough in an oiled bowl, cover and let rise until doubled, about an hour.
Punch the dough down and shape into a loaf. Place on a baking sheet lined with parchment paper. Alternatively, you can shape the dough and put it into a greased 9x5 loaf pan. Using a sharp knife, make a slash down the center of the loaf lengthwise. Cover and let rise for another hour.
Bake at 350 degrees for 30-35 minutes. Brush with melted butter to soften the crust a little.
Here's a closer look so you can see the caraway seeds:
After enjoying this bread, my family never wants to go back to store bought rye bread again!
I've made it my bread machine before, but it always turned out dense. This recipe, however, is lighter and not dense at all. It's not a dark rye loaf. And I really, really like it that way.
We eat this bread along soup or as the base for a good pastrami or BLT sandwich. It's perfectly tangy, too, from the addition of pickle juice! So good!
Here's what you need:
1 cup warm water
2 1/2 teas yeast
1 1/2 TBSP sugar
1/4 cup olive oil or melted butter
1/4 cup dill pickle juice (I just strain it straight from the pickle jar)
2 cups unbleached bread flour (I use King Arthur)
1 cup rye flour
2 TBSP vital wheat gluten
2 TBSP caraway seeds
1 1/2 teas sea salt
In the bowl of a stand mixer, combine the water, yeast and sugar. Allow to stand for about 5 minutes or until puffy.
Stir in the remaining ingredients. Using the dough hook, mix the dough until it's combined but still a little sticky and shaggy looking. Cover and let rise for 30 minutes.
After 30 minutes, knead with the dough hook again until smooth, adding a little more flour if necessary. Place the dough in an oiled bowl, cover and let rise until doubled, about an hour.
Punch the dough down and shape into a loaf. Place on a baking sheet lined with parchment paper. Alternatively, you can shape the dough and put it into a greased 9x5 loaf pan. Using a sharp knife, make a slash down the center of the loaf lengthwise. Cover and let rise for another hour.
Bake at 350 degrees for 30-35 minutes. Brush with melted butter to soften the crust a little.
Here's a closer look so you can see the caraway seeds:
After enjoying this bread, my family never wants to go back to store bought rye bread again!
Tuesday, October 7, 2014
Rosemary Parmesan Bread
I really like making homemade bread.
I never thought I would say that. I always believed it was too much work. So for many years, I relied on a bread machine to produce homemade loaves. It was convenient and easy to load up some ingredients and let the machine take care of it.
But after hubby got me a stand mixer, I started to experiment with making my own bread. I started off with easy things like pizza crust. Over time, I've expanded my repertoire of bread recipes so that I hardly use a bread machine any more.
This recipe quickly became a family favorite. It pairs so well with Italian meals like pasta and chicken parmesan. It's a great accompaniment to soup as well. Not only does it make a flavorful grilled cheese sandwich, it's wonderful to use for BLT's. And it's great with real butter spread over it.
You can make this a day ahead of time because it stays moist. It takes about 2 hours to make, so give yourself time. It's worth it!
Here's what you need:
1 1/4 cup warm water
1 1/2 TBSP yeast
2 teas sugar
1 TBSP olive oil or melted butter
3 cups unbleached all-purpose flour
1 1/2 teas salt
2 TBSP freshly chopped rosemary or 2 teas dried rosemary
1/2 cup freshly grated Parmesan cheese, plus a little more
1 TBSP melted butter
In the bowl of a stand mixer, combine the water, yeast and sugar. Allow to stand for about 5 minutes until puffy. Add the olive oil, flour,salt and 1 1/2 TBSP of the rosemary. Mix with a dough hook. The dough should come away from the sides of the bowl and form a ball. If it doesn't, sprinkle in a little more flour. Now add the 1/2 cups Parmesan cheese. Continue to mix for about 5 minutes. Cover with a kitchen towel and let rise for 30 minutes.
Punch the dough down and turn onto a floured surface. Shape into a loaf and place on a baking sheet lined with parchment paper. Cover and let rise for another 30 minutes. Brush with melted butter and sprinkle the remaining rosemary over the top, along with some more Parmesan cheese.
Bake at 375 degrees for 20-25 minutes or until golden brown all over. If there's any butter remaining, brush it over the loaf.
Can you see the flecks of rosemary in the bread? They give the bread such wonderful flavor. And it smells so heavenly while it's baking! My mouth waters just thinking about it.
I never thought I would say that. I always believed it was too much work. So for many years, I relied on a bread machine to produce homemade loaves. It was convenient and easy to load up some ingredients and let the machine take care of it.
But after hubby got me a stand mixer, I started to experiment with making my own bread. I started off with easy things like pizza crust. Over time, I've expanded my repertoire of bread recipes so that I hardly use a bread machine any more.
This recipe quickly became a family favorite. It pairs so well with Italian meals like pasta and chicken parmesan. It's a great accompaniment to soup as well. Not only does it make a flavorful grilled cheese sandwich, it's wonderful to use for BLT's. And it's great with real butter spread over it.
You can make this a day ahead of time because it stays moist. It takes about 2 hours to make, so give yourself time. It's worth it!
Here's what you need:
1 1/4 cup warm water
1 1/2 TBSP yeast
2 teas sugar
1 TBSP olive oil or melted butter
3 cups unbleached all-purpose flour
1 1/2 teas salt
2 TBSP freshly chopped rosemary or 2 teas dried rosemary
1/2 cup freshly grated Parmesan cheese, plus a little more
1 TBSP melted butter
In the bowl of a stand mixer, combine the water, yeast and sugar. Allow to stand for about 5 minutes until puffy. Add the olive oil, flour,salt and 1 1/2 TBSP of the rosemary. Mix with a dough hook. The dough should come away from the sides of the bowl and form a ball. If it doesn't, sprinkle in a little more flour. Now add the 1/2 cups Parmesan cheese. Continue to mix for about 5 minutes. Cover with a kitchen towel and let rise for 30 minutes.
Punch the dough down and turn onto a floured surface. Shape into a loaf and place on a baking sheet lined with parchment paper. Cover and let rise for another 30 minutes. Brush with melted butter and sprinkle the remaining rosemary over the top, along with some more Parmesan cheese.
Bake at 375 degrees for 20-25 minutes or until golden brown all over. If there's any butter remaining, brush it over the loaf.
Can you see the flecks of rosemary in the bread? They give the bread such wonderful flavor. And it smells so heavenly while it's baking! My mouth waters just thinking about it.
Saturday, March 8, 2014
Pretzel Dogs
Recently our local Walmart added an Auntie Anne's pretzel shop to the front of the store. Right by the exit. So you have to walk past it. Unless you try to avoid temptation and walk all the way over to the other side to exit, like I have been doing.
One of the popular items on Auntie Anne's menu is their pretzel dog, a hot dog all wrapped up in a pretzel. Like the pigs in a blanket we used to eat as kids. Only with a pretzel crust, these are WAYYYY better. But at $4 a hot dog, it's a little too pricy for my budget. I already have a pretzel bread recipe, so I just decided to halve that recipe for the pretzel crust.
I learned a couple of things in making these for my family. One, do not leave both ends of the crust open. Your hot dogs will become a little slippery as they bake and the dough won't stick well. And your hot dogs just might slip out of their pretzel-y shell and land on the floor, where your real-life furry dog is waiting for just such an occurrence. While he or she might be thrilled by such a turn of events, you will not be. You will be disappointed and offer to eat the empty hot-dog flavored pretzel shell.
Second, don't use bun length hot dogs. You won't have enough dough to wrap the dog completely AND enclose one end. I don't think I need to explain why you want one side enclosed again, do I?
So, here's what you need:
3/4 cup warm water
1 and 1/8 teas yeast
1 teas sugar
2 to 2 1/4 cups unbleached flour
2 TBSP melted butter or olive oil
1 teas sea salt
1/4 cup baking soda
1 egg white
coarse salt for sprinkling
Pkg of 8 hot dogs
In a mixing bowl, combine the water, yeast and sugar. Allow to stand for about 5 minutes, until foamy. Stir in the flour, melted butter, and salt. Start with two cups of flour, then add more (up to 1/4 cup) if the dough is too sticky. I use my stand mixer for this but you can do it by hand too. Cover and let rise for about an hour until doubled.
Turn the dough out onto a lightly floured surface. Divide into 8 equal pieces. Roll or twist each piece of dough into a long rope about 12 inches long. Wrap the dough around a hot dog, making sure one end is enclosed. Alternately, you can roll out each piece into a circle, then wrap it completely around the hot dog, enclosing both ends. It's up to you!
Bring a large pot of water to a boil. Reduce the heat to a low simmer, then add the baking soda. It will foam up at first, but that's okay. Drop two wrapped hot dogs into the water and allow to simmer for 30 seconds. Remove to a baking sheet lined with parchment paper. I use a slotted spoon and spatula to do this.
Brush each pretzel dog with egg white, then sprinkle on some coarse salt. Bake at 425 degrees for 15 minutes, or until browned.
One of the popular items on Auntie Anne's menu is their pretzel dog, a hot dog all wrapped up in a pretzel. Like the pigs in a blanket we used to eat as kids. Only with a pretzel crust, these are WAYYYY better. But at $4 a hot dog, it's a little too pricy for my budget. I already have a pretzel bread recipe, so I just decided to halve that recipe for the pretzel crust.
I learned a couple of things in making these for my family. One, do not leave both ends of the crust open. Your hot dogs will become a little slippery as they bake and the dough won't stick well. And your hot dogs just might slip out of their pretzel-y shell and land on the floor, where your real-life furry dog is waiting for just such an occurrence. While he or she might be thrilled by such a turn of events, you will not be. You will be disappointed and offer to eat the empty hot-dog flavored pretzel shell.
Second, don't use bun length hot dogs. You won't have enough dough to wrap the dog completely AND enclose one end. I don't think I need to explain why you want one side enclosed again, do I?
So, here's what you need:
3/4 cup warm water
1 and 1/8 teas yeast
1 teas sugar
2 to 2 1/4 cups unbleached flour
2 TBSP melted butter or olive oil
1 teas sea salt
1/4 cup baking soda
1 egg white
coarse salt for sprinkling
Pkg of 8 hot dogs
In a mixing bowl, combine the water, yeast and sugar. Allow to stand for about 5 minutes, until foamy. Stir in the flour, melted butter, and salt. Start with two cups of flour, then add more (up to 1/4 cup) if the dough is too sticky. I use my stand mixer for this but you can do it by hand too. Cover and let rise for about an hour until doubled.
Turn the dough out onto a lightly floured surface. Divide into 8 equal pieces. Roll or twist each piece of dough into a long rope about 12 inches long. Wrap the dough around a hot dog, making sure one end is enclosed. Alternately, you can roll out each piece into a circle, then wrap it completely around the hot dog, enclosing both ends. It's up to you!
Bring a large pot of water to a boil. Reduce the heat to a low simmer, then add the baking soda. It will foam up at first, but that's okay. Drop two wrapped hot dogs into the water and allow to simmer for 30 seconds. Remove to a baking sheet lined with parchment paper. I use a slotted spoon and spatula to do this.
Brush each pretzel dog with egg white, then sprinkle on some coarse salt. Bake at 425 degrees for 15 minutes, or until browned.
Thursday, March 6, 2014
Crusty Bread in a Cast Iron Pot
Last week hubby got me a cast iron Dutch oven for my birthday - which isn't for another 10 days, but I am not opposed to early birthday presents. At all.
I specifically wanted it so I could make this recipe for crusty bread. My mouth watered just thinking about it. With only 4 ingredients and no kneading, I knew I wouldn't be able to find any bread that is easier to make.
And so I tried it. It was amazing! My husband said it was worth every penny he spent on the Dutch oven for just one loaf! He compared it to an artisan loaf you'd spend $5 for at a bakery. The crust was very crunchy while the inside was delightfully chewy. So, so good!
Here's what you need:
3 cups unbleached flour
1 3/4 teas salt
1/2 teas yeast
1 1/2 cups warm water
In a large mixing bowl, combine the flour, salt and yeast. Stir in the warm water and mix until the flour is no longer dry. Your dough will look like a sticky mess.
Cover the bowl and allow to sit on the counter for 12-18 hours. I made my dough the night before I wanted to bake the bread. It was perfect. This is what your dough will look like after 12 hours.
See all those lovely bubbles in the dough? Those will make for some great texture in your bread!
When you're ready to bake your loaf, scrape the dough out of the bowl onto a floured surface. I just use a cookie sheet covered in parchment paper to reduce the mess I have to clean up later. Shape the dough into a round loaf shape.
Place your cast iron pot into the oven and heat the oven to 450 degrees. Allow the pot to heat up for 30 minutes. Remove from the oven very, very carefully - remember it's 450 degrees! Drop the loaf into the hot pot. Cover and place back into the oven for 30 minutes. Now take off the lid and allow to bake for another 10-15 minutes.
Isn't that just gorgeous?
Carefully remove the bread from the pot. I use two spatulas to do this since my pot is so heavy I can't tilt it while it's hot. Place the loaf on a cooling rack and wait about 30 minutes to slice.
I specifically wanted it so I could make this recipe for crusty bread. My mouth watered just thinking about it. With only 4 ingredients and no kneading, I knew I wouldn't be able to find any bread that is easier to make.
And so I tried it. It was amazing! My husband said it was worth every penny he spent on the Dutch oven for just one loaf! He compared it to an artisan loaf you'd spend $5 for at a bakery. The crust was very crunchy while the inside was delightfully chewy. So, so good!
Here's what you need:
3 cups unbleached flour
1 3/4 teas salt
1/2 teas yeast
1 1/2 cups warm water
In a large mixing bowl, combine the flour, salt and yeast. Stir in the warm water and mix until the flour is no longer dry. Your dough will look like a sticky mess.
Cover the bowl and allow to sit on the counter for 12-18 hours. I made my dough the night before I wanted to bake the bread. It was perfect. This is what your dough will look like after 12 hours.
See all those lovely bubbles in the dough? Those will make for some great texture in your bread!
When you're ready to bake your loaf, scrape the dough out of the bowl onto a floured surface. I just use a cookie sheet covered in parchment paper to reduce the mess I have to clean up later. Shape the dough into a round loaf shape.
Place your cast iron pot into the oven and heat the oven to 450 degrees. Allow the pot to heat up for 30 minutes. Remove from the oven very, very carefully - remember it's 450 degrees! Drop the loaf into the hot pot. Cover and place back into the oven for 30 minutes. Now take off the lid and allow to bake for another 10-15 minutes.
Isn't that just gorgeous?
Carefully remove the bread from the pot. I use two spatulas to do this since my pot is so heavy I can't tilt it while it's hot. Place the loaf on a cooling rack and wait about 30 minutes to slice.
Tuesday, September 3, 2013
Homemade French Bread
After pretzel bread, this is the bread my family requests the most. The bread is crusty on the outside but soft and tangy on the inside. The vinegar in the recipe lends a sourdough taste to the bread that's fantastic!
This recipe makes two nice-sized loaves. If we're having company, it's definitely nice to have two loaves with only one prep. Sometimes I cut the recipe in half to just make one loaf (I'll share the measurements at the end of this post) if it's only my family. I've never frozen this bread - it usually doesn't last long enough to make it to the freezer. But I imagine it would freeze just fine as long as it's wrapped tightly to prevent freezer burn/drying out.
I will warn you ahead of time, this bread does take a while to prepare. Make this when you have an afternoon to spend babysitting the dough. It's definitely worth the effort!
Here's what you need (2-loaf measurements):
Homemade French Bread - click here for a printable version.
2 1/2 cups warm water
3 TBSP sugar
2 TBSP yeast
2 TBSP white vinegar
1/3 cup olive oil - you can use vegetable or canola oil
6-7 cups flour
1 TBSP salt
In the bowl of a stand mixer, combine the water, sugar, yeast and vinegar. Allow to sit until the mixture is bubbly, about 5 minutes.
Add the oil, 6 cups of flour and salt. Gradually add more flour until the dough is soft and not sticky. I usually start with about 1/2 cup and work my way up until I've reached 7 cups total. With the dough hook attachment, knead for 5 minutes. If you don't have a stand mixer, you can also do this by hand with a wooden spoon. Transfer to a greased ovenproof bowl if you don't use the stand mixer. You're going to put the dough into a warm oven so it rises quickly, giving it lots of lovely air pockets. If you use the metal bowl that comes with the stand mixer, pour a little olive oil into the bowl and make sure your dough is greased so it doesn't stick.
Make sure your oven has enough room to hold the bowl of dough. I have to move my top rack down to accomodate mine. Now turn your oven on to 200 degrees. While the oven is heating, boil about two cups of water. Pour the water into an ovenproof pan, then pop it into the oven. When the oven reaches 200 degrees, turn it off. Place some foil over your dough bowl, then put the bowl into the oven.
Because the oven is warm, it won't take long for the dough to rise to the top of the bowl. Mine took about 30 minutes. Make sure you use pot holders to remove your metal bowl from the oven. It gets hot. Gently punch the dough down, scraping any dough from the sides of the bowl. Place the foil over it and return to the oven for another rising.
You'll want your dough to rise at least three times in the oven. Once it's risen enough times to suit you, take it out of the bowl and shape into loaves. Put onto baking sheets lined with parchment paper.
Brush with a beaten egg. The egg wash gives the loaves their wonderful shiny crusts. With a sharp knife, make three or four slashes on top of the loaves.
Allow to rise for another 20 minutes. You'll see the slashes expand a little and the loaves might get wider.
Bake at 375 degrees for 25-30 minutes until golden brown. The loaves are done when they sound hollow if you tap the bottoms. This is where the parchment papers comes in handy. You can just tilt the paper a little to give yourself room to tap the bottoms!
Doesn't that look amazing?
This bread is so delicious warm! If you cut it while it's still warm, though, use an electric knife to get even slices and avoid crushing the bread.
Now here are the measurements for one loaf. Just follow the same directions for mixing, kneading, rising, shaping and baking.
One loaf:
1 1/4 cups warm water
1 1/2 TBSP sugar
1 TBSP yeast
1 TBSP white vinegar
2 TBSP + 2 teas oil
3 1/2 cups flour
1/2 TBSP salt
Enjoy!
This recipe makes two nice-sized loaves. If we're having company, it's definitely nice to have two loaves with only one prep. Sometimes I cut the recipe in half to just make one loaf (I'll share the measurements at the end of this post) if it's only my family. I've never frozen this bread - it usually doesn't last long enough to make it to the freezer. But I imagine it would freeze just fine as long as it's wrapped tightly to prevent freezer burn/drying out.
I will warn you ahead of time, this bread does take a while to prepare. Make this when you have an afternoon to spend babysitting the dough. It's definitely worth the effort!
Here's what you need (2-loaf measurements):
Homemade French Bread - click here for a printable version.
2 1/2 cups warm water
3 TBSP sugar
2 TBSP yeast
2 TBSP white vinegar
1/3 cup olive oil - you can use vegetable or canola oil
6-7 cups flour
1 TBSP salt
In the bowl of a stand mixer, combine the water, sugar, yeast and vinegar. Allow to sit until the mixture is bubbly, about 5 minutes.
Add the oil, 6 cups of flour and salt. Gradually add more flour until the dough is soft and not sticky. I usually start with about 1/2 cup and work my way up until I've reached 7 cups total. With the dough hook attachment, knead for 5 minutes. If you don't have a stand mixer, you can also do this by hand with a wooden spoon. Transfer to a greased ovenproof bowl if you don't use the stand mixer. You're going to put the dough into a warm oven so it rises quickly, giving it lots of lovely air pockets. If you use the metal bowl that comes with the stand mixer, pour a little olive oil into the bowl and make sure your dough is greased so it doesn't stick.
Make sure your oven has enough room to hold the bowl of dough. I have to move my top rack down to accomodate mine. Now turn your oven on to 200 degrees. While the oven is heating, boil about two cups of water. Pour the water into an ovenproof pan, then pop it into the oven. When the oven reaches 200 degrees, turn it off. Place some foil over your dough bowl, then put the bowl into the oven.
Because the oven is warm, it won't take long for the dough to rise to the top of the bowl. Mine took about 30 minutes. Make sure you use pot holders to remove your metal bowl from the oven. It gets hot. Gently punch the dough down, scraping any dough from the sides of the bowl. Place the foil over it and return to the oven for another rising.
You'll want your dough to rise at least three times in the oven. Once it's risen enough times to suit you, take it out of the bowl and shape into loaves. Put onto baking sheets lined with parchment paper.
Brush with a beaten egg. The egg wash gives the loaves their wonderful shiny crusts. With a sharp knife, make three or four slashes on top of the loaves.
Allow to rise for another 20 minutes. You'll see the slashes expand a little and the loaves might get wider.
Bake at 375 degrees for 25-30 minutes until golden brown. The loaves are done when they sound hollow if you tap the bottoms. This is where the parchment papers comes in handy. You can just tilt the paper a little to give yourself room to tap the bottoms!
Doesn't that look amazing?
This bread is so delicious warm! If you cut it while it's still warm, though, use an electric knife to get even slices and avoid crushing the bread.
Now here are the measurements for one loaf. Just follow the same directions for mixing, kneading, rising, shaping and baking.
One loaf:
1 1/4 cups warm water
1 1/2 TBSP sugar
1 TBSP yeast
1 TBSP white vinegar
2 TBSP + 2 teas oil
3 1/2 cups flour
1/2 TBSP salt
Enjoy!
Thursday, May 16, 2013
Little Caesar's Crazy Bread at Home
Not long back I had a craving for Little Caesar's Crazy Bread. I wasn't willing to drive across town to buy any though, so I scoured the internet until I found a recipe I thought would suffice. Most of the recipes I found used refrigerated, canned pizza dough as the base, and I'll be honest, I don't care for that stuff at all! Then I found this recipe at Life at the Holman's that made the dough from scratch and gave it a try.
It was exactly like Little Caesar's, only fresher! I make this at least once a week, usually at the kids' request. Sometimes we eat it as an accompaniment to a meal, sometimes as a snack. It's quick and easy, too!
Here's what you need:
1 cup warm water
2 1/4 teas yeast
2 teas sugar
2 1/2 cup flour
1 teas salt
2 TBSP butter, melted and combined with 1 teas garlic powder
2 TBSP grated Parmesan cheese
In the bowl of a stand mixer, combine the warm water, yeast and sugar. Allow to sit for 5 minutes or so, until the mixture is foamy.
Add the flour and salt. Using a dough hook, knead the dough for 5 minutes or until it's smooth and not sticky. Let rest for 10 minutes.
Brush a pizza pan with a little olive oil. I like to sprinkle a little cornmeal over the pan to make it more like Little Caesar's but you don't have to. Roll out the dough to cover the pan. Using a pizza cutter, slice down the middle then across to form sticks. Let rest for 10 more minutes.
Heat oven to 450 degrees. Bake for 6-8 minutes or until golden brown. Immediately brush with butter mixture, then sprinkle with Parmesan cheese. Serve warm with pizza sauce.
It was exactly like Little Caesar's, only fresher! I make this at least once a week, usually at the kids' request. Sometimes we eat it as an accompaniment to a meal, sometimes as a snack. It's quick and easy, too!
Here's what you need:
1 cup warm water
2 1/4 teas yeast
2 teas sugar
2 1/2 cup flour
1 teas salt
2 TBSP butter, melted and combined with 1 teas garlic powder
2 TBSP grated Parmesan cheese
In the bowl of a stand mixer, combine the warm water, yeast and sugar. Allow to sit for 5 minutes or so, until the mixture is foamy.
Add the flour and salt. Using a dough hook, knead the dough for 5 minutes or until it's smooth and not sticky. Let rest for 10 minutes.
Brush a pizza pan with a little olive oil. I like to sprinkle a little cornmeal over the pan to make it more like Little Caesar's but you don't have to. Roll out the dough to cover the pan. Using a pizza cutter, slice down the middle then across to form sticks. Let rest for 10 more minutes.
Heat oven to 450 degrees. Bake for 6-8 minutes or until golden brown. Immediately brush with butter mixture, then sprinkle with Parmesan cheese. Serve warm with pizza sauce.
Thursday, January 24, 2013
Pretzel Bread
Over a year ago, I started making pretzel rolls for my family. We all love them. The salty, chewy outside. The soft, tender inside. I mean, what's not to like?
Well, I'll be honest. These delicious rolls are time-consuming to make. That would be the only thing NOT to like about them.
So I thought, why not just make pretzel loaves instead of pretzel rolls? As long as I had a pot big enough in which to poach the loaves, adapting this recipe to make two small loaves instead of more than a dozen little rolls was pretty simple. I'm all about taking shortcuts to make my life easier!
And my family loves the bread form just as much as the roll form, if not a little more. I'm making this bread at least once a week now. And they're eating it as quickly as I can make it.
The recipe and method are almost exactly the same as the original recipe. But this version saves time, so that's even more reason to love it!
Click here for a printable recipe.
Here's what you need:
1 1/2 cups warm water
1 pkg (or 2 1/4 teas) yeast
2 teas sugar
4 to 4 1/2 cups flour (I used King Arthur unbleached)
2 teas coarse salt
1/4 cup oil or melted butter
1/4 cup baking soda
1 egg, lightly beaten
Additional coarse salt for sprinkling on top
In a mixing bowl, combine the water, yeast and sugar. Allow to stand for 5 minutes, or until foamy. Add the flour, salt and oil or butter. I always start with 4 cups of flour and add more if the dough seems too sticky. Combine well (I use my stand mixer and dough hook for this) and then cover with a towel. Allow to rise in a warm place for about an hour or until doubled.
Remove the dough from the bowl and shape into two small, oval loaves. Place on a baking sheet lined with parchment paper. Cover with a towel and allow to rise for about 30 minutes.
Bring a large pot of water to boil. Be sure not to fill the pot too full. The weight of the loaves will displace too much water if the pot's too full. When the water starts boiling, add the baking soda. Reduce the heat to a simmer, then carefully place one loaf in the pot. Allow to poach for 30 seconds, then gently turn. I use two spatulas to do this, one under each end of the loaf. Poach for another 30 seconds, then remove and put back on the baking sheet. Repeat with the other loaf.
With a sharp knife, slash the top of each loaf a couple of times or make an X. Use a pastry brush to glaze the loaves with the beaten egg, making sure all sides are covered. Sprinkle with coarse salt.
Bake at 425 degrees for 15-20 minutes, until browned.
It's much easier to slice this bread with an electric knife than a regular bread knife. The outside isn't crusty like a normal loaf of bread. It's more chewy and flexible. You might end up smashing the bread with a regular bread knife because you have to exert a little more effort.
Doesn't that look scrumptious? (It is!)
Well, I'll be honest. These delicious rolls are time-consuming to make. That would be the only thing NOT to like about them.
So I thought, why not just make pretzel loaves instead of pretzel rolls? As long as I had a pot big enough in which to poach the loaves, adapting this recipe to make two small loaves instead of more than a dozen little rolls was pretty simple. I'm all about taking shortcuts to make my life easier!
And my family loves the bread form just as much as the roll form, if not a little more. I'm making this bread at least once a week now. And they're eating it as quickly as I can make it.
The recipe and method are almost exactly the same as the original recipe. But this version saves time, so that's even more reason to love it!
Click here for a printable recipe.
Here's what you need:
1 1/2 cups warm water
1 pkg (or 2 1/4 teas) yeast
2 teas sugar
4 to 4 1/2 cups flour (I used King Arthur unbleached)
2 teas coarse salt
1/4 cup oil or melted butter
1/4 cup baking soda
1 egg, lightly beaten
Additional coarse salt for sprinkling on top
In a mixing bowl, combine the water, yeast and sugar. Allow to stand for 5 minutes, or until foamy. Add the flour, salt and oil or butter. I always start with 4 cups of flour and add more if the dough seems too sticky. Combine well (I use my stand mixer and dough hook for this) and then cover with a towel. Allow to rise in a warm place for about an hour or until doubled.
Remove the dough from the bowl and shape into two small, oval loaves. Place on a baking sheet lined with parchment paper. Cover with a towel and allow to rise for about 30 minutes.
Bring a large pot of water to boil. Be sure not to fill the pot too full. The weight of the loaves will displace too much water if the pot's too full. When the water starts boiling, add the baking soda. Reduce the heat to a simmer, then carefully place one loaf in the pot. Allow to poach for 30 seconds, then gently turn. I use two spatulas to do this, one under each end of the loaf. Poach for another 30 seconds, then remove and put back on the baking sheet. Repeat with the other loaf.
With a sharp knife, slash the top of each loaf a couple of times or make an X. Use a pastry brush to glaze the loaves with the beaten egg, making sure all sides are covered. Sprinkle with coarse salt.
Bake at 425 degrees for 15-20 minutes, until browned.
It's much easier to slice this bread with an electric knife than a regular bread knife. The outside isn't crusty like a normal loaf of bread. It's more chewy and flexible. You might end up smashing the bread with a regular bread knife because you have to exert a little more effort.
Doesn't that look scrumptious? (It is!)
Monday, November 5, 2012
Flatbread Shortcut
I have a fantastic recipe for flatbread that I've shared before. I'm not going to lie. It IS amazing! But it also takes some time because it requires two risings. I definitely have to plan ahead when I make it.
And even though I love, love, love my flatbread recipe, sometimes I need to shave time off my meal prep. This is a quick, easy substitute that works wonderfully when time is of the essence.
All I do is mix up a batch of pizza dough, divide it into 8-10 portions, roll it out thinly and throw on the griddle. It takes all of 10 minutes to prepare the dough, a few more minutes to roll it out and a couple of minutes to cook each one. So I've taken a 2-hour process and condensed it into 30 minutes. Not bad!
My family can't even tell the difference, even though the pizza dough version isn't as flat. And that's typically because I haven't rolled it out thinly enough. This time-saving version is just as fabulous for gyros and wraps as the original.
So, what shortcuts do you want to share? How do you save time in the kitchen? Share in the comments!
And even though I love, love, love my flatbread recipe, sometimes I need to shave time off my meal prep. This is a quick, easy substitute that works wonderfully when time is of the essence.
All I do is mix up a batch of pizza dough, divide it into 8-10 portions, roll it out thinly and throw on the griddle. It takes all of 10 minutes to prepare the dough, a few more minutes to roll it out and a couple of minutes to cook each one. So I've taken a 2-hour process and condensed it into 30 minutes. Not bad!
My family can't even tell the difference, even though the pizza dough version isn't as flat. And that's typically because I haven't rolled it out thinly enough. This time-saving version is just as fabulous for gyros and wraps as the original.
So, what shortcuts do you want to share? How do you save time in the kitchen? Share in the comments!
Wednesday, July 18, 2012
Green Chile Cheddar Bread
I saw this recipe at Lazy J Bar C Farm and knew I had to try it. I switched out the jalapenos for mild green chiles because that's what I had on hand and I didn't want the bread to be too spicy for the young'uns. They ended up loving this bread and wanting me to make more! I gave the second loaf to friends, and they loved it, too.
When I saw cornmeal listed as an ingredient, I worried a bit about the texture. No need to worry, though, because the texture was amazing! It was slightly chewy and grainy but still moist. This bread is the perfect accompaniment to soups or stews or any kind of Mexican/Southwest dish. And since it makes two loaves, you can give one away or freeze one for later. One prep, two loaves - yeah, that sounds good to me!
Here's what you need:
1 cup warm water
2 teas yeast
1 TBSP sugar
2 TBSP melted butter or olive oil
3 cups flour (I used half white wheat, half unbleached white)
1 cup cornmeal
1 1/2 cups shredded cheddar cheese, plus a little more for the top of the bread
1/2 of a 4 oz can of mild green chiles, plus one or two more TBSP for the top
1 1/2 teas salt
In a mixing bowl, dissolve the yeast in the warm water. Let stand for 5 minutes until frothy. Add the remaining ingredients (except for the topping cheese and chiles) and mix well. With a stand mixer or by hand, knead the dough for 5 minutes. Cover and let rise in a warm place until doubled.
Divide the dough into two pieces. Shape into round loaves and place on a lightly greased baking sheet. With a sharp knife, slash an X into the top of each loaf.
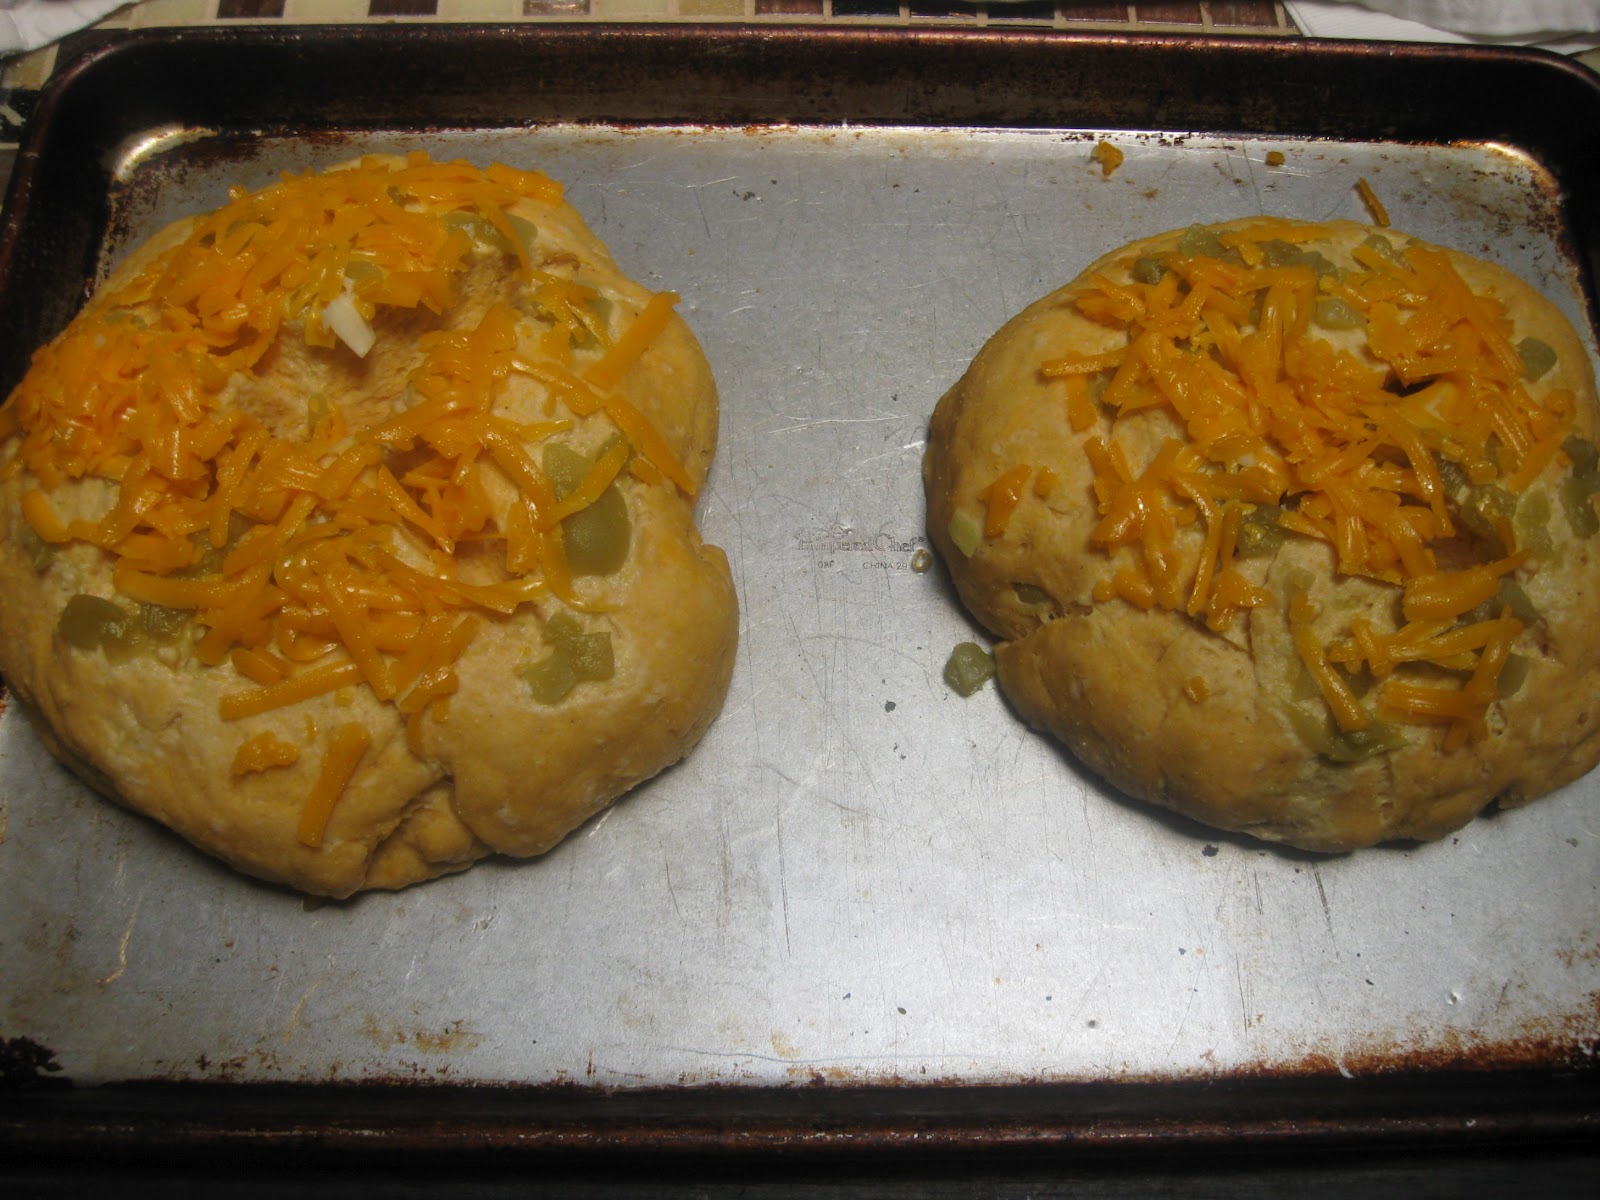
Put the extra chiles on top, then cover with the extra cheese. Let the loaves rise for one hour.
Bake at 375 degrees for 20-25 minutes or until golden brown.
Remove to a wire rack to cool. Then slice and enjoy!
I'm linking this recipe up to Miz Helen's Full Plate Thursday. Go on over there and take a look at some more delicious recipes!
When I saw cornmeal listed as an ingredient, I worried a bit about the texture. No need to worry, though, because the texture was amazing! It was slightly chewy and grainy but still moist. This bread is the perfect accompaniment to soups or stews or any kind of Mexican/Southwest dish. And since it makes two loaves, you can give one away or freeze one for later. One prep, two loaves - yeah, that sounds good to me!
Here's what you need:
1 cup warm water
2 teas yeast
1 TBSP sugar
2 TBSP melted butter or olive oil
3 cups flour (I used half white wheat, half unbleached white)
1 cup cornmeal
1 1/2 cups shredded cheddar cheese, plus a little more for the top of the bread
1/2 of a 4 oz can of mild green chiles, plus one or two more TBSP for the top
1 1/2 teas salt
In a mixing bowl, dissolve the yeast in the warm water. Let stand for 5 minutes until frothy. Add the remaining ingredients (except for the topping cheese and chiles) and mix well. With a stand mixer or by hand, knead the dough for 5 minutes. Cover and let rise in a warm place until doubled.
Divide the dough into two pieces. Shape into round loaves and place on a lightly greased baking sheet. With a sharp knife, slash an X into the top of each loaf.
Put the extra chiles on top, then cover with the extra cheese. Let the loaves rise for one hour.
Bake at 375 degrees for 20-25 minutes or until golden brown.
Remove to a wire rack to cool. Then slice and enjoy!
I'm linking this recipe up to Miz Helen's Full Plate Thursday. Go on over there and take a look at some more delicious recipes!
Monday, April 30, 2012
Homemade Tortillas
I love the convenience of tortillas. You can roll up veggies and cheese for quick snacks or make easy quesadillas. Peanut butter and jelly spread onto a tortilla, then rolled up and sliced into spirals make wonderful afternoon snacks. And of course, you can't forget tacos, burritos, and enchiladas! Tortillas are fantastic!
But the ingredients in store-bought tortillas are not fantastic. They are loaded with preservatives and unhealthy ingredients. So I decided to try my hand at making my own. And I loved how they turned out. I adapted a recipe from Beautiful 2 God.
Let me just admit right off that I'm circle-impaired. Meaning I can't roll out a tortilla in a perfect circle to save my life! Maybe I'll get better with more practice, but right now my tortillas generally turn out egg-shaped. Not to worry, though. When you wrap them around yummy ingredients, the shape really isn't that important. To me, knowing that I've used better ingredients makes up for it!
Here's what you need:
3 cups flour (I use white wheat)
1 cup warm water (if you use any kind of wheat flour, you may need a little more)
1/4 teas baking powder
1 teas salt
1/4 cup olive oil
Mix the water, oil, baking powder and salt in the bowl of a stand mixer. If you don't have a mixer, just do this by hand. It's not hard at all. Using the paddle attachment, slowly add the flour. Mix on low speed until everything is incorporated. Switch to the dough hook and knead until the dough forms a smooth ball. Add a little more flour if the dough is too sticky, or a little more water if it is too dry.
Let the dough rest for about 10 minutes. Divide the dough into 8 pieces and shape into balls. Allow to rest for another 10 minutes.
When resting time is over, use a rolling pin to roll the dough balls into 10-inch circles. Make sure you do this on a floured surface so your circles come up easily. You want them to be very thin, but if they're too thin, they'll tear easily.
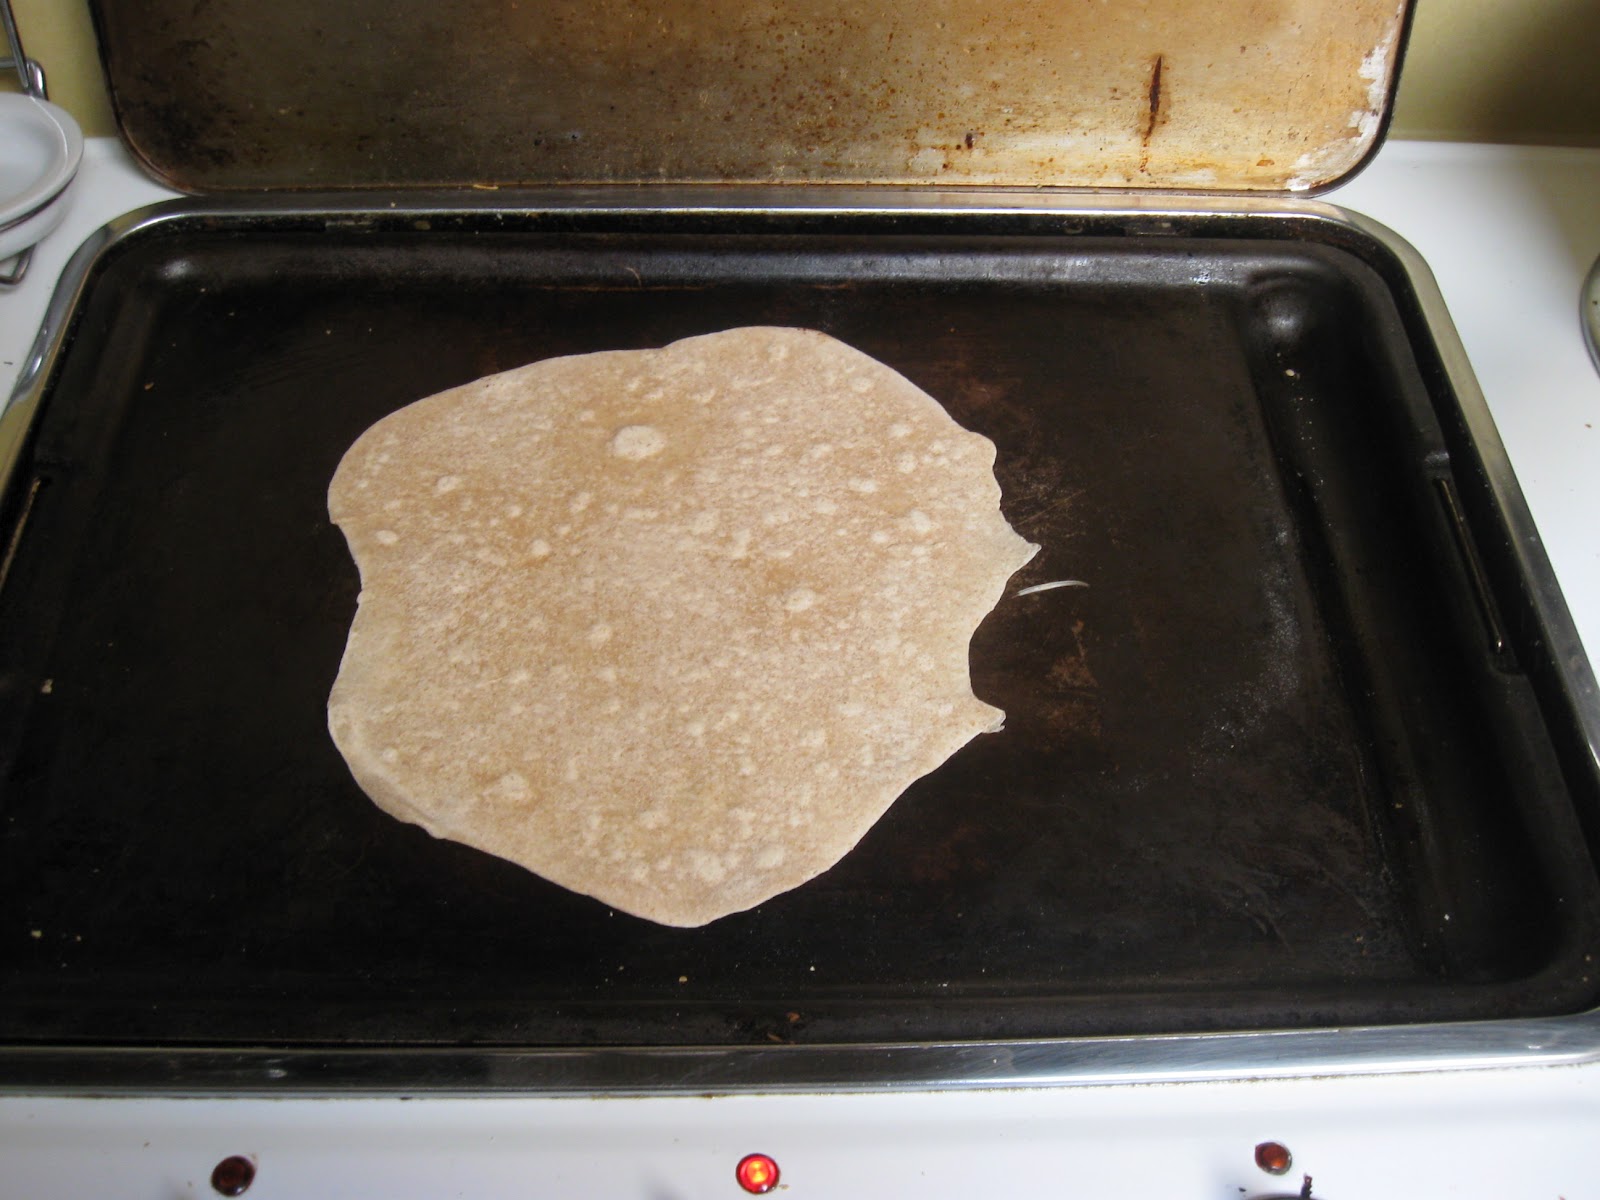
On a hot griddle, cook the tortillas on one side for a couple of minutes, then flip over. Both sides should be lightly browned.
But the ingredients in store-bought tortillas are not fantastic. They are loaded with preservatives and unhealthy ingredients. So I decided to try my hand at making my own. And I loved how they turned out. I adapted a recipe from Beautiful 2 God.
Let me just admit right off that I'm circle-impaired. Meaning I can't roll out a tortilla in a perfect circle to save my life! Maybe I'll get better with more practice, but right now my tortillas generally turn out egg-shaped. Not to worry, though. When you wrap them around yummy ingredients, the shape really isn't that important. To me, knowing that I've used better ingredients makes up for it!
Here's what you need:
3 cups flour (I use white wheat)
1 cup warm water (if you use any kind of wheat flour, you may need a little more)
1/4 teas baking powder
1 teas salt
1/4 cup olive oil
Let the dough rest for about 10 minutes. Divide the dough into 8 pieces and shape into balls. Allow to rest for another 10 minutes.
When resting time is over, use a rolling pin to roll the dough balls into 10-inch circles. Make sure you do this on a floured surface so your circles come up easily. You want them to be very thin, but if they're too thin, they'll tear easily.
On a hot griddle, cook the tortillas on one side for a couple of minutes, then flip over. Both sides should be lightly browned.
Continue with the process until all tortillas are cooked. Please note - if you want smaller tortillas for tacos or such, simply divide the dough up into smaller balls.
To freeze the tortillas for future use, stack them with waxed paper or parchment paper between each one. Slide into a freezer bag and remove as much air as possible before sealing. To thaw, place as many tortillas as you will need in the fridge overnight. If you forget to thaw them in the fridge, you can reheat them on the stove in a skillet. Be careful that they don't dry out, though.
Monday, March 19, 2012
Lemon Cream Cheese Bread
A friend sent me a recipe for Orange Cream Cheese Bread last fall. I tried it, but the baking time and temperatures were off. It turned out kind of crispy, not exactly the kind of loaf I like. I filed the recipe away and thought I'd try it again later.
Well, later came when I came across the recipe last week. I didn't have any oranges on hand and really didn't want to make a trip to the store for some. But I did have lemons. Lovely, lovely lemons. And so I substituted lemons for oranges. Wow! I'm so glad I did. This recipe makes two loaves, so I was ready to freeze one for later. My family didn't cooperate and both loaves where gone in a flash! It's just that good!
Here's what you need:
1 8 oz. pkg cream cheese, softened
1/2 cup butter, softened
1 1/2 cups sugar
2 eggs
1/4 cup lemon juice
2 1/4 cups flour
1 teas salt
1 TBSP baking powder
3/4 cup milk
zest of 2 lemons
1/2 cup chopped nuts
For the glaze:
1 cup powdered sugar
enough lemon juice to make the glaze easy to drizzle
In a mixing bowl, cream the butter and cream cheese until smooth. Beat in the sugar until light and fluffy. Add the eggs one at a time, beating well after each addition. Stir in the lemon juice.
In another bowl, combine the flour, salt, and baking powder. Add to the creamed mixture. Stir in the milk and lemon zest. Add the nuts and mix well.
Pour the batter into two greased and floured loaf pans. Bake at 325 degrees for 55-60 minutes. If the top browns too quickly, cover loosely with foil. Check for doneness by inserting a toothpick or butter knife into the center. If it comes out clean, the bread is done.
Allow to cool in the pans for 10 minutes. Carefully remove from the pans and place on wire racks to finish cooling. I always cover my wire racks with wax paper because I like to add a glaze and don't want it dripping through the racks.
After 30 minutes, make the glaze by adding enough lemon juice to the powdered sugar to allow it to drizzle easily. Spread over the slightly warm loaves.
Thursday, February 9, 2012
Easy Breadsticks Kitchen Tip
I make ugly bread sticks. There I said it.
I want to make pretty, perfectly proportioned bread sticks, but apparently I don't have the gift for it. Or maybe I don't have the patience for it! Who wants to take the time to shape a dozen bread sticks, anyway?
So I've made it easier on myself. And maybe a little bit prettier. Or maybe a little less ugly would be more accurate. Instead of shaping each bread stick individually, I roll the dough out into a rectangle and use my pizza cutter to slice it.
The bread sticks may still not be absolutely perfect, but they look more like bread sticks and less like alien arms.
Since we're talking about bread sticks, how about an easy recipe? I adapted this one from SnoWhite at Finding Joy in My Kitchen. It's a recipe similar to Olive Garden's breadsticks, the ones they used to serve. Not the tasteless, frozen-then-reheated ones they serve now. These yummy bread sticks are soft on the inside with a slightly crunchy crust on the bottom.
Here's what you need:
3/4 cup warm water
1 1/8 teas yeast
1 TBSP sugar
1 TBSP olive oil
2 1/4 cup flour (I use half white, half white-wheat)
1 teas sea salt
In a mixing bowl, combine the water, yeast and sugar. Let sit about 5 minutes or until the mixture is puffy. Add the oil, then the flour and salt. Mix well. Allow to rest for about 40 minutes.
Then roll out the dough into a rectangle until it's about an 1/2 inch thick. Slice with a pizza cutter into 8-10 breadsticks.
Bake at 400 degrees for 7 minutes. While the bread sticks are baking, combine 2 TBSP melted butter with 1 teas garlic powder and 1/2 teas salt. After 7 minutes, remove from the oven and brush with the butter mixture. Return to the oven for another 7 minutes. Brush the remaining butter over the bread sticks. Serve warm.
I want to make pretty, perfectly proportioned bread sticks, but apparently I don't have the gift for it. Or maybe I don't have the patience for it! Who wants to take the time to shape a dozen bread sticks, anyway?
So I've made it easier on myself. And maybe a little bit prettier. Or maybe a little less ugly would be more accurate. Instead of shaping each bread stick individually, I roll the dough out into a rectangle and use my pizza cutter to slice it.
The bread sticks may still not be absolutely perfect, but they look more like bread sticks and less like alien arms.
Since we're talking about bread sticks, how about an easy recipe? I adapted this one from SnoWhite at Finding Joy in My Kitchen. It's a recipe similar to Olive Garden's breadsticks, the ones they used to serve. Not the tasteless, frozen-then-reheated ones they serve now. These yummy bread sticks are soft on the inside with a slightly crunchy crust on the bottom.
Here's what you need:
3/4 cup warm water
1 1/8 teas yeast
1 TBSP sugar
1 TBSP olive oil
2 1/4 cup flour (I use half white, half white-wheat)
1 teas sea salt
In a mixing bowl, combine the water, yeast and sugar. Let sit about 5 minutes or until the mixture is puffy. Add the oil, then the flour and salt. Mix well. Allow to rest for about 40 minutes.
Then roll out the dough into a rectangle until it's about an 1/2 inch thick. Slice with a pizza cutter into 8-10 breadsticks.
Bake at 400 degrees for 7 minutes. While the bread sticks are baking, combine 2 TBSP melted butter with 1 teas garlic powder and 1/2 teas salt. After 7 minutes, remove from the oven and brush with the butter mixture. Return to the oven for another 7 minutes. Brush the remaining butter over the bread sticks. Serve warm.
Monday, August 29, 2011
Pretzel Rolls
A couple of years ago, our family went to Disney World and ate at Le Cellier, a restaurant in the Canadian pavilion at Epcot. The steaks were fantastic, the dessert was amazing, but the part of the meal we couldn't stop talking about was the pretzel bread! I promised my family I'd find a recipe for it that I could make at home. This recipe is the closest one I've found. The outside is chewy and delicious, while the inside is soft and yummy!
The pretzel bread at Le Cellier was shaped like bread sticks. I tried doing that, but they turned out all lumpy and not very attractive. Shaping the bread into rolls makes them pretty! And who doesn't like to eat pretty rolls?
Here's what you'll need:
1 1/2 cups warm water
1 pkg (or 2 1/4 teas) yeast
2 teas sugar
4 to 4 1/2 cups flour (I used King Arthur unbleached)
2 teas coarse salt
1/4 cup oil or melted butter
1/4 cup baking soda
1 egg, lightly beaten
Additional coarse salt for sprinkling on top
In a mixing bowl, combine the water, yeast and sugar. Allow to stand for 5 minutes, or until foamy. Add the flour, salt and oil or butter. I always start with 4 cups of flour and add more if the dough seems too sticky. Combine well (I use my stand mixer and dough hook for this) and then cover with a towel. Allow to rise in a warm place for about an hour or until doubled.
After an hour, punch the dough down and turn out onto a lightly floured service. Cut the dough into 16 equal pieces. I start by cutting the entire lump of dough in half, then halving each piece until I end up with 16 pieces.
Now comes the fun part of shaping the dough. Take one piece of dough and pinch the sides into the center to seal.
Turn the ball of dough over, so the pinched side is down. The side facing you should look fairly smooth. Using the palm of your hand, roll the ball in small circles. Don't press down hard, just roll the ball a few times.
The bottom of the dough should look more smooth after you do this. Place the dough on agreased cookie sheets. You could also use parchment paper to line your sheets. Repeat this with all of the remaining balls of dough. Cover with a towel and allow to rise again, this time for about 30 minutes.
When the rolls are shaped, bring 2 quarts of water to a low boil on the stove. Add the baking soda, which will cause the water to bubble up. With the water simmering, add a couple of rolls at a time. They will start to puff up right away.
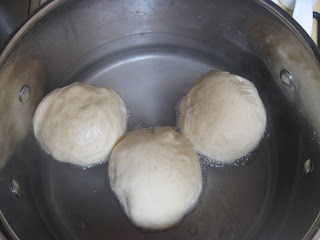
Using a slotted spoon, turn the rolls over after 3o seconds. The bottoms will be puffy and lumpy, as they should be.
After another 30 seconds, remove the rolls from the water and place back on the cookie sheets, seam side down. Repeat with the remaining rolls. Can you tell which rolls have been boiled and which haven't?
With a pastry brush, glaze each roll with the beaten egg, making sure to coat all sides. Sprinkle each one with a little coarse salt. With a sharp, straight-edged knife, cut an X into the top of each roll.
Bake at 425 degrees for 15-20 minutes or until browned. Serve warm if you can. They're so yummy that way!
These rolls are fantastic! They're a perfect accompaniment to soup and salad. We like them with broccoli cheese soup the best! But they truly are wonderful with anything.
For more yummy recipes, visit Blessed with Grace's Tempt My Tummy Tuesday.
Edited to add:
To make these into pretzel bread bowls, just divide the dough into four equal portions. Then follow the rest of of the recipe as written.

The pretzel bread at Le Cellier was shaped like bread sticks. I tried doing that, but they turned out all lumpy and not very attractive. Shaping the bread into rolls makes them pretty! And who doesn't like to eat pretty rolls?
Here's what you'll need:
1 1/2 cups warm water
1 pkg (or 2 1/4 teas) yeast
2 teas sugar
4 to 4 1/2 cups flour (I used King Arthur unbleached)
2 teas coarse salt
1/4 cup oil or melted butter
1/4 cup baking soda
1 egg, lightly beaten
Additional coarse salt for sprinkling on top
In a mixing bowl, combine the water, yeast and sugar. Allow to stand for 5 minutes, or until foamy. Add the flour, salt and oil or butter. I always start with 4 cups of flour and add more if the dough seems too sticky. Combine well (I use my stand mixer and dough hook for this) and then cover with a towel. Allow to rise in a warm place for about an hour or until doubled.
After an hour, punch the dough down and turn out onto a lightly floured service. Cut the dough into 16 equal pieces. I start by cutting the entire lump of dough in half, then halving each piece until I end up with 16 pieces.
Now comes the fun part of shaping the dough. Take one piece of dough and pinch the sides into the center to seal.
The bottom of the dough should look more smooth after you do this. Place the dough on agreased cookie sheets. You could also use parchment paper to line your sheets. Repeat this with all of the remaining balls of dough. Cover with a towel and allow to rise again, this time for about 30 minutes.
When the rolls are shaped, bring 2 quarts of water to a low boil on the stove. Add the baking soda, which will cause the water to bubble up. With the water simmering, add a couple of rolls at a time. They will start to puff up right away.
Using a slotted spoon, turn the rolls over after 3o seconds. The bottoms will be puffy and lumpy, as they should be.
After another 30 seconds, remove the rolls from the water and place back on the cookie sheets, seam side down. Repeat with the remaining rolls. Can you tell which rolls have been boiled and which haven't?
With a pastry brush, glaze each roll with the beaten egg, making sure to coat all sides. Sprinkle each one with a little coarse salt. With a sharp, straight-edged knife, cut an X into the top of each roll.
These rolls are fantastic! They're a perfect accompaniment to soup and salad. We like them with broccoli cheese soup the best! But they truly are wonderful with anything.
For more yummy recipes, visit Blessed with Grace's Tempt My Tummy Tuesday.
Edited to add:
To make these into pretzel bread bowls, just divide the dough into four equal portions. Then follow the rest of of the recipe as written.
Friday, March 11, 2011
Cheesy Pull-Apart Bread
This easy recipe was a staple at our house for many years as an after-church snack on Sunday nights. I recently made it again as an appetizer when we had friends over for dinner. There was nothing left. Not a crumb. Once you start snacking on this bread, you won't want to stop until it's gone.
Here's what you'll need:
One round loaf of sourdough bread
1 8-oz block of cheese, cut into thin slices (you can use sharp cheddar, white cheddar
or monterey jack, all are yummy)
1/4 cup bacon pieces (cooked, of course)
1/4 cup melted butter
1 teas garlic powder
1 teas poppy seeds
2 green onions, thinly sliced (optional)
With a bread knife, cut thick slices of the bread, but don't cut all the way through.

Now cut slices in the opposite direction to form little squares. Again, don't slice all the way through.

Place the loaf on a piece of foil large enough to wrap around the entire loaf. Stuff the cheese slices into every crevice you can find.

Sprinkle the loaf with the bacon pieces. Combine the butter, garlic powder and poppy seeds. Pour over the entire loaf, getting down into the crevices and all around the edges. If you're using green onions, sprinkle them over the loaf, too.

Tightly wrap the foil around the loaf and on a baking sheet. Bake at 400 degrees for 15-20 minutes or until the cheese is melted throughout the loaf.

Now start pulling that bread apart and enjoy the cheesy goodness!
Here's what you'll need:
One round loaf of sourdough bread
1 8-oz block of cheese, cut into thin slices (you can use sharp cheddar, white cheddar
or monterey jack, all are yummy)
1/4 cup bacon pieces (cooked, of course)
1/4 cup melted butter
1 teas garlic powder
1 teas poppy seeds
2 green onions, thinly sliced (optional)
With a bread knife, cut thick slices of the bread, but don't cut all the way through.
Now cut slices in the opposite direction to form little squares. Again, don't slice all the way through.
Place the loaf on a piece of foil large enough to wrap around the entire loaf. Stuff the cheese slices into every crevice you can find.
Sprinkle the loaf with the bacon pieces. Combine the butter, garlic powder and poppy seeds. Pour over the entire loaf, getting down into the crevices and all around the edges. If you're using green onions, sprinkle them over the loaf, too.
Tightly wrap the foil around the loaf and on a baking sheet. Bake at 400 degrees for 15-20 minutes or until the cheese is melted throughout the loaf.
Now start pulling that bread apart and enjoy the cheesy goodness!
Subscribe to:
Posts (Atom)