Showing posts with label parties. Show all posts

Friday, February 22, 2013

Phineas and Ferb Birthday Party

We had Mr. Lego's 12th birthday party a couple of weeks ago. He chose Phineas and Ferb as the theme. I don't know about you, but I find Phineas and Ferb hilarious! It's just as fun for adults as it is for kids.

Because he's getting so mature and grown up, he really didn't want a lot of decoration and fuss. Sad, huh? So we pretty much confined our decorations to the table, most of which I found at Wal-Mart.
The best part was coming up with some fun games! I found several ideas online and customized them for our party. Want me to share?

All of these were based on episodes, sayings or songs from the show.

My Undead Mummy and Me - we divided into teams and had each team wrap one of their players with toilet paper.
I Know What We're Going to Do Today - I had a box of craft supplies and all kinds of household stuff. Each team chose something they were going to do - build the best race car ever, go to the moon, or create a time machine.
The best race car ever!

Busted! - Candace is always wanting to bust her brothers, but this game consisted of balloons and dollar bills. We inflated several balloons, stashing rolled up dollar bills inside several of them. Then the kids had to pop the balloons, looking for the cash which they got to keep. Lots of fun, but I don't have any pics of this game. I was laughing too hard!

Where's Perry? We hid a plush Perry figure for the boys to find. At the beginning of each episode, Perry the platypus sneaks off to become Agent P, only to return at the end of the show as if nothing had happened. In our case, Dr. Doofenshmirtz had kidnapped Perry and left clues throughout the house. The kids raced around trying to find the next clue - under the sink, on the ceiling, on the sunporch, then ultimately in our garden shed. This one had them stumped a couple of times, but they worked together to rescue Perry!

I had a couple of more things planned - making slime in Dr. Doofenshmirtz's evil lab and playing inflatable guitars. The inflatable guitars were supposed to come in packs of 12. Twice the company sent me one guitar only. I finally gave up on that one. We didn't make the slime because everyone was eager to eat some cake and open presents.

So now my little boy is all grown up. Or so he thinks.

Tuesday, July 17, 2012

Tea Party Favors and Games

When the Princess decided she wanted to host a tea party for her birthday, I immediately started brainstorming what kind of favor we could make or buy. I didn't want a typical goodie bag but something unique that would last.

I finally thought about giving every girl a real teacup and saucer to take home. So we began scouring thrift stores to find cups and saucers. It took some searching, but we finally had as many as we needed.

I filled the cups with chocolates and raspberry tea bags (the kind we served at the party). Then I placed each one in a clear plastic bag and tied them up with ribbons.


Turned out rather well, don't you think?


To entertain our young guests, we played charades based on children's books and movies. We also enjoyed pass the bean bag (think, hot potato) while playing classical music, perfect for a tea party. Our favorite game was Tea Party Bingo. I found free templates for the bingo cards here. We used glass gems from the Dollar Tree as the bingo markers instead of chips or coins.

The Princess also wanted to do a craft with her guests. I racked my brain for weeks trying to come up with something unusual. Then it came to me! I asked my husband if he could cut some teacup shapes out of wood for the girls to paint. He agreed, that sweet man!


He used 1/8 inch craft wood. They were roughly 3x5 inches. The girls really enjoyed painting and embellishing them. So they got another little memento to take home from the party!


The Princess and her guests declared the party to be a smashing success. I'm glad they enjoyed it, but whew! I'm glad it's over! LOL

If you missed my post on Tea Party Treats, you can find it here.

I don't know about you, but making my own tea party favors and crafts works for me. Head over to We are THAT Family for more tips and hints.

Monday, July 16, 2012

Tea Party Treats

The Princess decided months ago that she wanted to host a tea party for her birthday. So we pulled out cookbooks and pored over them to find recipes that would be appropriate. She chose about twenty treats to serve! I asked her to pare it down to three or four, since we'd only be serving 5-6 guests.

We decided that cupcakes were easier to serve than cake, so my dear friend Suzanne made those for us. We found flower petal wrappers, which fit well with our theme.


Then came the hard part - the rest of the food! The Princess just could not decide! So I asked her to choose one type of finger sandwich. She wanted cucumber sandwiches because she read in a magazine that those were often served at teas. They are very simple and elegant, so I agreed.

Here's what you need:

1 English (seedless) cucumber
10 slices wheat bread
10 slices white bread
1 carton garden vegetable cream cheese

Wash the cucumber well. Then slice into three or four long pieces. Take a fork and scrape the sides of each piece firmly. Then cut into pretty little slices.


Remove the crusts from the bread. I used kitchen shears to do this. Using a rolling pin, flatten each piece of bread. With a 2-inch biscuit cutter, cut 4 rounds of bread from each slice.


Spread twenty wheat rounds and twenty white rounds with the cream cheese. It's much easier to do this assembly line style than one sandwich at a time. Place one cucumber slice on each round. Put just a dab of cream cheese on the remaining bread rounds, then press each onto a cucumber slice. The little bit of cream cheese keeps the top of the sandwich from sliding around.


These sandwiches were a big hit with girls and parents alike! We didn't have any leftovers.

The Princess also wanted some kind of fruit to be served. So I prepared fruit tarts. These were so easy! The hardest part was dicing the fruit small enough to fit on the tart.

Here's what you'll need:

2 boxes of mini fillo shells (found in the freezer section) - you could make your own
1 box (3 oz) white chocolate pudding, prepared according to the package directions
2 or 3 different kinds of fruit, diced small - we used strawberries, peaches and kiwi

Place the fillo shells on a cookie sheet. Fill the shells with pudding. I used a teaspoon to do this. Mix the diced fruit together. Top the pudding with a teaspoon of the fruit mixture. Refrigerate until ready to serve.


For our last treat, we made pretzel butterflies. The Princess loved doing this one!

Here's what you need:

Mini pretzels - you'll need two for each butterfly
3/4 cup chocolate chips, melted
Two or three colors of candy melts
Sprinkles, coarse sugar or other decorations

On waxed paper, place two pretzels together with the two "humps" facing out. Put the melted chocolate into a ziploc baggie and snip off one corner. Pipe a line of chocolate to join the two pretzels. Repeat with the remaining pretzels until you have as many butterflies as you want. Refrigerate until set.

Melt the candy melts according to the package directions. Using the same ziploc baggie method, pipe the melted candy into the pretzel holes. Sprinkle with the desired decorations. Refrigerate until set.


The pretzel butterflies resting at the top of the treat tower.

All of the treats were tasty and fun! The Princess was so proud that she had helped make them for her friends. So, if you're planning a tea party, keep the treats simple. Let your daughter help as much as possible. The whole experience will be that much more special to her.
Tuesday, July 10, 2012

Popcorn Cupcakes and other Carnival Party Food

This past weekend the Princess celebrated her 10th birthday with her two cousins (one who is 8 and one who is also 10) at a carnival party. My lovely sister-in-law did most of the planning since it was held in her backyard. I did help with some of the food prep and game prizes, though.

We made popcorn cupcakes that were a huge hit. I say "we" because she baked 'em and I decorated 'em. If you only knew how "outside the comfort zone" decorating a cupcake is for me. But this was so easy, even Marsha can do it!


You'll need 20-24 cupcakes, depending on how many your recipe makes. Let them cool completely before trying to decorate them.

Frost with plain white icing of your choice. To speed things along, we used Duncan Hines frosting in a can, but you can make some from scratch if you choose. We were in a hurry, so we took all the shortcuts we could.

Now here comes the fun (as in messy) part. Take a bag of mini marshmallows and snip each one with kitchen shears. If you don't have kitchen shears, use a sharp knife. Don't cut them in half, just about midway through.


Pinch the uncut ends between your fingers. They will burst open, just like popcorn kernels.


Set aside and repeat with the remaining marshmallows. You can store in a Ziploc bag until ready to use.

Now frost the cupcakes with the plain white icing. Dip the tops into a bowl of the popped marshmallows. Press down lightly. This is so much easier than trying to individually place each marshmallow on the cupcake.


To give the appearance of butter, dilute a few drops of yellow food coloring with water. With a paint brush, lightly dab the color onto the marshmallows.


Digging in!

In addition to the popcorn cupcakes, my sister-in-law made flavored popcorn.

The pink is watermelon, the blue is berry blue, and the red is strawberry


To make the flavored popcorn you need:

10 cups popped corn
1 box (3oz) flavored Jello - we used watermelon, berry blue, and strawberry
1/2 cup butter
3/4 cup sugar
1 TBSP corn syrup
3 TBSP water

Place the popped corn on a greased baking sheet - very important because the flavored syrup you're about to make will stick to everything if the pan isn't greased or buttered!

Melt the butter in a saucepan. Add the Jello and remaining ingredients. Bring to a boil and cook for 4 minutes, stirring constantly. Pour over popcorn and stir to coat. Bake at 250 degrees for 10-15 minutes. Check often to make sure it's not burning.

The strawberry and berry blue flavors tasted just like crunchberries from Cap'n Crunch cereal. I'm not kidding. It was like a sweet blast from the past since that was one of my favorite cereals growing up.

We placed the popcorn, along with some regular buttered popcorn, on a snack table alongside roasted peanuts in the shell and a jar of large pickles. We were trying to keep the carnival theme going.

So, have you ever hosted a carnival? What kinds of foods did you serve?

Sunday, July 17, 2011

Tangled Party

I asked the Princess what theme she would like for her birthday party this year, and she said without hesitation that she wanted a Tangled theme. So I started searching the internet and found lots of inspiration and instructions, all of which proved invaluable to this uncreative mama.

This is not something you want to do the night before. I started about two weeks before the party, making banners and preparing the crafts we were doing. And of course, invitations had to be made. I found a template for the invitations here.


I started making a pennant banner like the ones seen in the village scenes in the movie. I traced suns on yellow cardstock, then cut them out and glued them to purple felt triangles. I made slits in the corners of the pennants, then strung them on twine and tied ribbons in between each one.


I purchased paper lanterns from Oriental Trading so we could have the girls color and decorate them. We added the lanterns to our banner. Charles glued flameless tealights in the bottom of each lantern so they would glow. The above picture is dark because we wanted to see if it worked! This is what they looked like after the girls let their creativity flow. Cute, huh? Oh, we wove gobs of yarn through the railing to resemble Rapunzel's hair. It was difficult to work with because it kept getting...well, tangled.


We also made hair barrettes with ribbons and flowers. I bought barrettes at Hobby Lobby. I also got some pretty ribbon that I cut into 12-inch pieces. We wrapped several ribbons around the barrette bar and knotted them. Then we hot-glued silk flowers on to cover the knots. The results were beautiful, but I didn't get a good picture of them! Boo!

Now on to the food! I found lots of inspiration from Paging Supermom. We made the Tangled tower cake with lots of help from my lovely friend Suzanne. She's the cupcake queen around here! Charles put together a wooden base with a skinny dowel rod. I stacked several Little Debbie pecan spin wheels onto the dowel. Suzanne added the icing ivy crawling up the sides. The top is an unfrosted cupcake with a purple candy-coated sugar cone to make the tower.


Homemade artisan bread, strawberry butter, smoked cheese, blueberries, grapes and cherries rounded out the menu. Oh, and jello lakes with candy slice boats! They were a huge hit!


After eating and opening presents, the girls sat down and colored pictures while watching the Tangled movie.

Oh, look! You can see the barrette in one of the girls' hair on the right!

The Princess loved everything about her party. She enjoys playing hostess and spending time with her friends. I had a great time planning and preparing, but boy! Am I glad it's another year before I have to do this again!

Saturday, May 28, 2011

I Surprised My Husband!

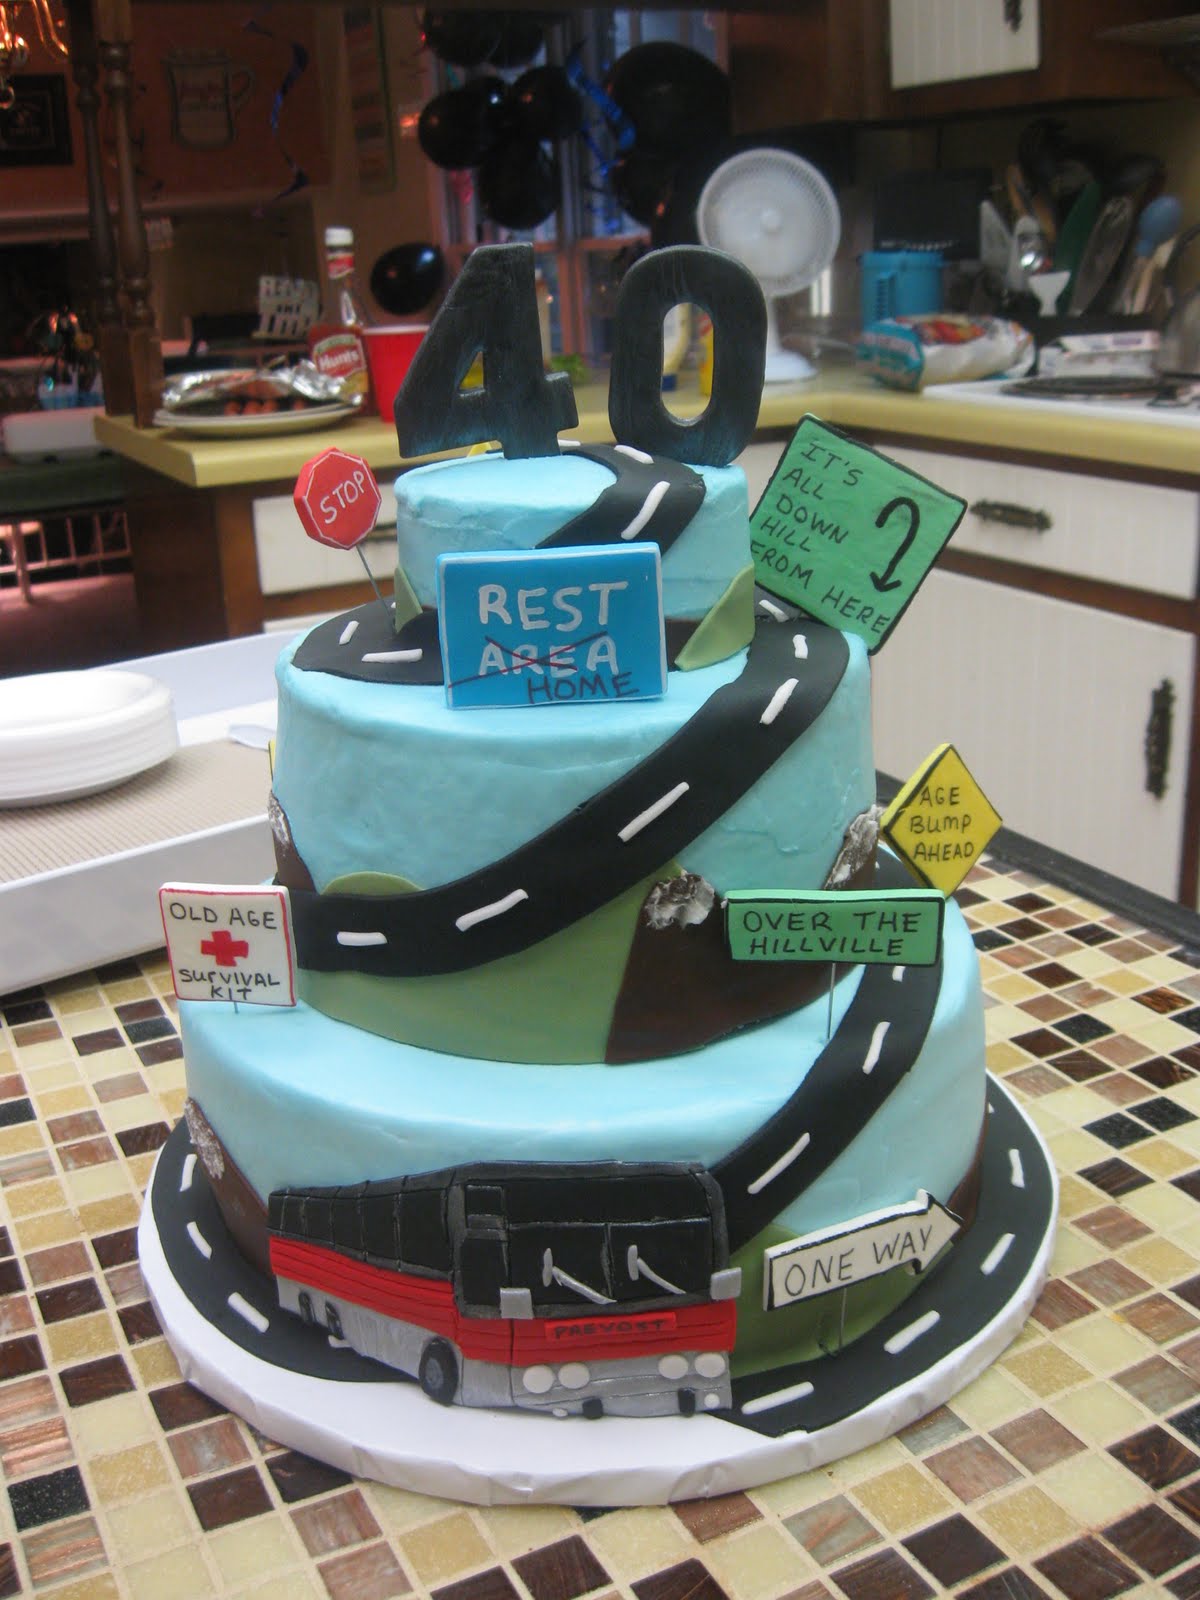
I started planning this months ago. His fortieth birthday was approaching and I wanted to throw a party. But honestly, the logistics of getting several people over to the house or another location without him knowing was going to be a real obstacle.

Then he suggested that we have a cook-out for friends around Memorial Day. He suggested! I all too willingly agreed! The very people I would have invited to a surprise party were invited to join us for burgers and hot dogs. And of course, I told them all this would also serve as a surprise party. Everyone delightedly joined in the fun!

There was a minor glitch when he walked in while we were decorating with black balloons and over-the-hill banners. But he hadn't seen the best part - the cake! Made by my friend Paige, it has a red Prevost bus on the front, the exact same bus hubby used to drive for our church! He was thrilled with it!


The way his face lit up when he saw the cake made my whole evening! I love that man and am so glad God's given him forty years on this earth, thirteen of them with me.

Tuesday, February 15, 2011

Mr. Lego's Lego Party

On Saturday, Mr. Lego turned 10. He is so excited to be in double digits!

I made some Lego decorations out of colored paper. I cut sheets of paper in half, then used a paper punch to cut out circles. I attached the circle with pop dots to make them stand out a little.


Here's our Lego building game. Each boy was given a pile of Legos. Then he was handed a card with the name of something he had to build using only Legos from his pile. We had a helicopter, a train, and a robot to name a few. It was fun watching the boys be creative.


We enjoyed a chocolate chip cookie cake complete with a Lego mini figure army. We bought the mini figure mold at the Lego Store. Then it was just a matter of melting some chocolate and pouring it. Charles took care of the army and I made the cookie.


And of course, the Lego loot. The rest of the afternoon was spent putting sets together.


These past 10 years have flown by. I'm so honored to be this guy's mom.