Showing posts with label works for me. Show all posts

Tuesday, November 13, 2012

Cheap Elf on the Shelf Alternative

I have to admit, I love the idea of Elf on the Shelf.  An elf comes to your house and keeps an eye on the children. Then he reports back to Santa. The catch - the elf is often naughtier than the kids!

And that's why I love it. It gives me a chance to be a kid again. But I really wasn't looking forward to paying $30 for a tiny little elf. So I thought, why can't I "make" my own Elf on the Shelf? Only my elf is a snowman.

Meet Melton.
I got him at Hobby Lobby for 50% off. I think I paid $10 for him. A whole lot cheaper than an official Elf on the Shelf that everyone else has! Our guy is unique!

Melton came with a letter, explaining he was there to be Santa's eyes and ears. He would let Santa know who had been naughty or nice. Every morning we'd wake up to find him in a different spot. The kids raced downstairs to see if they could find him first.
Watching a Veggie Tales movie with some other snowmen
Uh-oh! Melton TP'd the tree!
Cutting out snowflakes and making a mess!
Melton used a dry erase marker on our family photos!
Reading to the Barbies
He was super naughty - trying to unwrap presents!
Discussing the true meaning of Christmas with the Nativity figures

The night he left to go back to the North Pole, Melton left us something to remember him by.
He decorated our fridge like a snowman
 Our entire family enjoyed this fun tradition. I will admit, it challenged my creativity quite a bit. But it was well worth it. And I loved that Melton was cheaper than the Elf on the Shelf. And cuter, too!

Cheap and cute definitely Works for Me!

Monday, May 7, 2012

That Works for Me Mother's Day Sale

A couple of weeks ago I told you about a new e-book, That Works for Me from Kristen of We are THAT Family. Well, Kristen is offering the book for 1/2 off just in time for Mother's Day!

That's right! Half-off! You can get all of those handy tips for just $4 if you purchase the e-book on May 8th or 9th!


Click here to visit wearethatfamily.

Use the promotion code "works4mom" to receive your discount! Hurry because it's a limited time offer.


Disclosure: I am affiliate, so I will receive a small portion of the purchase price if you click the above link and make a purchase. Just wanted you to know.

Wednesday, April 25, 2012

That Works for Me!

Have you heard about this weekly blog carnival hosted by Kristen at We are That Family? Readers submit their favorite helpful tips about household tasks, crafts, cooking, gardening....you name it.

Well, Kristen has organized over 800 of the best tips into a new e-book, That Works for Me. 


And I'm proud to say, a few of my submissions are included in the book! Yay!
 
You can purchase the e-book for only $8! It's worth every penny, in my opinions. You will find all kinds of tried and true tips, organized into categories like baby, crafts, organization and travel. It's so handy having all that information in one place. The convenience alone is worth the price.

And part of every purchase will go to help Mercy House, a safe haven for women in Kenya, East Africa. So not only will you help yourself with some helpful, time-saving tips, you'll get to help women in need all the way across the globe! Awesome!

Click here to visit wearethatfamily.

Disclosure: The above link is an affiliate link, so I'll receive a small commission if you purchase the book.

Tuesday, September 6, 2011

Meal Planning Tips

If you've followed my blog for any length of time, you'll know that meal planning is a way of life for me. I'm not necessarily an organized person in other areas of my life, but when it comes to cooking for my family, I must have a plan.

I started meal planning when I was first married, almost 13 years ago. I was working full-time and didn't get home until 5:30pm. Planning out my menus in advance took so much stress out of the evenings. Back then, my meals were very, very simple. We had spaghetti at least once a week if not more often. It was just me and Charles, and he wasn't picky at all, as long as he got his belly full!

When the kids came along, I branched out and started cooking more from scratch. I was determined that my children wouldn't confine themselves to the typical American kid diet of fries and chicken nuggets. (I know, that was a sweeping generalization.) So I introduced them to a variety of veggies and all kinds of fruits. That has paid off. They will eat just about anything now.

Some people are intimidated by planning menus. Really, it takes a few minutes and pays off greatly throughout the week. It doesn't require fancy worksheets or gourmet dishes. Here are a few tips I've learned over the years.

1. Keep it simple. I use a simple spiral-bound notebook to plan my menus. Nothing fancy. I write down the days of the week, then list a main dish and maybe one side dish or bread that will go with it. The next week, I draw a line down the middle of the paper and do the same. Two weeks on one page. This comes in handy to keep track of how recently I've made a particular meal. I just glance back at the last few pages to see how often I've had it on the menu.


2. Plan your meals around what is on sale. Just doing this simple thing can save you big bucks. Browse your local stores' ads and take advantage of discounts. When chicken goes on sale, I usually plan two or more chicken dishes for that week. I'll even buy extra to freeze so next week when it's not on sale, I can still have chicken. Stock up on other deals, too. Buy pasta, rice, noodles, beans, whatever. You can use those for side dishes. By having a well-stocked pantry, you give yourself more options for quick, easy meals.

3. Cook what you know your family will eat. No one knows your family's tastes better than you do. So why subscribe to a menu planning service that has no clue what your family enjoys? Sit down and make a list of 10 meals you know how to cook and that your family likes. Add a couple of side dishes. There - you've done it! You've made a meal plan!

4. But don't be afraid to try new recipes. I try to incorporate one new recipe each week. It might be a side dish or a dessert. But it helps break up the routine a little and expands my family's culinary horizons. When looking for something new to prepare, browse sites like Allrecipes.com and food.com. These recipe sites have ratings systems that allows you to read what other cooks have said about the dish or changes they made to the recipe.

5. Be flexible! Sometimes our week doesn't go according to plan. And that means that sometimes my menu plan gets out of whack. It's okay! I just postpone making that meal until another day. But I take comfort in knowing I have the ingredients on hand to make it when I can.

6. Make a store list based on your meal plan. There's nothing worse than starting a dish and realizing you're missing a key ingredient. Ack! So, once you've settled on the dishes you want to make for the week, write down what ingredients you need from the store. This helps to reduce impulse purchases and ensures you have everything you need when it comes time to make the dish.

7. Get your family involved. My kids love to make suggestions for meals. Every couple of weeks I'll ask them if there's something they'd like me to fix. They will even volunteer to help in the kitchen! When they are part of the planning process, they feel an ownership of the meal and usually eat it with great enthusiasm.

8. Schedule a leftover night. After you've prepared a full week's worth of meals, there are bound to be leftovers. We usually eat them the next day for lunch, but sometimes we still have a little of this and a little of that. So I set everything out like a buffet. There's something for everyone!

Meal planning definitely works for me. If you're not a meal planner already, now is a good time to start. For more helpful hints and tips, visit Works for Me Wednesday over at We are THAT Family.

Tuesday, June 21, 2011

Summer Time Treats that won't heat up your kitchen!

With temps staying in the 90's most days, I dread turning on the oven to make treats for the kids. So I turn to no bake or frozen desserts to keep things cool around here. Here are a few of them:

No Bake Granola Bars - great for a summer trip or picnic!

Chocolate Peanut Butter Rice Krispie Treats - chocolate and peanut butter. Need I say more?

No Bake Cookies
- an old favorite that can't be beat!

Chocolate Banana Pops - so good and refreshing! Healthy, too.

White Chocolate Berry Pie - take advantage of fresh berries for this yummy dessert!

Chocolate Mint Freeze - saving the best for last! Like a fudgesicle on a plate with a minty twist.

Keeping my kitchen cool in the summer works for me. For more helpful tips, visit We are THAT Family's Works for Me Wednesday.

Tuesday, May 31, 2011

Practical Ways to Help after a Natural Disaster

We've all watched the latest natural disasters with horror. The devastation and destruction left by tornadoes and earthquakes is unimaginable. It seems like every time we turn around, another disaster occurs.

I felt helpless as I saw people in my own county lose everything they owned. What could be done to help them? FEMA and local authorities can only do so much. And even then, the "big" things like shelter and food are considered while other comforts are not.

When helping out our friends and hearing from others who had pitched in with clean-up efforts, I compiled a list of things to do to help. Some of these things aren't necessarily for survival, but they do make things a bit easier on people affected by natural disasters. You might not be able to rebuild a house, but these little things can bring comfort to people who are in need.

1. Offer to babysit. Children are naturally curious and digging around in a pile of debris is very alluring. Alluring and dangerous. While a family is struggling to find any remainders of their life in a heap of rubble, they don't need to worry about their children getting hurt.

2. Donate storage containers. When they do find something salvageable, where can they put it? Volunteer to store their things until they can get a more permanent location.

3. Wash their clothes. Often disaster areas are without power or water so there's no way to clean salvaged clothes. They can mildew very quickly. If nothing is salvageable, take them shopping for basic necessities.

4. Buy a disposable camera and give it to the affected family. Often insurance companies require photographic proof of damage. But if the family's camera has been destroyed by the disaster, taking pictures is impossible. Get the pictures developed, too.

5. Keep bottled water handy. Cleaning up debris is hard work and takes a lot out of a person. Help yourself and the people you're assisting stay hydrated.

6. Bring along extra work gloves and sunscreen. No one wants to dig through debris without gloves and chances are, if they've lost everything else they won't find a pair of gloves lying around. Under a hot sun with little shade (cause the trees are gone), it doesn't take long to get sunburned, so the sunscreen will come in handy.

7. Fill a can of gas to supply generators or gas-powered equipment. With no electricity, this is very helpful. Our friends were able to save a freezer full of food by running a generator off and on until power was restored.

8. Buy several boxes of garbage bags. Believe me, there are never enough garbage bags when you're cleaning up the mess a tornado leaves behind. Other cleaning supplies are helpful, too - bleach, Clorox wipes, a wet-dry vac if you have one.

9. Put together a personal hygiene kit for the whole family. Toothbrushes, toothpaste, deodorant, nail clippers, shampoo, soap, wash clothes - anything that will help them feel human again. Don't forget feminine products, too.

10. Home cooked meals and snack items are a huge blessing. It's stressful having to worry about what you're going to eat when everything's gone or the power is off for who knows how long. Having someone care enough to prepare a nutritious meal is a great encouragement.

No kindness is too small in situations like this. Don't let fear of doing the wrong thing keep you from doing anything.

For more tips and hints, visit We are THAT Family's Works for Me Wednesday.

Tuesday, May 10, 2011

Saving Time in the Kitchen - bake your pancakes!

My family loves to eat pancakes. We rarely have them for breakfast. Mostly just for lunch or dinner!

I don't love standing over the griddle waiting for them to cook. My griddle is big enough to hold 3 pancakes at a time, but it seems like it takes forever to cook them.

My solution to cut the cooking time in half - bake them!

Mix up your favorite pancake recipe. You don't have to add anything special to it, just mix it up as if you were using a griddle. Pour the batter into a greased 9x13 pan and spread it out evenly.

Bake at 400 degrees for 10-12 minutes until a knife inserted in the center comes out clean. Cut into squares and serve with butter and syrup or whatever pancake toppings you like.


The pancakes will be fluffier, almost cake-like - which my kids adore! It is so much easier and quicker, too. When serving a crowd, double your recipe and use two pans. In no time, you'll be sitting down to eat with your family instead of flipping pancakes all morning. That definitely works for me!

To find more helpful hints and tips, visit Works for Me Wednesday over at We are THAT Family.

Tuesday, March 15, 2011

Have you heard of Ana-White.com?

My husband found this wonderful website a few months ago and was intrigued by how easy Ana White made furniture-making seem. She includes the plans for each piece with exact supply lists. Not only that, but she also tells you how many cuts and what size is needed for each. Really, she takes the calculating out of the planning, which is a big stumbling block for many wanna-be DIY'ers. Simply follow the directions and you'll do great!

The hardest part for Charles was deciding which project he wanted to tackle. He finally chose this console table as his first attempt to make furniture. Including black wood stain and polyurethane, the supplies cost about $50. Try buying a similar solid wood console table for that! You won't be able to!

Look at the finished table! We put it in our guest room.


Yes, if you come to visit us, we'll give you Milano cookies and bottled water. See that high gloss on the table? I love it! Charles did a fantastic job.


He's already picked his next project, this factory cart coffee table for our den. I think we're going to paint it a rustic red and distress it a little. Really looking forward to that!

For more helpful tips and useful websites, visit We are THAT Family's Works for Me Wednesday.

Tuesday, January 25, 2011

Getting dough to rise in a cold kitchen

In the winter I have trouble getting dough to rise. Because every dough recipe out there states, "let rise in a warm place free of drafts." And finding a draft-free, warm location in my house can be difficult during the colder months.

So I turn to my oven. It makes a wonderful warm cocoon in which my dough can rise.

First I heat the oven to 200 degrees. When it's reached that temp, I turn the oven off. While the oven's warming up, I boil some water and pour a couple of inches of it into a pan. I place that in the oven right before putting my dough in. The steam from the water helps keep the dough from developing a crusty skin as it rises in the warm oven.


Then the dough goes in. I leave it in the stainless steel bowl of the mixer and cover loosely with foil. I want to leave this in the oven until it doubles in size. Usually it will take about 20 minutes.
Here's the before picture:


After 20 minutes:


Don't forget to use pot holders if when handling your metal bowl! If your dough doesn't require a second rise, you're good to go. But if it does need to be shaped and allowed to rise again, don't worry about reheating the oven. There's still plenty of warmth left. At this point, I take the pan of water out.

Shape your dough into loaves or rolls or whatever. Here I'm making bread bowls for soup.


Return to the oven for another 15-20 minutes, or until doubled in size.


Now bake as directed in your recipe! Easy, easy, easy!

Note: I always move my oven rack down before heating the oven for the first rise. My mixer bowl wouldn't fit otherwise. After the second rise, I put the rack back in place to bake the bread/rolls/whatever.

For more helpful tips on topics like cooking, budgeting, parenting and having fun, visit We are THAT Family's Works for Me Wednesday.

Tuesday, January 18, 2011

Dry Skin Solutions - a repost

NOTE: This is a repost of a post from last January. While it hasn't been as cold as last year, it's still cold and our skin is suffering once again. Thought this would be a nice reminder to myself and my readers how to gently care for our dry skin!

I don't know what the weather is like where you are, but here in the Deep South, it's COLD! Not as cold as some of you, but definitely colder than usual. We've had our 7th straight day of freezing temps and this cold is supposed to last at least until the weekend.

Not only is our heating bill suffering, our skin is too. The cold, dry air is really taking its toll. Hubby and The Princess get the worst of it. Both of them are afflicted with dry skin anyway. And this cold snap is exacerbating the problem. My hands give me the most trouble because I'm in the kitchen a great deal, washing hands and dishes.

I made a homemade skin salve to put on our dry itchy spots. It soaks in and gives relief to the itchiest patches. It's made from all natural ingredients and contains no alcohol. Did you know that most brand name hand and skin lotions contain alcohol? Look at the ingredients on the bottle. Do you know what alcohol does to your skin? It dries your skin out! Now why would these companies put drying ingredients in products that are supposed to moisturize? Do they want you to keep buying more products? Hmmmm.

All you need for this salve is olive oil, coconut oil, beeswax, and whatever essential oil you want for scent. Lavender is my favorite, but peppermint and lemon are also really nice. I found the beeswax in pastille or pearl form at a craft store, but you can use beeswax blocks as well. The blocks are usually sold per pound.


Measure 1/3 cup olive oil into a small saucepan. Add 1/2 cup coconut oil. The coconut oil solidifies at temperatures under 76 degrees. So if your kitchen is anything like mine in this cold weather, your coconut oil will be solid!


Heat the oils over low heat until the coconut oil is melted. This will only take a minute or two. When the oils are combined, add 2 tablespoons of beeswax. Stir frequently with a small whisk or spoon.


Continue stirring until the beeswax is completely melted. This will be the longest part of the process, even though it only takes a few minutes. If you're using wax blocks it might take a little longer. Remove from the heat and add 10-15 drops essential oil. Stir well to blend.


Pour into an 8-ounce container. I ordered this one from Mountain Rose Herbs. You could use a glass canning jar or jelly jar, too.


Cover container with a paper towel and let cool for an hour. The salve will solidify as it cools.


The salve will look solid, but you can easily dip your finger into it and spread it on your skin. A little salve will go a long way, so start with a tiny amount. It might feel slightly greasy as first, but it will soak in after a few minutes. Give it time to work.

The best time to apply this is right after you shower. Pat your skin dry - don't rub with a rough towel, just pat. Then massage in some salve on your dry spots. Let it soak in before you start getting dressed. Reapply the salve as needed throughout the day.

Here are some other ways to help your dry skin during this cold weather if you don't want to make the salve.

Use olive oil on your hands and dry spots before you go to bed. Just a dab will do.

Coconut oil makes a marvelous facial moisturizer. I've been using it for over a year and have seen improvements in my complexion. Word of caution - don't use the coconut oil that's located with the cooking oils at the grocery store. You want unrefined coconut oil, usually found in health food or natural food stores. It's pure, doesn't contain any harsh ingredients, and naturally nourishes the skin. We've been conditioned to believe that all oil on our face is bad. But if you take a look at the ingredients in most facial care products on the market, you'll find some really harsh stuff. Why put that on one of the most sensitive parts of your body? As long as you're not slathering it on, the coconut oil will soak in and nourish your skin.

Stay hydrated. Your skin is the last place your body will hydrate. Major organs are more important in the grand scheme of survival, so skin goes last when body parts are getting hydrated. So drink plenty of water. Your skin will benefit, as will the rest of you.

Turn down the temperature on your hot water heater. Hot water, though it may feel good on a cold morning, will dry out your skin. Short, warm showers are best. And remember to pat yourself dry gently.

Use a cool mist humidifier at night. This not only helps your skin but keeps your nasal passages and throat moist too. Don't you just hate waking up with a dry, scratchy throat and nose?

Apply lip balm regularly. Don't wait until your lips are chapped to start putting it on. Look at the ingredients, too. If the lip balm contains alcohol, avoid using it if possible. It will provide temporary relief, but it will take your lips longer to heal if they're chapped. I'll post a lip balm recipe later this week.

Eat your veggies! Foods rich in Vitamin A and C will help keep your skin hydrated longer. Green leafy vegetables, carrots, and sweet potatoes are good sources of Vitamin A, while citrus fruits, tomatoes, and broccoli provide Vitamin C.

Hopefully some of these solutions will help if you or your family suffers from dry skin.

For more helpful tips, visit Works for Me Wednesday at We are THAT Family.

Tuesday, November 30, 2010

Easiest Cookie in a Jar Recipe

When I was teaching in a Christian school, I used to make cookies in a jar for all of my fellow teachers for Christmas. They all loved receiving a gift they could use during the holidays.

I'd set up an assembly line in the kitchen, packing down the ingredients and trying not to make a huge mess. I'd measure out flour for each jar, then sugar, then the next ingredient and so on until the jars were filled instead of trying to fill them one at a time.

There had to be an easier, quicker way. But I couldn't come up with one.

Until I started thinking about my recipe for cake mix cookies. Why not combine the recipe with the jar idea?

So that's what I did!

All you need is a cake mix, 1 teaspoon of baking powder, 1 cup of mix ins (refer to the recipe linked above for ideas), and a quart jar. You'll also need to print or write out the instructions and attach the to the jar.

Start by making sure your jar is clean. Pour about half of the cake mix into the jar and pack it down. I use my Pampered Chef tart shaper, but anything like a spatula or spoon will do. Add the baking powder next. Then add the rest of the cake mix and pat, pat, pat. I'm using a spice cake mix for this jar.


Layer your mix-ins next. I put 1/2 cup nuts in, then 1/2 cup butterscotch chips. Toffee bits would also be good with the spice cake mix. To give the jar a more interesting layered look, you could put half the cake mix, then half the mix-ins and repeat the layers. It's up to you!


Print the instructions onto cardstock and attach them to the jar. I punched a hole in the cardstock and used a simple curling ribbon to attach it. You can get as fancy as you want to.


The recipe instructions read as follows:

Pour the jar contents into mixing bowl. Add 2 eggs and 1/2 cup vegetable oil. Stir until well combined. Drop by rounded spoonfuls onto ungreased cookie sheets. Bake at 350 degrees for 8-10 minutes. Yield: 3 1/2 dozen.

I can't tell you what a timesaver this is! It used to take me all evening to fill jars, now it takes just minutes! I got cake mixes on sale for $.68, so it's pretty cheap too!

For more holiday tips and gift ideas, head over to Works for Me Wednesday hosted by We are THAT Family.

Tuesday, October 26, 2010

How to roast your own red peppers

Roasted red peppers add a great deal of flavor to salads and sandwiches, but I have to say, I don't like the slimy ones in the jars. They're just so....slimy.

So I decided to roast my own because they're so very easy. And the flavor is fresh and wonderful, not jarred.

First, wash and dry your pepper. Slice the pepper in half from top to bottom and remove the stem and seeds. Place on a lightly greased baking sheet, cut side up. Roast at 450 degrees for 10 minutes. Then turn the peppers over and return to the oven for another 10-15 minutes, until the skin is blackened.


Place the pepper halves into a bowl and cover tightly with foil. The steam from the peppers will make the skin easier to remove. You should be able to slide them right off.


Now slice into strips or chunks or however you want to use them! These will keep in the fridge for about a week.


Once you've tried roasting your own peppers, you won't be satisfied with jarred ones.

For more helpful tips, visit Works for Me Wednesday at We are THAT Family.

Tuesday, October 19, 2010

Kitchen Tip - draining grease from a pan

I have many recipes that instruct you to brown ground meat, then drain. But you know, it's not easy to do sometimes with a hot pan full of hot grease. Besides, who wants to clean up grease drips all over the counter?

As I bemoaned this problem early on in our marriage, my resourceful husband suggested I use a turkey baster to drain the pan.

Could it be that easy?

Why, yes is could!

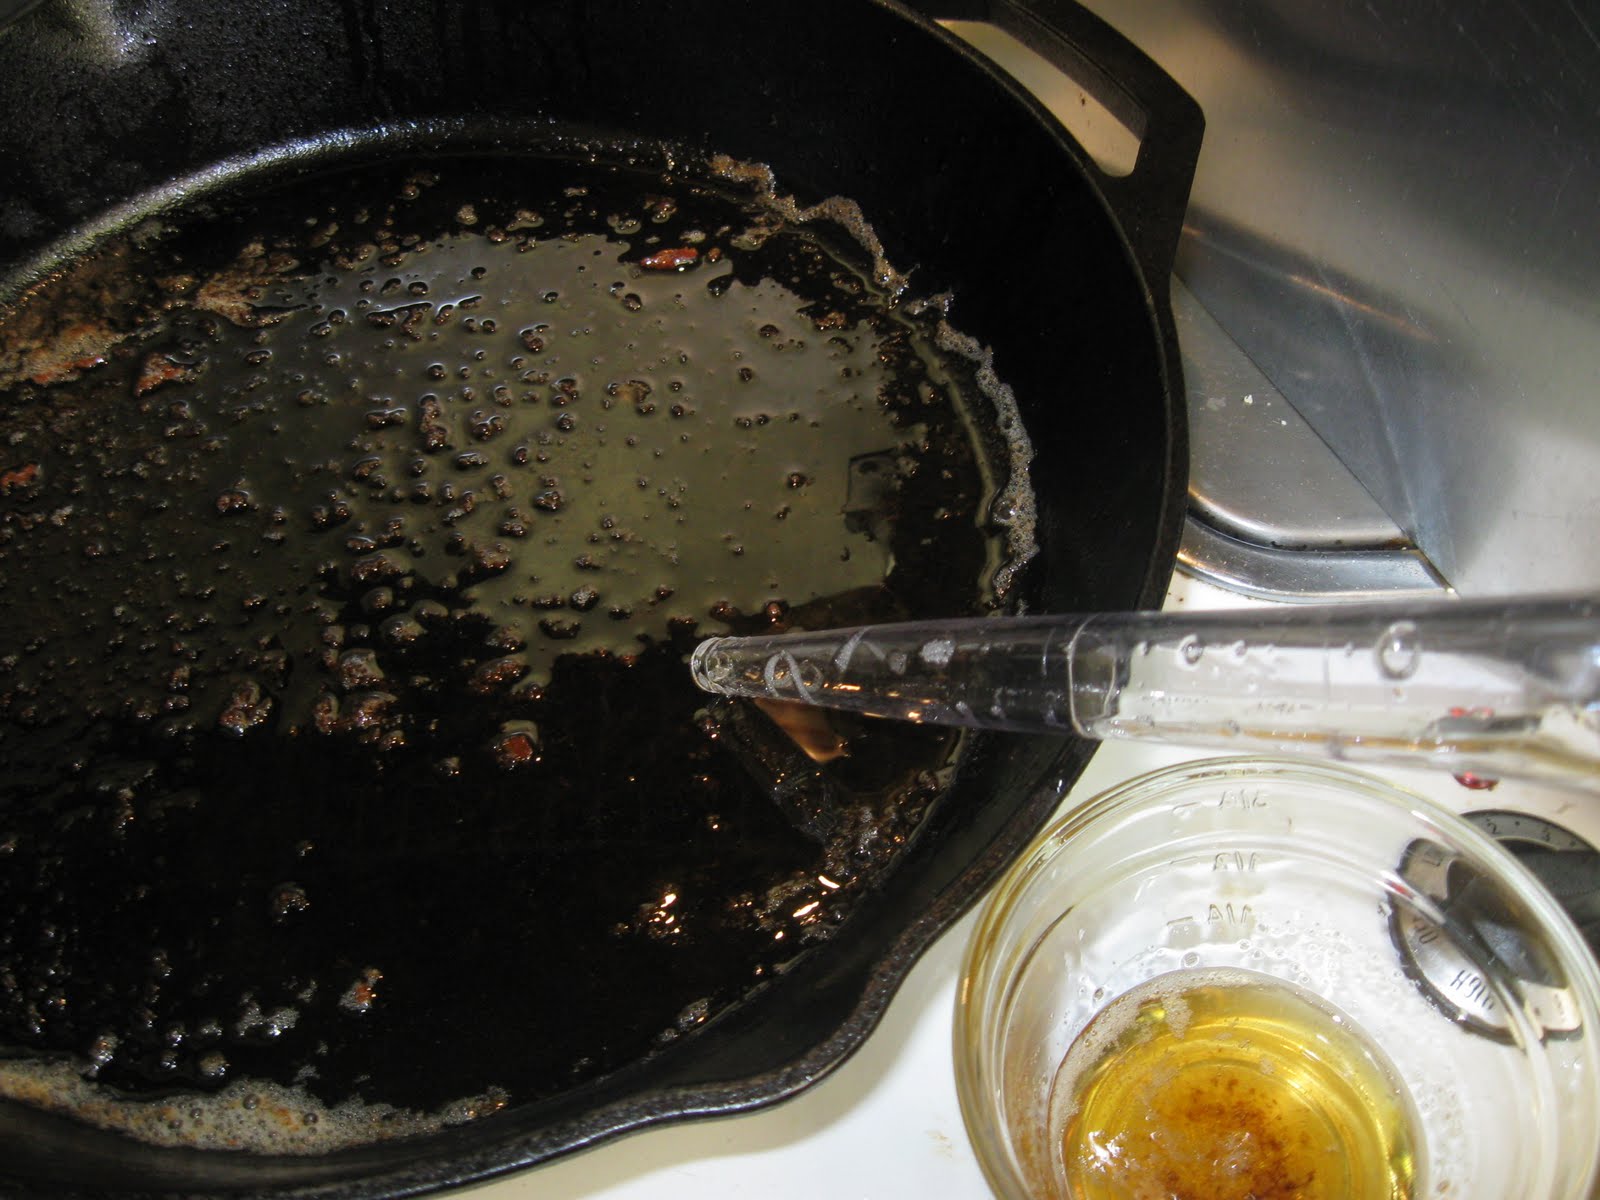
Here's how I do it. I tilt the pan and let as much grease as possible flow to one side. If there's any meat in the pan, I use a spatula to keep it to the other side. Then I draw as much out as possible with the turkey baster.


Of course, I keep a small bowl right beside the pan to collect the grease so there are no drips. I just squeeze it out of the turkey baster into the bowl and try to suck up some more from the pan! I can dispose of it later.

I can't tell you how much annoyance this little tip has spared me!

For more helpful tips, visit Works for Me Wednesday over at We are THAT Family.

Tuesday, July 27, 2010

Mixbook.com Works for Me!


I love to scrapbook. I really do. But it takes a great deal of time, creativity (which I lack), and supplies. After our family's first trip to Disney World in 2007, it took me nearly two years to create two books. I barely finished in time for our trip in October of last year.

So I decided this time I'd use an online photo book maker like Shutterfly or Snapfish. But as I looked over their background options, I wasn't really happy with what I saw. I wanted a more "scrapbooky" look.

And I found it with Mixbook.com. They have several themes and layouts to choose from. I love that I can fit multiple pictures on a page, something that would be hard to do the old-fashioned way with paper and pictures.


Mixbook offers digital elements to enhance your pages, too. This gives them a more scrapbooky feel.


Don't you just love my new word - scrapbooky?

Anyway, the Disney book I created was 20 pages, about the same amount I'd use in a scrapbook album. I chose an 8x8 format, but there are other sizes such as 12x12 and 8 1/2 x11. My book cost about $30 with shipping, which is cheaper than I could buy an album, papers, and embellishments for the same size book. I saved hours and hours in putting it together. And the memories contained in the Mixbook are no less memorable because I didn't scrap them myself.

Will I give up paper scrapbooking all together? Probably not until I use up my stash of supplies. In the meantime, Mixbook.com works for me!

For more helpful tips, visit We are THAT Family's Works for Me Wednesday.

Tuesday, July 20, 2010

Helpful Hint - Filling Ziploc Bags

I don't know about you, but when I'm putting liquids or messy ingredients into a Ziploc bag, I can't help but get it all over me. For instance, I make my own chicken broth and ladle it into bags to freeze. No matter how careful I am, it splashes everywhere! And freezing homemade pizza sauce? Let's not even go there.

It seems I don't have the coordination to hold the bag open and upright without letting the contents spill out while putting more contents in. Does anyone?

But I found a solution! And it was so simple, I almost smacked myself upside the head and said "Duh!"

Place the Ziploc bag (quart size) into a wide-mouthed glass jar with the top of the bag hanging over the edges. Screw the metal ring over the bag and start filling! How easy is that?

The wide-mouthed jar makes it so easy to ladle, scoop or pour right into the bag. And the ring keeps the bag open without me having to hold on to it! Above is a picture of funnel cake batter I put into a Ziploc so I could squeeze it out into a frying pan. It was so messy trying to get it in the bag until I did it this way. Now there's no mess!

For more helpful hints, head over to We are THAT Family's Works for Me Wednesday.

Tuesday, June 22, 2010

Disney tip - Early entrance to the Magic Kingdom


Have you ever seen empty tables at Casey's on Main Street? If you've ever wanted to see Main Street and the castle in a peaceful, serene setting, I have a great way to do it. Make reservations to eat breakfast at the Crystal Palace between 8:15 and 8:45 am! Simply tell the cast members at the entrance the time of your reservation. They may ask for your name to confirm, they may not.


The Crystal Palace is located to the left of Casey's off Main Street. The design is based on the Crystal Palace in Hyde Park in London that was built to house the Great Exhibition of 1851. The outside of the restaurant clearly demonstrates the Victorian influence of the original.


The breakfast buffet was excellent, as you can see by the Princess' plate!


We got to meet all of the Pooh characters, too!

Anything that helps beat the crowds works for me! Check out more helpful tips at We are THAT Family's Works for Me Wednesdays.

Wednesday, June 16, 2010

Packing tip for travelers

I can't take credit for this tip. I heard it on "Say Yes to the Dress" on TLC. You know the show about women choosing their wedding garb at Kleinfeld's in NYC? The Princess and I watch it together. She loves seeing brides in their bridal gowns.

Anyway, the show gave some packing tips for couples traveling by plane and this one jumped out at me in one of those "Duh! Why didn't I think of that?" moments. Here's the tip - when packing two suitcases for you and your spouse, pack half of your clothes and half of his clothes in each suitcase. If one of your suitcases gets lost or has a slow time catching up with you, both of you will have some clothes. Wouldn't that be better than one of you having absolutely nothing to wear for a few days?

For more helpful tips, visit We are THAT Family's Works for Me Wednesday.

Tuesday, June 8, 2010

Tenderizing steak the fast and frugal way

There's nothing worse than a tough, leathery steak that's hard to cut and chew. Well, here's a simple, frugal, fast way to tenderize steak. Use rock salt. You know, the kind you use for ice cream making. I can buy a 4-pound bag for less than two dollars. That's a whole lot of tenderizing! And in 10 minutes, you can have a flavorful, juicy steak.

Here's what you do:

Liberally cover your steak with the rock salt, both sides. Press it lightly so it sticks.


Let the steaks sit for 10 minutes. Then start scraping the salt off the meat. Use a knife if you want to. The salt will be almost clear instead of white. That's what you want.


The salt breaks down the protein fibers, allowing more "juice" to flow throughout the meat. Now grill as usual, but don't overcook.

You'll be amazed at how tender and juicy the steak will be! I know I was. I was afraid it would be too salty, but it was like a brine. The flavor was distributed throughout the steak and it needed no other seasoning.

If you're hesitant about the salty factor, try rinsing the steaks after tenderizing. Pat dry before grilling.

So what about you? How do you tenderize your steaks for the grill?

For more tips, visit We are THAT Family's Works for Me Wednesday.

Tuesday, May 25, 2010

Summertime Boredom Busters Part Two

This is the last week before the unofficial start of summer! Memorial Day Weekend is what most people consider the first weekend of summer, especially hotels which jack up their prices for the season. If your kids are like mine, they're going to play, play, play for the first day or two, then come to you with cries of "I'm bored!"

Last week I shared some fun boredom busters to try with them in Part One. Now on to Part Two.

11. Write a letter to Grandma. Or anyone, really. But Grandmas really like that sort of thing, especially if you and your kids live far, far away like we do. This will give them some handwriting and spelling practice, too. Gotta keep those skills sharp!

12. Build a castle out of cardboard. You can find some really cool instructions here. For a simpler version, go here. You use toilet paper, right? Well, here's a great way to use up those cardboard rolls! And give your kids something constructive to do in the process.

13. Make placemats with their artwork and contact paper. Cut two sheets of contact paper a few inches larger than their pictures. Lay their masterpieces face down on one sheet very carefully to avoid wrinkles. Then cover the back with the other sheet of contact paper. Trim around the edges. You can also use this as a playdough mat to stop those pesky little playdough droppings from sticking to your table!

14. Plan a theme party together. This doesn't have to be elaborate. It can be as simple as having a few of their friends over for sandwiches one afternoon. But pick a theme like a bug party or a water party. You could have a baking party and let your guests create cupcakes or something easy. Have your children design invitations to be sent out. Let them plan games and activities that revolve around the chosen theme. Note - this is NOT a birthday party. Oh, no. This is just because. Mainly because you're a cool mom!

15. Publish a family newspaper. Tell your friends and family all the latest news from your children's perspectives. We did this a few weeks ago - it was Mr. Lego's idea. His headline? "Dad fixes sink!" He also drew some pretty interesting stick figure illustrations. What would a newspaper be without the funny pages? Let them draw cartoons or write jokes. Include favorite family recipes, too. The Princess was a little too eager to inform the general public of her brother's misdeeds, so we left the crime report out.

16. Whip up a batch of salt dough and let them create. Here's a basic recipe:
Dissolve 1 cup of salt in 1 1/4 cups water. Stir in 3 cups of flour, one cup at a time, until a nice soft dough forms. Now you have a substance similar to Sculpey clay. You can roll this out and cut into shapes, or you can let them create anything from a bouquet of salty flowers to a zoo full of little animals. You can even make salt dough beads for jewelry! Bake their creations at 200 degrees for about an hour or until dry and hard. Allow to cool, then paint.

17. Design a puzzle. There are two ways to start this project. You can let them color a picture from a coloring book or they can draw and color their own picture. Either way, it's their creation. Once they have their design, cut apart a cereal box and glue the picture to the cardboard. Let them cut the picture into 20-30 pieces. Now they have their own personal puzzle!

18. Maintain a journal. Give each child their own spiral notebook. Once or twice a week, write a question down in the notebook for them to answer. It can be silly like "What kind of super power do you wish you had?" to serious such as "What quality to you admire most about your Dad?" Google "children's journaling prompts" for hundreds of ideas for questions. Even when summer is over, you can incorporate the journal into your weekly routine and let them write down invaluable memories and thoughts about their childhoods.

19. Set up an obstacle course in the backyard. Use chairs, cones, even pool toys to create zig zags, hurdles and race courses. Time each competitor with a stop watch. Then run the courses backwards. Not in reverse. I mean, turn around and run backwards! Reward each athlete with a popsicle or snow cone!

20. Put together an "All About Me" collage. Get a piece of poster board for each child and let them tell about themselves through pictures, drawings, or lists. Include their height and weight, as well as eye color, hair color, how many teeth they have missing, etc. Make lists of their favorite things. Cut pictures out of magazines of their favorite foods. Write the date on the back so you know when they created it. Next year, make another collage. It will be fun to see how much they've grown and changed.

I hope I've given you some inspiration to try new things with your kids this summer. As we do these things, I'll post pictures and tips, too!

If you have an awesome idea for keeping your kids from being bored this summer, please share! Please!

For more helpful tips and hints, visit We are THAT Family's Works for Me Wednesday.

Tuesday, May 18, 2010

Summertime Boredom Busters Part One

Summer's nearly upon us and along with it comes the inevitable cries of "Mom! I'm bored!" I mean, here are these kids who've whined about having to study and do schoolwork now wanting me to give them something to do! What's up with that?

I've been compiling a list of activities I'm going to try with my kids - or have already tried - to combat the boredom. Some of them actually will keep their reading and writing skills honed for the summer. Hee hee, they're doing schoolwork without even realizing it! Some of these activities are just for the fun of it. Every child needs memories of summer time fun, even if I do have to prompt them to do it!

So far, I've got twenty different things for the kids to do. I figure we'll do two a week. I'm going to break the list down into more manageable posts, so check back next week for Part Two.

Here's Part One:

1. Make a craft box available. Put paper, glue, scissors, pens, string, crayons, tape, stickers.....anything you can think of that your children can cut or glue. I went through my scrapbook stash and found tons of paper and stickers I haven't used and probably won't. But I know two kids who will! The Princess has already availed herself of the box and created some pretty interesting things. I'm starting to rethink including glitter, though. Here's a tip....check out the Dollar Spot at Target for some cheap supplies. Or the Dollar Store. The sky's the limit with what you can include in the box, and hopefully your child's creativity will soar!

2. Invest in a couple of new board games. One of our favorites is Doodle Dice. We have the standard Clue, Monopoly, Sorry and Dominoes, too. But this summer we're going to try some new ones for variety, such as Apples to Apples and Guess Who. I also want to get Zobmondo. Keep your eye out for games at yard sales and thrift stores, too. If you don't want to spend the money on a new game, have your children invent one.

3. Have a water gun fight. What's summer without getting wet? I know it can be a pain to clean up after dripping wet kids, but it's something they'll remember. Don't stand on the sidelines, either! Grab a gun and start squirting! If you don't have water guns available, try water balloons. And if you really want to live on the edge, plan to ambush Dad when he gets home from work. Only if he's not carrying his laptop or important papers, though.

4. Act out a favorite story. All kids have books they read over and over again. Let them dress up and portray their favorite characters. It's amazing how closely they can recreate the dialogue and actions they love so much in books! Much better then Hollywood! Try to act out your favorite Bible story, too. And don't forget to take pictures!

5. Make ice cream in a bag. We love homemade ice cream around here, but we don't have an ice cream maker. So I found a recipe that all of us could help with. It makes about 1 cup which will serve two people.

Ice Cream in a Bag

1 gallon Ziploc bag
1 quart Ziploc bag
1/4 cup rock salt
1 cup milk
1 teas vanilla
2 TBSP sugar
ice

Pour the milk, vanilla and sugar into the quart bag. Squeeze out as much air as possible, then seal the bag. Make sure it's sealed tight. Place the smaller bag inside the gallon bag. Cover with ice and seal.

Shake, toss, or flip the bag for 10 minutes. You can wrap a dish towel around the bag if it's too cold. You will see the milk start to freeze, but don't stop shaking for at least 10 minutes.

Open the bags and spoon ice cream into cups or bowls.

For chocolate ice cream, omit the vanilla and 1 TBSP of sugar. Add 2 TBSP (or as much as you like!) chocolate syrup. Then shake, shake, shake!

6. Send the kids on scavenger hunts. Go ahead and print out several lists of things for them to find, indoors or out. Make each one a little different. Have them find things like a yellow flower, a paperclip, a quarter from your state, etc. You could modify this to include a picture scavenger hunt. Send them with a digital camera to take photos of certain flowers or people - but only if you feel they're responsible enough to handle the camera! Then you can take the pictures and have them document the fun they had in a scrapbook! Which leads me to my next point....

7. Let them create a scrapbook of favorite memories. Supply them with pictures of your last vacation or Christmas or field trip, anything. Let them create their own scrapbook page to preserve their memories of that special time. Encourage them to write the who, where, when, why and how of the picture somewhere on the page. (See, keep them writing even though they're out of school!)
You could continue this throughout the summer and by the time school starts again, your children will have a keepsake of their childhood. Don't just scrap special occasions, either. Let them have pictures of the family pet, their grandparents, house, whatever might spark their interest.

8. Design a driveway city with sidewalk chalk. Challenge them to draw enough buildings to fill the entire driveway. Then add cars, flowers, trees and even people. I'm sure my daughter will have a castle or two in hers! Just a thought...let them do this in the morning before the sun has a chance to heat the pavement!

9. Plan dinner and help Mom cook it. If you're like me, you have tons of cookbooks and recipe magazines on hand. Give them to your kids and let them pick a recipe or two that they might like. Help them make a grocery list, then take them to the store to shop for ingredients. Not only will they realize how much effort you put into cooking for them, it will give them a sense of accomplishment. And who knows? Maybe they'll try something new and actually like it because they prepared it!

10. Check out "how to draw" books from the library. Then let your children draw, draw, draw. Praise their efforts and display their drawings. Have a family art show to highlight their work. Invite some friends to participate, too.

Hopefully you can save your sanity this summer by offering some fun, new things for your kids to do. I'll have ten more activities to try next week.

For more helpful tips, visit Works for Me Wednesday over at We are THAT Family. You'll find tons of hints to make your life easier!