It's already November! Can you believe it? Only 55 more days until Christmas! The weather has definitely taken a cooler turn, so comfort food is what I'm into this week!
Here's the menu plan for the week:
Sunday
Pan-seared tilapia, cauliflower (didn't get to this last week)
Monday
Pizza
Tuesday
Baked egg rolls
Wednesday
Quesadillas
Thursday
Homemade chicken nuggets
Friday
Cola roast, mashed potatoes
Saturday
Cheeseburger soup, homemade bread
For more inspiring menu ideas, visit Organizing Junkie's Menu Plan Monday.

Sunday, October 31, 2010


Friday, October 29, 2010
CSN Stores Review - Hamilton Beach Stay or Go Slow Cooker
Last month, I told you I'd be doing a product review from CSN Stores. Their stores carry so many wonderful products that I had a hard time choosing just one to try out!
Eventually I settled on the Hamilton Beach Stay or Go 6-quart Slow Cooker. There's nothing easier than putting a meal's ingredients in the crockpot and letting it do all the work instead of me!

I particularly like this model because of the locking lid. There is a rubber gasket around the top of the removable crock to seal it tightly when latched. I even put water in the crockpot and turned it upside down to see if it would leak. It didn't.
This is the perfect slow cooker for transporting food to a friend's house or church function. No more wrapping towels around the entire crockpot and hoping it doesn't tip over in the back of the van! The lid stays on tight the whole time, until you unlatch it.
I also like the spoon rest on top of the lid. No more searching for a suitable spoon, only to realize you've already put it in the dishwasher because you forgot you needed it later! Does that sound like the voice of experience speaking? Ha ha!
Over the years, I've tried out many slow cookers, but I have to say, this is one of my favorites. It cooks evenly and is easy to clean. The latching lid is the best, most practical feature in my book. I'd definitely recommend this to anyone who regularly uses a slow cooker.
Disclaimer: I received no compensation for this review other than the product itself so I could conduct a review. My opinion is entirely my own.
Eventually I settled on the Hamilton Beach Stay or Go 6-quart Slow Cooker. There's nothing easier than putting a meal's ingredients in the crockpot and letting it do all the work instead of me!

I particularly like this model because of the locking lid. There is a rubber gasket around the top of the removable crock to seal it tightly when latched. I even put water in the crockpot and turned it upside down to see if it would leak. It didn't.
This is the perfect slow cooker for transporting food to a friend's house or church function. No more wrapping towels around the entire crockpot and hoping it doesn't tip over in the back of the van! The lid stays on tight the whole time, until you unlatch it.
I also like the spoon rest on top of the lid. No more searching for a suitable spoon, only to realize you've already put it in the dishwasher because you forgot you needed it later! Does that sound like the voice of experience speaking? Ha ha!
Over the years, I've tried out many slow cookers, but I have to say, this is one of my favorites. It cooks evenly and is easy to clean. The latching lid is the best, most practical feature in my book. I'd definitely recommend this to anyone who regularly uses a slow cooker.
Disclaimer: I received no compensation for this review other than the product itself so I could conduct a review. My opinion is entirely my own.
Tuesday, October 26, 2010
How to roast your own red peppers
Roasted red peppers add a great deal of flavor to salads and sandwiches, but I have to say, I don't like the slimy ones in the jars. They're just so....slimy.
So I decided to roast my own because they're so very easy. And the flavor is fresh and wonderful, not jarred.
First, wash and dry your pepper. Slice the pepper in half from top to bottom and remove the stem and seeds. Place on a lightly greased baking sheet, cut side up. Roast at 450 degrees for 10 minutes. Then turn the peppers over and return to the oven for another 10-15 minutes, until the skin is blackened.

Place the pepper halves into a bowl and cover tightly with foil. The steam from the peppers will make the skin easier to remove. You should be able to slide them right off.

Now slice into strips or chunks or however you want to use them! These will keep in the fridge for about a week.

Once you've tried roasting your own peppers, you won't be satisfied with jarred ones.
For more helpful tips, visit Works for Me Wednesday at We are THAT Family.
So I decided to roast my own because they're so very easy. And the flavor is fresh and wonderful, not jarred.
First, wash and dry your pepper. Slice the pepper in half from top to bottom and remove the stem and seeds. Place on a lightly greased baking sheet, cut side up. Roast at 450 degrees for 10 minutes. Then turn the peppers over and return to the oven for another 10-15 minutes, until the skin is blackened.

Place the pepper halves into a bowl and cover tightly with foil. The steam from the peppers will make the skin easier to remove. You should be able to slide them right off.

Now slice into strips or chunks or however you want to use them! These will keep in the fridge for about a week.

Once you've tried roasting your own peppers, you won't be satisfied with jarred ones.
For more helpful tips, visit Works for Me Wednesday at We are THAT Family.
Monday, October 25, 2010
Herb Bubble Bread
When I found this recipe in a magazine, I knew I had to try it. It reminds me of monkey bread, only uses savory ingredients instead of sweet. This pull-apart bread is a great accompaniment to soup and salads. It's a fun change of pace from rolls or bread, too. Of course, I did my usual tweaking to suit my family's preferences.
Here's what you need:
18-20 frozen dinner rolls, thawed
1/4 cup melted butter
1/2 cup grated parmesan cheese
1 teas Italian seasoning
1 teas coarse salt
1/2 teas garlic powder
In a small bowl, combine the parmesan cheese and spices. Once the dinner rolls have thawed, dip each one into the melted butter, then into the cheese mixture.

Place in a greased loaf pan and allow to rise until doubled.

Bake at 350 degrees for 20-25 minutes. If the top browns too quickly, slip a piece of foil over it.

Allow to cool for a few minutes. Then invert onto a serving plate.

The kids really, really liked pulling this bread apart and stuffing it into their mouths! There was no need for buttering the rolls, since they were already covered with it. Each bite was full of flavor and zest. It was great!
For more yummy recipes, visit Blessed with Grace's Tempt My Tummy Tuesday.
Here's what you need:
18-20 frozen dinner rolls, thawed
1/4 cup melted butter
1/2 cup grated parmesan cheese
1 teas Italian seasoning
1 teas coarse salt
1/2 teas garlic powder
In a small bowl, combine the parmesan cheese and spices. Once the dinner rolls have thawed, dip each one into the melted butter, then into the cheese mixture.

Place in a greased loaf pan and allow to rise until doubled.

Bake at 350 degrees for 20-25 minutes. If the top browns too quickly, slip a piece of foil over it.

Allow to cool for a few minutes. Then invert onto a serving plate.

The kids really, really liked pulling this bread apart and stuffing it into their mouths! There was no need for buttering the rolls, since they were already covered with it. Each bite was full of flavor and zest. It was great!
For more yummy recipes, visit Blessed with Grace's Tempt My Tummy Tuesday.
Sunday, October 24, 2010
Menu Plan Monday October 24-30
Last week's Coconut Curry Chicken was sooooo good! My mouth is watering just thinking about it! This week will be another simple week. I'm planning on using leftovers for lunches, which makes it very convenient and cuts down on my time in the kitchen. Why not make a little extra for dinner while you're already doing the work and save yourself time tomorrow?
Here's the plan for the week:
Sunday
Out to eat
Monday
Tori No Kara-age (Japanese chicken nuggets), rice
Tuesday
Herbed Pork and Potatoes
Wednesday
Spaghetti and garlic bread
Thursday
Pan-seared tilapia, cauliflower
Friday
Enchiladas, chili rice
Saturday
Broccoli cheese soup, herb bubble bread
For more great menu plan ideas, visit Organizing Junkie's Menu Plan Monday. She's also hosting a giveaway for a year's subscription to Meal in a Box Menu Planning Online.
Here's the plan for the week:
Sunday
Out to eat
Monday
Tori No Kara-age (Japanese chicken nuggets), rice
Tuesday
Herbed Pork and Potatoes
Wednesday
Spaghetti and garlic bread
Thursday
Pan-seared tilapia, cauliflower
Friday
Enchiladas, chili rice
Saturday
Broccoli cheese soup, herb bubble bread
For more great menu plan ideas, visit Organizing Junkie's Menu Plan Monday. She's also hosting a giveaway for a year's subscription to Meal in a Box Menu Planning Online.
Friday, October 22, 2010
Coconut Curry Chicken
I've wanted to make chicken curry for a while, but my husband doesn't care for curry and neither do my children. The Princess says it's too sour. What? And Mr. Lego thinks it's too spicy. What is wrong with his taste buds?
That's okay. I didn't mind eating leftovers for lunch the next few days! Keep in mind, this recipe is pretty mild and a little sweet. If you like spicy, you can add more curry.
Here's what you need:
2 boneless, skinless chicken breasts, cut into small chunks
salt and pepper
1 TBSP cooking oil
2 TBSP curry powder, divided
1/2 onion, diced
2 teas minced garlic
1 (14 oz) can coconut milk
1 (15 oz) can tomato sauce
2 TBSP sugar
Sprinkle the chicken chunks with salt and pepper. Heat the cooking oil and 1 TBSP curry powder in a large skillet for two minutes. By this time, your kitchen will smell great! Stir in the onions and garlic and cook for another minute or two. Add the chicken, tossing lightly to coat with the curry oil. Cook for another 7-8 minutes until chicken is cooked through.

While the chicken is cooking, combine the coconut milk, tomato sauce, sugar and remaining curry powder in a saucepan. Simmer for 20 minutes. Ignore the splashes of sauce on the stove!

Add the chicken to the saucepan and continue simmering for another 30 minutes. The curry sauce should thicken as it cooks.

Serve over hot cooked rice.

This was really, really good. And even better the next day. The flavors deepened and blended so well together. I wanted to lick the bowl when I was done.
Excuse me while I go wipe sauce off my nose! LOL!
That's okay. I didn't mind eating leftovers for lunch the next few days! Keep in mind, this recipe is pretty mild and a little sweet. If you like spicy, you can add more curry.
Here's what you need:
2 boneless, skinless chicken breasts, cut into small chunks
salt and pepper
1 TBSP cooking oil
2 TBSP curry powder, divided
1/2 onion, diced
2 teas minced garlic
1 (14 oz) can coconut milk
1 (15 oz) can tomato sauce
2 TBSP sugar
Sprinkle the chicken chunks with salt and pepper. Heat the cooking oil and 1 TBSP curry powder in a large skillet for two minutes. By this time, your kitchen will smell great! Stir in the onions and garlic and cook for another minute or two. Add the chicken, tossing lightly to coat with the curry oil. Cook for another 7-8 minutes until chicken is cooked through.

While the chicken is cooking, combine the coconut milk, tomato sauce, sugar and remaining curry powder in a saucepan. Simmer for 20 minutes. Ignore the splashes of sauce on the stove!

Add the chicken to the saucepan and continue simmering for another 30 minutes. The curry sauce should thicken as it cooks.

Serve over hot cooked rice.

This was really, really good. And even better the next day. The flavors deepened and blended so well together. I wanted to lick the bowl when I was done.
Excuse me while I go wipe sauce off my nose! LOL!
Thursday, October 21, 2010
Caramel Apple Muffins
October 21 is Caramel Apple Day. So I'm going to share a recipe for Caramel Apple Muffins! I found this recipe on the Taste of Home website, but I modified it slightly to reduce the amount of sugar.
Here's what you need:
2 cups flour (I use half unbleached white, half wheat)
1/2 cup sugar
2 teas baking powder
2 teas cinnamon
1/2 teas salt
1 egg
1 cup milk
1/4 cup vegetable oil
1 teas vanilla extract
1/2 cup diced apple
12 caramels, coarsely chopped
For the topping:
1/2 cup brown sugar
1/4 cups quick oats
3 TBSP melted butter
1 teas cinnamon
In a large bowl, combine the flour, sugar, baking powder, cinnamon and salt.

In another bowl, mix together the egg, milk, oil and vanilla. Stir into the dry ingredients just until moistened. Don't overmix, because that will cause your muffins to not rise.

Gently stir in the apples and caramels.

Fill paper-lined muffin cups with the batter. Combine the topping ingredients and spoon over the muffin.

Bake at 350 degrees for 15-20 minutes, or until a toothpick inserted in a muffin comes out clean. The topping will get all melty and gooey, as will the caramels. Let cool in the pan for a few minutes, then move to a wire rack.

We loved these muffins because they had all the flavors of a caramel apple without the sticky mess. Enjoy!

Here's what you need:
2 cups flour (I use half unbleached white, half wheat)
1/2 cup sugar
2 teas baking powder
2 teas cinnamon
1/2 teas salt
1 egg
1 cup milk
1/4 cup vegetable oil
1 teas vanilla extract
1/2 cup diced apple
12 caramels, coarsely chopped
For the topping:
1/2 cup brown sugar
1/4 cups quick oats
3 TBSP melted butter
1 teas cinnamon
In a large bowl, combine the flour, sugar, baking powder, cinnamon and salt.

In another bowl, mix together the egg, milk, oil and vanilla. Stir into the dry ingredients just until moistened. Don't overmix, because that will cause your muffins to not rise.

Gently stir in the apples and caramels.

Fill paper-lined muffin cups with the batter. Combine the topping ingredients and spoon over the muffin.

Bake at 350 degrees for 15-20 minutes, or until a toothpick inserted in a muffin comes out clean. The topping will get all melty and gooey, as will the caramels. Let cool in the pan for a few minutes, then move to a wire rack.
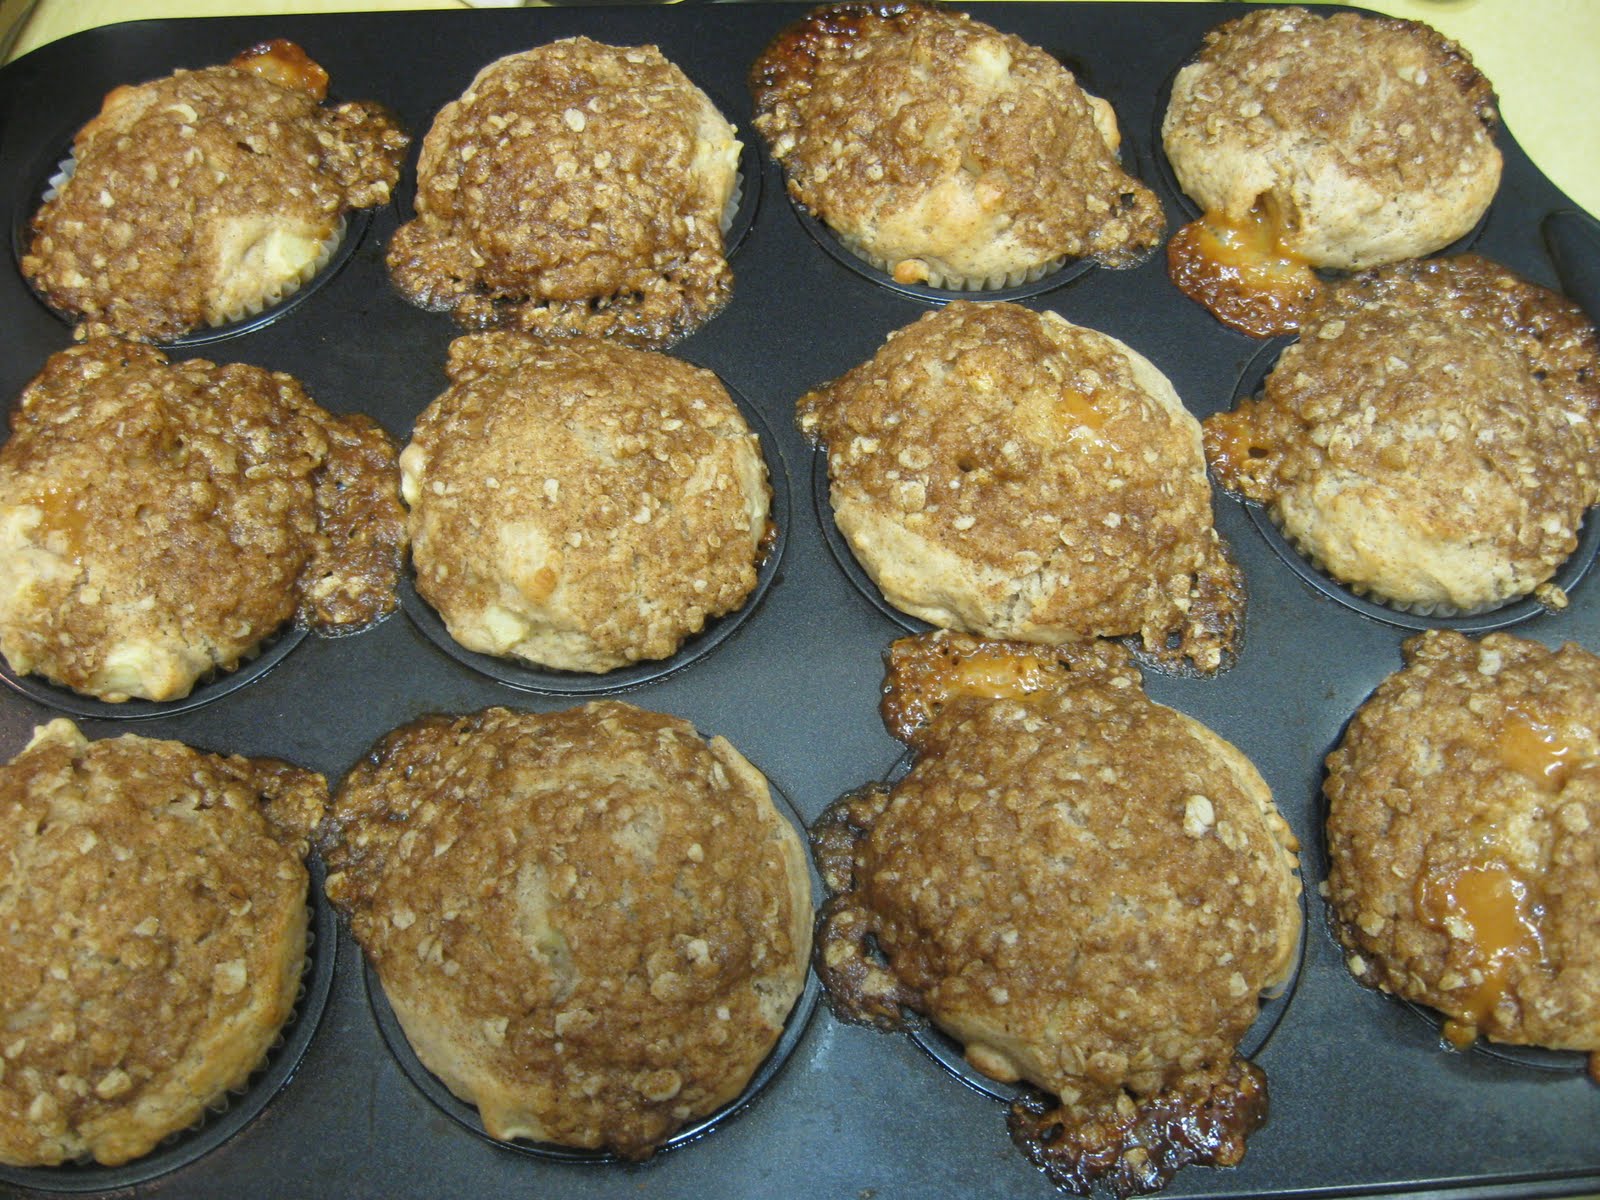
We loved these muffins because they had all the flavors of a caramel apple without the sticky mess. Enjoy!

Subscribe to:
Posts (Atom)